background image

Copy/Document Server Settings

User Tools

5 - 9

Copy/Document Server Settings

Basic Steps to Accessing Copy/Document Server Features

The tables on the following pages provide you with information necessary to access the 
functions of the six copy features.

Exiting from User Tools

After changing the User Tools settings, touch the Exit key, or press the User Tools/Counter key.

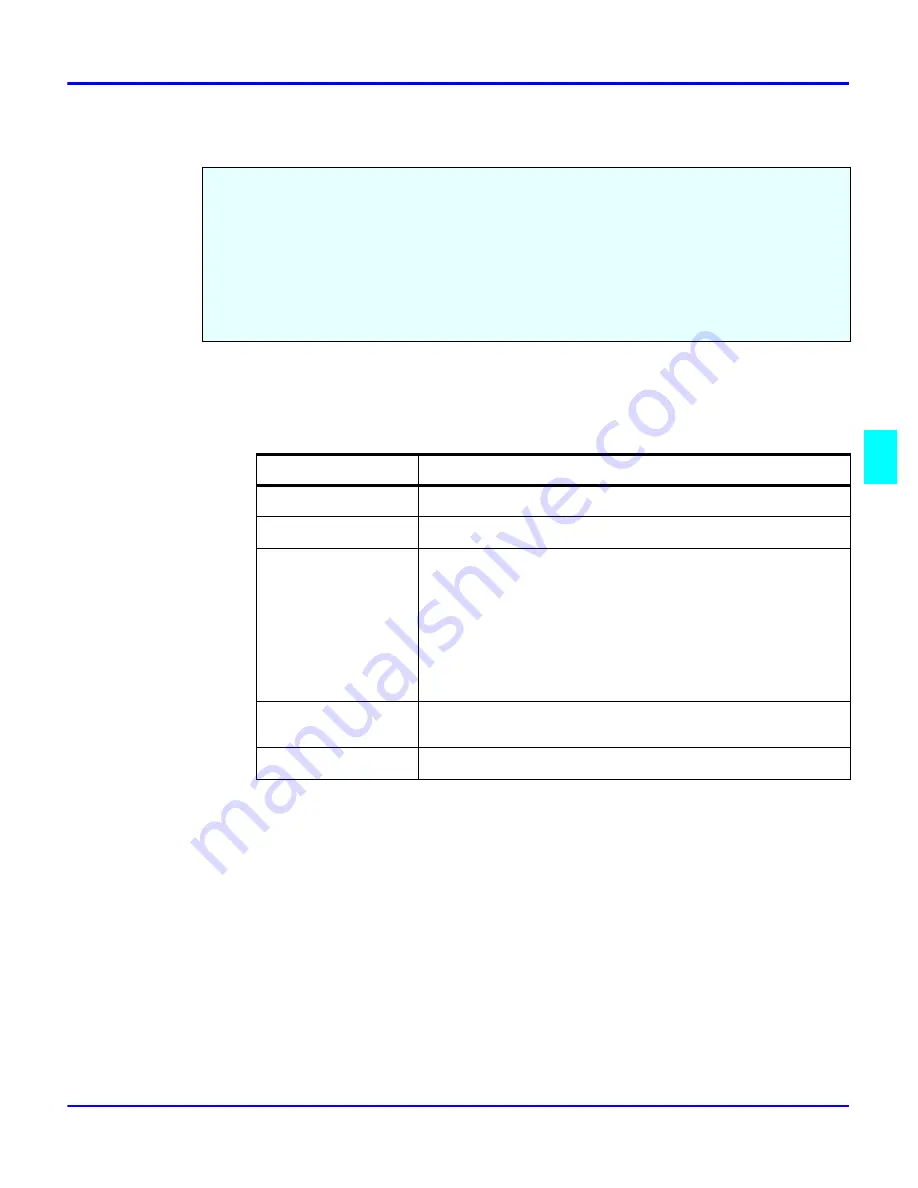
Follow the five basic steps to access Copy Feature Settings. 

General Features - 3 windows

Reproduction Ratio - 2 windows

Page Format - 2 windows 

Input/Output

Count Manager

Note: Default settings are shown in italics.

Step

Procedure to Perform

1

Press the User Tools/Counter key.

2

Touch the Copy/Document Server Features key.

3

Touch the desired Window Tab.

General Features

Reproduction Ratio

Page Format

Stamp Setting

Input/Output

Count Manager

4

Touch the key for the desired item. Change settings by 

following the instructions on the panel display.

5

Touch the OK key.

Содержание 5455

Страница 1: ...your document management partner Operator Guide Digital Copier F P O F P O F P O F P O 5455 5470 5455 5470 5455 5470 5455 5470 ...

Страница 2: ...bers here MODEL NUMBER __________________________ SERIAL NUMBER __________________________ To order supplies call To request service call Customer Vision Our commitment to your complete satisfaction Lanier Worldwide Inc 2000 April Printed in the U S A As an Energy Star Partner Lanier Worldwide Inc has determined that this product meets the Energy Star guidelines for energy efficiency ...

Страница 3: ...Manual Exposure Mode 3 4 Using Combination Auto Image Density Manual Mode 3 4 Selecting Original Modes 3 5 Selecting the Original Mode 3 6 Special Originals 3 7 Using Special Original Mode 3 7 Selecting Copy Paper 3 8 Using Auto Paper Select 3 8 Using Manual Paper Select 3 8 Enlargement and Reduction Ratios 3 9 Using Auto Reduce Enlarge 3 9 Using Preset Copy Ratio Keys 3 9 Zoom Keys 3 10 Size Magn...

Страница 4: ... 2 Sided 8 Pages to Combine 1 Side 4 17 2 Sided 4 Pages to Combine 2 Side 4 18 2 Sided 8 Pages to Combine 2 Side 4 19 2 Sided 16 Pages to Combine 2 Side 4 20 Double Copying 4 21 Duplex Copying 4 22 1 Sided to 2 Sided Copying 4 22 2 Sided to 2 Sided Copying 4 24 Image Repeat Copying 4 25 Interrupt Copying 4 26 Overhead Transparencies and Thick Paper 4 27 Cover and Page Insert Copying 4 28 Front Cov...

Страница 5: ...py Job 6 2 Edit Preset Copy Job 6 3 Delete Preset Copy Job 6 4 Sample Copy 6 5 Storing Copy Settings In Memory 6 6 Storing Your Settings 6 6 Changing a Stored Program 6 7 Cancelling a Program 6 8 Recalling a Program 6 9 Document Server 6 10 Features and Benefits 6 11 Scanning Originals 6 13 Printing Saved Documents 6 16 Sample Printing 6 17 Print First Page 6 18 To Search by File Name 6 18 Deletin...

Страница 6: ... 8 11 Paper Punch 8 13 Removing Punch outs 8 13 Cleaning 8 14 Cleaning the Machine 8 14 Cleaning the Exposure Glass 8 14 Cleaning the Document Feeder 8 14 Chapter 9 Specifications Specifications 9 1 Main Copier Unit 9 1 Noise Emission 9 2 RADF Unit 9 3 LCC 565 option 9 3 F 550 Finisher option 9 4 F 585 Finisher option 9 5 SSF 550 Finisher option 9 6 PP 585 Punch Unit option 9 6 Agency Certificatio...

Страница 7: ...e your new unit been easy or difficult 2 How well did the Operator Guide answer your questions 3 How well did the Help Messages answer your questions 4 Generally speaking do you Please fold on this line when complete 5 In your opinion what is the unit s most important feature 6 Suggestions for improving the Operator Guide or Help Messages are 7 Additional comments regarding Model 5455 5470 Digital...

Страница 8: ...any Name Phone Number Address City State Zip Customer Vision our commitment to your complete satisfaction POSTAL INFOR MATION Lanier Worldwide Inc Documentation Department 4667 N Royal Atlanta Dr Tucker GA 30084 9615 ...

Страница 9: ...Important Safeguards ...

Страница 10: ...y part has been dropped until it is checked by a authorized Lanier Service Technician 4 The fusing area is hot Exercise care in this area 5 Do not install the unit in areas that are Damp or humid Exposed to direct sunlight Extremely dusty Poorly ventilated Close to machines generating ammonia such as diazo copy machines Subject to extreme temperature or humidity changes for example near an air con...

Страница 11: ...Chapter 1 Making Copies ...

Страница 12: ... Power Switch on page 1 1 Operation Key on page 1 1 Placing Original Documents on page 1 2 Making Your Copy on page 1 3 For additional information on the more advanced features of your copier refer to Chapter 3 Copier Functions and Chapter 4 Copying Methods ...

Страница 13: ...sage Input user code then press is displayed Enter your User Code See Entering User Codes on page 3 1 Operation Key The Operation key is on the far right side of the Control Panel It turns the copier operation on and off while maintaining power to the copier If the On indicator light is OFF and the Main Power indicator light is ON press the Operation key The On indicator light turns ON and the Mes...

Страница 14: ...opies Placing Original Documents Place original documents Face down on the Exposure Glass Align originals to the indicator mark that represent the size of originals you are going to copy Face up on the Automatic Document Feeder ...

Страница 15: ...Combination Touch Auto Image Density and press Lighter or Darker Use with colored background See Using Combination Auto Image Density Manual Mode on page 3 4 Original Mode The selected mode is indicated above Original Mode on the Message Display You can select from Text Text Photo Photo Pale and Generation Copy Just touch Original Mode and then touch the desired mode See Selecting the Original Mod...

Страница 16: ...Making Copies 1 4 Making Copies Notes ...

Страница 17: ...Chapter 2 Component Identification ...

Страница 18: ...Component Identification Chapter Overview This chapter describes your copier s main components Included in this chapter are Control Panel Display Panel Component Location Status Display Indicators ...

Страница 19: ...Chapter 3 Copier Functions ...

Страница 20: ...riginal Modes on page 3 5 Special Originals on page 3 7 Selecting Copy Paper on page 3 8 Enlargement and Reduction Ratios on page 3 9 Size Magnification on page 3 11 Document Feeder on page 3 12 Horizontal Vertical Sizing on page 3 15 Directional Size Magnification on page 3 16 Erase Center and Border on page 3 18 Margin Adjustment on page 3 23 Centering Your Copy on page 3 24 For additional infor...

Страница 21: ...of your User Code This feature prevents unauthorized use of the copier by limiting copier access to those persons who know an assigned User Code The User Code feature monitors copier usage by department project or persons and tracks the number of copies made with each User Code The Key Operator can activate the User Code feature When this feature is active the Key Operator can program up to 50 Use...

Страница 22: ...riginal is required enter the number of copies you desire using the key pad Press the Clear Stop key to clear an entry if you entered an incorrect quantity If no quantity is entered one copy is automatically selected by your copier When the copier is first turned ON it takes five and one half minutes for it to warm up and come to its Ready condition During this time you can set up your copy job pr...

Страница 23: ...e Auto Image Density mode Select the copy darkness modes using Auto Image Density Manual Combination Auto Image Density Manual Select the Copy Darkness setting before making your copy If you do not the copier uses Auto Image Density mode as the default setting Auto Image Density automatically adjust the copier for the best quality copy For example the dark background on newspapers or recycled pape...

Страница 24: ...ng Combination Auto Image Density Manual Mode 1 Touch the Auto Image Density key Auto Image Density is highlighted 2 Touch the Lighter or Darker key to select the lightness or darkness of the copy There are seven settings to choose from Manual Exposure mode allows you to manually adjust the image density darker or lighter Combination Auto Image Density Manual mode is used when originals have color...

Страница 25: ...t Text Photo when your original contains photographs or picture with letters Select Photo when copying photographs and colored originals The copier automatically adjust to provide the best copies When you are using Photo you can also use the Manual adjustments to fine tune the darkness or lightness of the copy Select this mode for originals that have lighter lines written in pencil or for faint co...

Страница 26: ...cting Original Modes 3 6 Copier Functions Selecting the Original Mode 1 If the desired mode is not shown above the Original Mode touch the Original Mode key 2 Touch the desired Original Mode 3 Then touch OK ...

Страница 27: ...ur copier automatically checks the size of the originals and makes the appropriate copy Selecting Thin Mode Use this mode when placing thin originals into the Document Feeder Using Special Original Mode 1 Touch the Special Original key 2 Touch the desired special original key Batch SADF Mixed Sizes Thin 3 Touch OK The selected Special Original key is displayed just above the Special Original key 4...

Страница 28: ... Paper Select 1 Touch Paper Tray 1 Paper Tray 2 Paper Tray 3 LCC or the Bypass Tray 2 Proceed with your copy set up selections 3 Press Start to copy Your copier provides two ways to select copy paper Auto Paper Select Manual Paper Select Your copier automatically detects the paper size and copies to the proper Paper Drawer You can manually select a desired paper size for copying ...

Страница 29: ...e Enlarge key Your copier allows you to enlarge or reduce your copies using Auto Reduce Enlarge Preset Copy Ratios Zoom Key with 1 increments Auto Reduce Enlarge allows the copier to select the appropriate ratio based on the original size and paper size that you select The preset Copy Ratio keys allows you to select from eleven preset reduction and enlargement ratios There are five preset Enlarge ...

Страница 30: ...3 Enter the percent ratio by touching the and keys or entering the percent using the keypad When using the keys touching the key changes the ratio in 1 increments Holding down the keys causes the ratio to change in 10 increments 4 After you selected your desired Copy Ratio touch OK 5 To return to a 100 ratio touch Full Size The Zoom key allows you to select a precise copy ratio selection from 32 t...

Страница 31: ...e keypad 5 Touch the key in the display 6 Enter the length of the copy a with the keypad 7 Touch the key in the display To change length entered touch the Clear key or press the Clear Stop key Then enter a new value To change a length entered after touching the key select original or copy and enter the desired length 8 Touch the OK key two times Calculate a ratio from the lengths of the original a...

Страница 32: ...the surface of any two originals are so rough that they cannot be moved when pinched between two fingertips the friction between the originals may obstruct paper separation even when the paper weight is within specifications The Reversing Automatic Document Feeder RADF feeds originals to the Exposure Glass for copying and if Duplex Copying is selected it turns the original over for copying the oth...

Страница 33: ... the Batch SADF key 3 Touch OK RADF allows you to stack feed up to 100 originals into the Document Feeder by pressing the Start key one time If you are feeding single sheets into the Document Feeder switch the copy mode to SADF and you will not have to press the Start key for each original See SADF Feeding One Original at a Time below SADF allows you to manually feed multiple single sheets into th...

Страница 34: ...r of the RADF is ON 6 When the Auto Feed indicator light turns ON you can feed the next original The second and subsequent originals can be fed automatically without pressing the Start key Note The SADF is on a time setting and will return to the original RADF copy mode after a preset time To change the time setting refer to 3 Input Output on page 5 20 ...

Страница 35: ...ng the keypad 6 Touch the key 7 Touch the OK key 8 Set your originals then press the Start key This feature allows you to stretch and squeeze an image by independently changing the horizontal and vertical reproduction ratios When the original is on the Exposure Glass the reproduction ratios are 25 to 400 When the original is on the Document Feeder the reproduction ratios are Vertical 37 to 150 Hor...

Страница 36: ...1 Touch the Reduce Enlarge key 2 Touch the Size Mag key 3 Touch the D Mag key When your original is on the Exposure Glass the reproduction ratios are 25 to 400 When your original is on the Document Feeder the reproduction ratios are Vertical 37 to 150 Horizontal 25 to 400 When entering page size use the key to enter the decimal ...

Страница 37: ...o in 1 increments 4 Touch the Vertical key 5 Touch either the or key to change the ratio in 1 increments 6 Touch the OK key Enter the Ratios Using the Keypad 1 Touch the Horizontal key 2 Enter the desired ratio using the keypad 3 Touch the Vertical key 4 Enter the desired ratio using the keypad 5 Touch the OK key 6 Touch the OK key 7 Set your originals then press the Start key ...

Страница 38: ...ge caused by the bound originals such as books Border erases the edge margin of the original image Center erases the center margin of the original image Center Border erases both center and edge margins of the original image This feature is not active when you are using the Bypass Tray Margin width default is 0 4 10mm Using the User Tools you can change the margin from 0 1 to 2 0 in 0 1 steps 3 to...

Страница 39: ...r 4 Sides Selecting Same Width 1 If the Same Width key is not selected select it 2 Set the erase border width using the and keys Each touch of the key changes the value by 1 inch 3 Touch the OK key Selecting 4 Sides 1 Touch the 4 Sides key 2 Set the erase border width using the and keys Each touch of the key changes the value by 1 inch 3 Touch the OK key ...

Страница 40: ... 3 20 Copier Functions Using Center Erase 1 Touch the Edit Stamp key 2 Touch the Erase key 3 Touch the Center key 4 Set the center width using the and keys Each touch of the key changes the value by 1 inch 5 Touch the OK key ...

Страница 41: ...Erase Center and Border Copier Functions 3 21 Using Center Border Erase 1 Touch the Edit Stamp key 2 Touch the Erase key 3 Touch the Center Border key Set the erase margin ...

Страница 42: ... Center key 2 Touch the Same Width key 3 Touch the Border key 4 Set the erase border using the and keys 5 Touch the OK key Selecting 4 Sides 1 Touch the 4 Sides key 2 Touch the key for the part you wish to change and set an erase margin width using the and keys 3 Touch the OK key ...

Страница 43: ...value by 0 1 inch 4 Touch the up and down arrows to set the top and bottom margins for the front and back side of the page Each touch of the arrow key changes the value by 0 1 inch 5 When your settings are complete touch the OK key 6 Touch the OK key 7 Set your originals then press the Start key You can shift the image on the page either left or right to make a binding margin The default setting i...

Страница 44: ...nctions Centering Your Copy 1 Select paper size 2 Touch the Edit Image key 3 Touch the Centering key 4 Touch the OK key 5 Set your originals then press the Start key This feature allows you to center an image on a larger sheet of paper ...

Страница 45: ...Chapter 4 Copying Methods ...

Страница 46: ...ing on page 4 8 Double Copying on page 4 21 Duplex Copying on page 4 22 Image Repeat Copying on page 4 25 Image Repeat Copying on page 4 25 Interrupt Copying on page 4 26 Overhead Transparencies and Thick Paper on page 4 27 Cover and Page Insert Copying on page 4 28 Slip Sheets on page 4 34 Series Copying Book to 1 Sided Copies on page 4 35 Series Copying 2 Sided to 1 Sided Copies on page 4 36 ...

Страница 47: ...e reproduction ratio to meet the paper size and copies the originals together onto the paper You cannot use the Bypass Tray with this function Also the copier cannot copy originals different in size and direction Book to 2 Sided allows you to copy two facing pages of a book to both sides of a sheet Note If Multi to 2 Sided has been selected in Book Duplex of the User Tools change it to Book to 2 S...

Страница 48: ...then press the Start key Multi to 2 Sided 1 Touch the Duplex Combine key 2 Touch the Book key Multi to 2 Sided copies each two page spread original as it is onto both sides of a sheet Note If Book to 2 Sided has been selected in Book Duplex of the User Tools change it to Multi to 2 Sided Refer to General Features Window 2 of 3 on page 5 12 ...

Страница 49: ...2 Sided key 5 Touch the OK key 6 Select the paper source 7 Set the originals in place then press the Start key Booklet 1 Touch the Duplex Combine key 2 Touch the Book key Booklet makes copies in page order for a folded booklet Four originals are copied onto each sheet of copy paper ...

Страница 50: ...s in place then press the Start key Magazine 1 Touch the Duplex Combine key 2 Touch the Book key 3 Touch the Magazine key 4 Touch the OK key 5 Select your paper source 6 Set the originals in place then press the Start key Magazine copies two or more originals to make copies in page order when they are folded and stacked ...

Страница 51: ... make a copy on a transparency for overhead projection OHP or have the need to use special paper letterhead or paper other than that which is in the copier Paper Tray you may feed this paper into the Stack Feed Bypass Tray See Using Stack Feed Bypass on page 4 5 Bypass does not work in the Duplex mode Bypass copying bypasses the Paper Trays and feeds copy paper from the Stack Feed Bypass Tray Use ...

Страница 52: ... Bypass Tray If necessary pull out the paper extension bar to support longer sheets of paper 6 Press the Start key to begin copying The sheet of paper in the Bypass Feed Slot feeds into the copier The copy exits to the Exit Tray or Finisher Non Standard Size Paper 1 Open the Bypass Paper Tray 2 Press the key on the keypad Non standard paper dimensions are from 4 11 7 vertical and 6 17 horizontal ...

Страница 53: ...d 6 Press the key to enter this value 7 Touch the Horz key 8 Enter the horizontal size of the paper using the keypad 9 Press the key to enter this value 10 To register the non standard size entered touch the Store key Note Only one non standard value can be entered 11 Touch the OK key 12 Set the originals in place then press the Start key ...

Страница 54: ...de of a sheet 5 1 Sided 8 Pages to Combine 2 Side Copies eight 1 sided originals to the two page spread on both sides of a sheet 6 1 Sided 16 Pages to Combine 2 Side Copies 16 1 sided originals together to both sides of a sheet 7 2 Sided 2 Pages to Combine 1 Side Copies one 2 sided original to one side of a sheet 8 2 Sided 4 Pages to Combine 1 Side Copies two 2 sided original to one side of a shee...

Страница 55: ...Combine key 2 Touch the 1 Sided key for original then touch the Combine 1 Side key for your copy 3 Touch the 2 Originals key then touch the OK key 4 Select the paper source 5 Set the originals in place then press the Start key Copies two 1 sided originals to the two pages spread of a sheet ...

Страница 56: ...x Combine key 2 Touch the 1 Sided key for original then touch the Combine 1 Side key for your copy 3 Touch the 4 Originals key then touch the OK key 4 Select the paper source 5 Set the originals in place then press the Start key Copies four 1 sided originals together to one side of a sheet ...

Страница 57: ... Combine key 2 Touch the 1 Sided key for original then touch the Combine 1 Side key for your copy 3 Touch the 8 Originals key then touch the OK key 4 Select the paper source 5 Set the originals in place then press the Start key Copies eight 1 sided originals together to one side of a sheet ...

Страница 58: ... 1 Sided key for original then touch the Combine 2 Side key for your copy 3 Touch the 4 Originals key then touch the OK key 4 Check the paper orientation 5 Touch the OK key 6 Select the paper source 7 Set the originals in place then press the Start key Copies eight 1 sided original together to one side of a sheet ...

Страница 59: ...d key for original then touch the Combine 2 Side key for your copy 3 Touch the 8 Originals key then touch the OK key 4 Check the paper orientation 5 Touch the OK key 6 Select your paper source 7 Set your originals and then press the Start key Copies eight 1 sided originals to the two page spread on both sides of a sheet ...

Страница 60: ... 1 Sided key for original then touch the Combine 2 Side key for your copy 3 Touch the 16 Originals key then touch the OK key 4 Check the paper orientation 5 Touch the OK key 6 Select the paper source 7 Set the originals in place then press the Start key Copies 16 1 sided originals together to both sides of a sheet ...

Страница 61: ...ouch the 2 Sided key for original then touch the Combine 1 Side key for your copy 3 Touch the 2 Pages key then touch the OK key 4 Check the paper orientation 5 Touch the OK key 6 Select the paper source 7 Set the originalsin place then press the Start key Copies one 2 sided original to one side of a sheet ...

Страница 62: ...ouch the 2 Sided key for original then touch the Combine 1 Side key for your copy 3 Touch the 4 Pages key then touch the OK key 4 Check the paper orientation 5 Touch the OK key 6 Select the paper source 7 Set the originals in place then press the Start key Copies one 2 sided original to one side of a sheet ...

Страница 63: ...uch the 2 Sided key for original then touch the Combine 1 Side key for your copy 3 Touch the 8 Pages key then touch the OK key 4 Check the paper orientation 5 Touch the OK key 6 Select the paper source 7 Set the originals in place then press the Start key Copies four 2 sided originals to one side of a sheet ...

Страница 64: ...he 2 Sided key for original then touch the Combine 2 Side key for your copy 3 Touch the 4 Pages key then touch the OK key 4 Check the paper orientation 5 Touch the OK key 6 Select the paper source 7 Set the originals in place then press the Start key Copies two 2 sided originals together to both sides of a sheet ...

Страница 65: ...e 2 Sided key for original then touch the Combine 2 Side key for your copy 3 Touch the 8 Pages key then touch the OK key 4 Check the paper orientation 5 Touch the OK key 6 Select the paper source 7 Set the originals in place then press the Start key Copies four 2 sided originals together to both sides of a sheet ...

Страница 66: ...e 2 Sided key for original then touch the Combine 2 Side key for your copy 3 Touch the 16 Pages key then touch the OK key 4 Check the paper orientation 5 Touch the OK key 6 Select the paper source 7 Set the originals in place then press the Start key Copies eight 2 sided originals together to both sides of a sheet ...

Страница 67: ...the OK key 4 Select the paper 5 Set the originals in place then press the Start key Using Double Copy you can make two copies of the same image on one sheet Note You cannot use the Bypass Tray for this feature You can insert separated lines between the repeated images See Page Format Window 2 of 2 on page 5 16 ...

Страница 68: ... the 1 Sided key for the original 3 Touch the 2 sided key for the copy 4 Touch the OK key There are two ways to make duplex copies with this copier 1 Sided to 2 Sided Copying This mode makes two sided copies from one sided originals 2 Sided to 2 Sided Copying This mode makes two sided copies from two sided originals ...

Страница 69: ...g is on the side use Top to Top This is the default setting If the binding is on the top of the page use top to bottom Your copies are automatically orientated top to bottom 1 Touch the Duplex Combine key 2 Touch the Orientation key 3 Select an original and copy orientation 4 Touch the OK key ...

Страница 70: ...Duplex Copying 4 24 Copying Methods 2 Sided to 2 Sided Copying 1 Touch the Duplex Combine key 2 Touch the 2 Sided key for the original 3 Touch the 2 sided key for the copy 4 Touch the OK key ...

Страница 71: ...Touch the OK key 5 Set the originals in place then press the Start key Using Image Repeat the same image can be copied repeatedly on the same paper Note The number of repeated images depends on the original size copy paper size and reproduction ratio Original Size 5 5 x 8 5 Copy Paper Size 8 5 x 11 0 landscape to landscape or portrait to portrait 4 repeats 71 16 repeats 35 Original Size 5 5 x 8 5 ...

Страница 72: ...nterrupt Copies are finished press the Interrupt key again to cancel the Interrupt mode Note The previous copy quantity copy ratio copy darkness and paper size are automatically reset 6 Put the remaining originals that you removed in Step 2 back into the Document Feeder 7 Press the Start key to continue the original copy job You can interrupt a copy job that is in progress to make a quick copy of ...

Страница 73: ...s Paper Guides to the width of the transparencies Be sure to place the transparencies in the same direction as your original 5Insert the OHP transparency or thick paper face up until the beep sounds 6 Press the key on the keypad 7 Select OHP or Thick Paper by touching the appropriate key 8 Touch the OK key 9 With the originals set press the Start key To make copies on OHP transparencies or thick p...

Страница 74: ...n page 4 28 Front and Back Covers The first and last pages of the originals are copied on specific paper sheets for covers Refer to Front and Back Covers on page 4 29 Page Insert Any specific page of the document is copied on specific paper sheets for slip sheets Refer to Page Insert on page 4 30 Chapters Separate one sided originals into chapters of two sided copies Refer to Chapters on page 4 32...

Страница 75: ...Methods 4 29 3 Select Copy or Blank and then touch the OK key 4 Select the tray you use 5 Set the originals in the Document Feeder and then press the Start key Front and Back Covers 1 Touch the Cover Slip Sheet key 2 Touch the F B Cover key ...

Страница 76: ...pying Methods 3 Select Copy or Blank and then touch the OK key 4 Select the tray you use 5 Set the originals in the Document Feeder and then press the Start key Page Insert 1 Touch the Cover Slip Sheet key 2 Touch the Designate Chapter key ...

Страница 77: ...r of the original s location you want to copy onto a slip sheet with 5 Press the key to enter the value 6 Select Copy of Blank for a slip sheet 7 Select the paper tray you wish to use for the slip sheets 8 Touch the OK key 9 Select the paper tray containing the non slip sheet paper 10 Set the originals in place then press the Start key ...

Страница 78: ...Cover and Page Insert Copying 4 32 Copying Methods Chapters 1 Touch the Cover Slip Sheet key 2 Touch the Designate Chapter key 3 Touch the key to select the chapter number 4 Touch the Chapters key ...

Страница 79: ... the keypad enter the page number of the first page of the first chapter 6 Press the key 7 To specify another page number repeat Steps 3 6 8 When you wish to finish specifying page numbers touch the OK key 9 Set the originals in place then press the Start key ...

Страница 80: ...r Blank 4 Touch the OK key 5 Select the paper tray containing the non slip sheet paper 6 Set the originals in place then press the Start key This function can be used to insert a slip sheet automatically between every OHP transparencies copied or used as a stack function You can also copy onto the slip sheets if desired ...

Страница 81: ...lex Combine key 2 Touch the Book key 3 Touch the Book 1 Sided key 4 Touch the OK key 5 Touch the OK key again 6 Make sure the Auto Paper Select is selected 7 Set the originals in place then press the Start key Use Series Copy to make two separate one sided copies from two facing pages of a bound book or magazine ...

Страница 82: ...ey for original Then touch 1 Sided key for copy 3 Check the orientation Orientation is indicated as T to T and T to B Touch the orientation key to make changes 4 Touch the OK key 5 Set the originals in place then press the Start key Use Series Copy to make two separate one sided copies from a 2 sided original You cannot use this feature in the Duplex Mode ...

Страница 83: ...Chapter 5 User Tools ...

Страница 84: ...User Tools Chapter Overview This chapter covers User Tools for System and Copy operations User Tool Settings on page 5 1 System Settings on page 5 2 Copy Document Server Settings on page 5 9 ...

Страница 85: ... for System and Copy features to operations that you use most System s User Tools has five window tabs Basic Page 1 Basic Page 2 Set Time Paper Size Setting Count Manager Copy Document Server User Tools has six window tabs General Features 3 windows Reproduction Ratio 2 windows Page Format 2 windows Stamp Setting Input Output Count Manager ...

Страница 86: ...ic steps to access System Settings The Message Display for System Settings consist of five windows Basic Page 1 Basic Page 2 Set Time Paper Size Setting Count Manager Note Default settings are shown in italics Step Procedure to Perform 1 Press the User Tools Counter key 2 Touch the Systems Settings key 3 Touch the desired Window Tab Basic Page 1 Basic Page 2 Set Time Paper Size Setting Count Manag...

Страница 87: ...uman Sensor If your copier does not detect anyone using it for a certain period of time it switches automatically to one of the preset modes AutoReset System Reset Low Power mode Auto Off Auto Tray Switching Paper Drawers If you load paper of the same size in two or more trays your copier automatically shifts to the other tray when the tray in use runs out of paper You can set or cancel this setti...

Страница 88: ...s 60 seconds ADF Orig Ejection RADF As a default setting the scanned originals from the Document Feeder RADF are ejected to the RADF external tray But if there is no space to attach an RADF External Tray you can change the output tray to the RADF tray Default is ADF Ext Tray F F4 Size Setting Currently three types of F sizes are available 8 5 x 13 8 25 x 13 and 8 x 13 The Document Feeder sensor ca...

Страница 89: ...when Finisher is not installed Finisher Shift Tray Finisher Proof Tray Menu Description NOTE Key Operator Code must be entered to access these settings Set Date Set the date for your copiers s internal clock This feature needs to be set for the weekly timer to work properly Set Time Set the time for your copier s internal clock This feature needs to be set for the weekly timer to work properly Wee...

Страница 90: ...r is OFF due to the activation of the Weekly Timer you can temporarily cancel the power off state by entering the Key Operator Code Menu Description Paper Tray Priority Select the paper tray which will be selected as a default Default Machine with LCC LCC Machine without LCC Tray 1 Tray 1 Paper Size Setting Tray 2 Paper Size Setting Tray 3 Paper Size Setting Select the size of copy paper set in th...

Страница 91: ...en Thin Paper is selected You can also have Cover and Slip Sheet displayed To display Cover or Slip Sheet select either Full Time or Mode Selected If you select Mode Selected Cover or Slip Sheet is displayed only when Cover or Slip Sheet function is selected When displaying the settings of Cover and Slip Sheet you cannot select Full Time for the same tray for both at the same time Priority is give...

Страница 92: ...y Operator Code If you select Yes only the operators who know the Key Operator Code can access the Set TIme and Count Manager user tools Set Key Card Key Operator Code If yes is selected only operators who know the Key Operator Code can access User Tools System and Copy Document Server features AOF Keep it ON This is for the automatic off feature It disables the Energy Saver mode Leave this set to...

Страница 93: ...er key Follow the five basic steps to access Copy Feature Settings General Features 3 windows Reproduction Ratio 2 windows Page Format 2 windows Input Output Count Manager Note Default settings are shown in italics Step Procedure to Perform 1 Press the User Tools Counter key 2 Touch the Copy Document Server Features key 3 Touch the desired Window Tab General Features Reproduction Ratio Page Format...

Страница 94: ...ode Display You can choose whether the original modes are shown on the initial display Default is Yes Original Mode Quality Level Text Text Photo Photo Pale Generation You can adjust the quality level of copies for each of the original types Text Text Photo Photo Pale Generation Adjust sharpness of text Default is Normal When there are photos and text on the original determine whether photo or tex...

Страница 95: ... OFF input 0 seconds Default is 60 seconds Paper Tray Priority You can select the paper tray which will be selected as a default in the following conditions When the Operation Key is turned ON When the System Reset or AUto Reset mode is turned ON When the Clear Modes Energy Saver key is pressed When the Auto Paper Select mode is selected Default settings are Copier with LCT LCT Copier without LCT ...

Страница 96: ... copy quantity can be set between 1 and 999 Default is 999 Original Beeper The beeper key tone sounds when you forget to remove originals after copying Default is On Job End Call You can choose whether or not the beeper sounds when the copying is complete when copying is interrupted when the paper tray runs out of paper and when there is a paper jam When Auto Response human Sensor is ON and the ma...

Страница 97: ...scription Shortcut R E You can register up to three frequently used Reduce Enlarge ratios other than the fixed Reduce Enlarge ratio and have them shown on the initial display You can also change the registered Reduce Enlarge ratios If no Reduce Enlarge ratio has been set when selecting User Ratio1 User Ratio 2 User Ratio 3 enter the desired Reduce Enlarge ratio using the keypad R E Priority Specif...

Страница 98: ...stering Shrink Center in a Shortcut key Default is Yes Menu Description Front Margin Left Right You can specify left and right margins on the front side of copies in Margin Adjust mode Default is Metric version Left 5mm Inch version Left 0 2 Back Margin Left Right You can specify left and right margins on the back side of copies in Margin Adjust mode Default is Metric version Right 5mm Inch versio...

Страница 99: ... 2 0 in 0 1 steps Default is Metric version 10mm Inch version 0 4 Combine Original Shadow Erase In Combine Copy or Booklet Magazine Copy mode you can specify whether to erase a 3mm 0 1 bounding margin around all four edges of original Default is Yes Erase Center The default setting of the width of the erased margins in Erase Center mode can be changed as follows 0 1 to 2 0 in 0 1 steps Default is ...

Страница 100: ...e Mode You can specify whether to make a combined copy on the front cover sheet when you select Copy in Front Cover mode Default is Combine Designated Slip Sheet Copy in Combine You can specify whether to make a combined copy on the inserted slip sheets in Designate Copy mode Default is Combine Booklet Magazine Original Orientation You can select the type of originals for Booklet or Magazine mode ...

Страница 101: ...t Top Bottom Margin 0 9 Left Right Margin 0 9 Stamp Condition You can adjust the size density and print page for the stamp Size You can set the size of the stamp Default 1X Density You can set the pattern used to print the stamp Normal Stamp is printed on the image Lighter The image can be seen through the stamp Light You can see the image even clearer than in the lighter setting Default is Normal...

Страница 102: ...e for User Stamp 1 to 4 you registered Print Page You can select whether the stamp is printed on the first page or all pages Default is All Pages Menu Description Format You can select the date format for Date Stamp mode Default is MM DD YYY Font You can select the Date Stamp font Default is Font 1 Position Priority You can set the position at which the stamp is printed Press the arrow keys to adj...

Страница 103: ... you use the Combine function and Page Numbering function together Default is Per Original Copy on Slip Sheet in Designate Mode You can select whether to print the page number onto slip sheets when you use the Designate function set to Copy and Page Numbering function together Default is Don t copy Position Priority P1 P2 Position Priority 1 5 2 5 Position Priority 1 2 Position Priority P 1 P 2 Po...

Страница 104: ...ring rotate sorting If you select No When paper of the required orientation runs out the copier stops copying and prompts your to load more paper If you select Yes Copying continues using copy paper of a different direction The copy job will finish even if you have left the copier Default is No Auto Sort Mode You can specify whether Sort mode is selected when the copier is turned ON or the mode is...

Страница 105: ...lt setting even if the number of originals in the optional Document Feeder is less than the number required in the selected Combine mode the lacking number of copies are automatically made in blank You can cancel this setting When you set one original at a time in the Document Feeder or set an original on the Exposure Glass this function does not come into effect The default is Yes Memory Full Aut...

Страница 106: ...ode is deleted the counter value will automatically be deleted Register You can register user codes Change You can change user codes The number of copies under the old code is added to the new code Delete User Codes You can delete user codes Delete All User Codes You can delete all user codes Face Up Down Selection in Bypass Mode You can set whether copies are delivered face up or face down when m...

Страница 107: ...s 5 23 Delete All The Saved FIles You can delete all the saved documents by pressing the Delete All The Saved Files key and the Yes key in the confirmation dialog box All documents including those with passwords are deleted Menu Description ...

Страница 108: ...Copy Document Server Settings 5 24 User Tools Notes ...

Страница 109: ...Chapter 6 Special Copier Functions ...

Страница 110: ...ctions Chapter Overview This Chapter includes Energy Saving Modes on page 6 1 Presetting the Next Copy Job on page 6 2 Sample Copy on page 6 5 Storing Copy Settings In Memory on page 6 6 Dual Connect Copying on page 6 21 ...

Страница 111: ...on page 5 3 Human Sensor detects presence of the copier operator and automatically turns the copier ON OR Press the Energy Saver Clear Modes key Message Display OFF Start Key Indicator OFF Operation Switch ON Low Power Shift Time 30 Automatically goes into Low Power Shift Time mode after the preset time of the Low Power Shift Time Set from 1 240 minutes See System Setting Basic Page 1 on page 5 3 ...

Страница 112: ... 4 Press the Return to menu in printing key After the current copy job the next copy jobs automatically begins You can switch the display to the current copy job by pressing the Return to menu in printing or Return to menu in scanning key You can switch the display to the preset copy job by pressing the Return to menu in setting new job key After the first copying job has been scanned you can set ...

Страница 113: ...the desired job is not shown and more than 5 jobs are preset press the 5 8 key to display the desired job 3 Touch the Check Modes Change key 4 Make changes to the settings 5 Touch the Return to job status menu key 6 Touch the Yes key 7 If you want to change the settings for other preset copy jobs repeat 2 to 6 8 Touch the Return to menu in printing key ...

Страница 114: ...s the preset job you want to delete Note If the desired job is not shown and more than 5 jobs are preset press the 5 8 key to display the desired job 3 Touch the Delete preset jobs key 4 Touch the Cancel key 5 If you want to delete other preset copy jobs repeat steps 2 4 6 Press the Return to menu in printing key ...

Страница 115: ... sure it is what you want 6 If it is acceptable and you want to continue the copy job touch the Yes key To make changes touch the No key 7 The number of copy sets you requested are made excluding the one proof copy When copying sets of copies to the Finisher you can run one sample set to verify that all of your copy settings are as you want them Then you can run the rest of your copy job This save...

Страница 116: ...med setting in it the Program In symbol appears in front of the Program Number You will be asked if you wish to overwrite it Touch either Yes or No 5 Enter the program name using the letter keys Up to 25 character can be used If no program name is desired proceed to Step 6 6 Touch the OK key All of the functions such as copy quantity percent reduction copy darkness margin shift etc for frequently ...

Страница 117: ... Program Number you want to store these copy settings to If the Program Number has programmed setting in it the Program In symbol appears in front of the Program Number You will be asked if you wish to overwrite it Touch either Yes or No To Overwrite Program 1 Touch the Delete key 2 Enter the program name using the letter keys Up to 25 character can be used If no program name is desired repeats St...

Страница 118: ...s In Memory 6 8 Special Copier Functions Cancelling a Program 1 Press the Program key 2 Touch the Delete key 3 Touch the Program Number you want to cancel Touch the Yes key 4 To cancel another program repeat steps 3 and 4 ...

Страница 119: ...r Functions 6 9 Recalling a Program 1 Touch the Program key 2 Touch the Recall key 3 Touch the Program Number you want to recall The stored settings of the selected Program Number are displayed 4 Set the originals in place then press the Start key ...

Страница 120: ... any time The Document Server enables you to save documents in the machine memory and then edit and print them as you want There are two ways to save documents Scanning from the Document Feeder Scanning from the Exposure Glass The following printing features are available with the Document Server On Demand Printing You can print the saved documents as you want at any time File Merge Printing You c...

Страница 121: ...opies and then staple them together manually With the Document Server If you save your document in the Document Server you can print it out at any time with the necessary print settings such as duplex and stapling Your documents will not be confused with those of others in the exit tray Stapling requires the installation of the optional finisher Punching requires the installation of the optional p...

Страница 122: ...nt Server You can save the originals individually by making the best settings for each original and edit them as a file It does not matter whether the originals were scanned using the document feeder or the exposure glass As you can specify the print order for several files you can combine them as you want and print them as a file You can check the print result by printing a sample set before maki...

Страница 123: ...o delete the documents stored in the Document Server with the User Tools See Auto File Delete You can change the file names that are assigned automatically You can use a password to prevent others from printing saved documents 1 Press the Document Server New Job key The Document Server Files display appears 2 Touch the Scan Originals key The Doc server Scanning display appears 3 Enter a file name ...

Страница 124: ...ssword Note If you do not wish to enter a password go to step 5 To set the password Touch the Change Password key Enter the password using the number keys 4 digits Note To change the number entered press the Clear or Clear Stop key and enter a new number Touch the OK or key 5 Set your originals either on the exposure glass or into the document feeder 6 Make any desired settings Note Touch the Scan...

Страница 125: ...d scanning job press the Resume key in the confirmation dialog box To delete the saved images and cancel the job press the Cancel key Note When storing a password appears on the left side of the file name To change the file name or password Touch the line of the document whose file name or password you want to change If you select a document which requires a password the Input the Password window ...

Страница 126: ...n print the first page to check the contents Press the line for the desired document and press the Print 1st Page key followed by the Start key Touch the selected line again to cancel the print job If you select a document which requires a password the Input the Password window appears Enter your password using the number keys then press the OK key To delete the value entered press the Clear or Cl...

Страница 127: ...y and enter new value If you print more than one set using the Sort function you can check the print result by printing out only the first set 6 Press the Start key The machine starts printing To pause the print job press the Clear Stop key In the confirmation dialog box press the Resume key to resume it or press the Cancel key to cancel it Sample Printing If you print multiple sets using the Sort...

Страница 128: ... Case key To change the letter entered press the Back Space Clear or Clear Stop key and enter new letters To delete the entered letters in 1 letter steps press the Back Space key To delete all the entered letters press the Clear or Clear Stop key 4 Touch the OK key Only the files beginning with the letters appear in the Document Server Files display To display all the files saved in the Document S...

Страница 129: ... If you cannot choose the desired document by its name you can print the first page to check the contents Press the line for the desired document and press the Print 1st Page key followed by the Start key Touch the selected line again to cancel the print job If you select a document which requires a password the Input the Password window appears Enter your password using the number keys and press ...

Страница 130: ...ition under which the copier is placed may make it necessary for you to adjust the contrast of the LCD panel About two seconds after the copy job is done a beeper beeps twice and an error message is displayed when you leave your originals on the Exposure Glass You can adjust when the beeper sounds using the Auto Response Sensor setting If set to YES the beeper sounds as soon as you leave the copie...

Страница 131: ...two copies are printed on the secondary copier Dual Connect Copying option allows you to connect two copiers together and effectively double your copy volume in the same amount of time The master copier acts as your primary copier and the other copier as your secondary copier Whichever copier is selected first becomes the master or primary copier After the originals are scanned into the master cop...

Страница 132: ...Dual Connect Copying 6 22 Special Copier Functions Notes ...

Страница 133: ...Chapter 7 Using the Finisher ...

Страница 134: ...er on page 7 1 F 550 Finisher 50 sheet stapler on page 7 1 SSF 550 Finisher saddle stitch finisher on page 7 1 Selecting Non Sort Mode on page 7 2 Selecting Sort Mode on page 7 3 Selecting Stack Mode on page 7 3 Selecting Staple Mode on page 7 4 Selecting Punch Mode on page 7 4 ...

Страница 135: ...sheets without punch 2 500 with punch Stapler 4 positions Staples up to 50 sheets at a time Punch optional up to 3 holes SSF 550 Finisher saddle stitch finisher This finisher has Proof Tray 150 sheets Shift Tray 1 000 sheets without staples 750 sheets with staples Booklet Tray up to 25 sets of 1 to 5 sheets Stapler 5 positions Stapler 1 position saddle stitch Folder Three optional finishers are av...

Страница 136: ... using the optional Finisher are Making Non Sorted Copies All copies exit to the Finisher Proof Tray top tray Making Sorted Copy Sets One copy of each original exits into the Finisher Shift Tray Each set or the top sheet only of each set in the saddle stitch finisher is shifted for ease of separation when you retrieve your copies Making Stacked Copy Sets The copies of each original are stacked tog...

Страница 137: ...r Tools Refer to 3 Input Output on page 5 20 2 Using the keypad enter the number of copies you desire 3 Set the originals in place then pess the Start key Sorting saves you a lot of time You can have your copies sort in two ways Rotate Sort Every other copy set is rotated by 90 degrees and delivered to the exit tray Note the same size paper must be in two different paper trays and one must e lands...

Страница 138: ...Your copies will exit on the Finishers Shift Tray with holes punched in them 3 To remove the paper punch outs from the finisher refer to Removing Punch outs on page 8 13 Depending on the finisher that you have the following staple positions are available Top Staples on the upper left corner left margin Top Staples on the upper left corner diagonal Top Staples on the lower left corner left margin D...

Страница 139: ...4 Touch the Copy Document Server Output Tray Finisher Shift Tray Finisher Proof Tray 5 Touch the OK key 6 Touch the Exit key 7 Touch the Exit key again You can have your copies exit to the Finisher Proof Tray top tray or to the Finisher Shift Tray during a non sort copy run When copies are sorted or stacked they automatically go to the Finisher Shift Tray bottom tray ...

Страница 140: ...Selecting the Output Tray 7 6 Using the Finisher Notes ...

Страница 141: ...Chapter 8 Service and Supplies ...

Страница 142: ...pplies gives the best results over the life of your copier The use of unauthorized supplies may cause damage to your copier Included in this chapter are Loading Paper on page 8 1 Changing Paper Tray Sizes on page 8 4 Adding Toner on page 8 5 Removing Misfeeds on page 8 7 Finisher on page 8 8 Paper Punch on page 8 13 Cleaning on page 8 14 ...

Страница 143: ...ding Paper Trays which easily open for paper loading The Add Paper Indicator turns ON when there is no copy paper in the selected Paper Tray or when the Paper Tray is not fully closed The tandem tray consist of a right and left side Each side holds up to 1550 sheets of copy paper for a total of 3100 sheets of paper During a copy run when the tandem tray is selected paper from the right tray is fed...

Страница 144: ... it stops 2 Fan the copy paper and insert it into the Paper Tray When adding paper to the Paper Tray first remove remaining paper combine it with the paper to be added and then reload the paper as a single stack The tray holds up to 500 sheets of 20 lb bond paper Do not load paper above the maximum height line 3 Push the Paper Tray fully back into the copier ...

Страница 145: ... the paper in the tray along the edge on the left 3 Press the Down key 4 Load paper by repeating steps 2 and 3 5 Close the Top Cover You can load up to 3500 sheets of paper in the LCC When the LCC is out of paper the Paper Down key flashes Also the indicator in the Message Display next to the LCT LCC paper size shows a paper out condition ...

Страница 146: ... Set the Paper Size Selector at the innermost part of the Tray to the new paper size To adjust the paper size to one not available with the paper size selector 1 Set the Paper Size Selector to the mark on the right 2 Press the Users Tool Counter key 3 Touch the System Settings key 4 Touch the Paper Size Setting key 5 Touch the Tray 2 Paper Size Setting key 6 Select your desired paper size 7 Touch ...

Страница 147: ...e Toner Indicator is ON copies will gradually become lighter until the copier stops and the Add Toner Indicator begins flashing The Add Toner Indicator may also begin flashing during long copy runs of multiple dark originals even though there is toner left Should the Add Toner Indicator begins to flash the copier stops making copies Open and close the Front Cover When sufficient toner has been fed...

Страница 148: ...outer cap Note Do Not remove the Inner Cap 6 Place the new Toner Bottle in position turn it clockwise then return the green lever back to its closed position 7 Return the Toner Bottle Holder to its original position 8 Close the Front Cover of the copier ...

Страница 149: ...plexer A Misfeed in the Document Feeder P Misfeed in the Bypass Feeder Z Misfeed in the System Stand Y Misfeed in the Sorter R Misfeed in the LCC U 3 Remove the paper misfeed following the instructions on the inside Front Cover When a misfeed occurs The copier stops The Misfeed Indicator turns ON The Message Display indicates a paper misfeed and provides a letter designator of the location of the ...

Страница 150: ...ut the Staple Unit 2 Lift the Staple Cartridge until it clicks 3 Gently pull out the Staple Cartridge On the inside of the front cover of the Finisher are pictorial instructions for Adding staples Removing staple jams Removing a paper misfeed When adding staples removing a staple jam or a paper misfeed refer to the pictorial instructions ...

Страница 151: ...pplies 8 9 4 Remove the empty refill in the direction of the arrow 5 Align the arrows on the new refill and the cartridge then push the refill in until it clicks in place 6 Pull out the ribbon 7 Reinstall the Staple Cartridge ...

Страница 152: ...Finisher 8 10 Service and Supplies 8 Press down on the Staple Cartridge until it clicks 9 Bring the Staple Unit back into place and close the Front Cover of the Finisher ...

Страница 153: ...r of the Finisher Locate the pictorial instructions for removing staple jams green on the inside of the Finisher Front Cover Pull out the Staple Unit 2 Lift the Staple Cartridge until it clicks 3 Pull out the Staple Cartridge 4 Open the Face Plate by pressing the lock on the right ...

Страница 154: ...e jammed staples 6 Close the Face Plate by pressing it until it clicks 7 Reinstall the Staple Cartridge 8 Press down on the Staple Cartridge until it clicks in place 9 Bring the Staple Unit back into place and close the Front Cover of the Finisher ...

Страница 155: ... Finisher 2 Pull out the Punch out container and properly dispose of the punch outs 3 Slide the Punch out Container back into the Finisher and close the Front Cover The optional 3 hole punch is located inside of the Finisher The punch outs fall into a container which is easily removable for emptying ...

Страница 156: ...rts a failure might occur Do not clean parts other than those specified in this Operator Guide Such parts should be cleaned by your service representative Cleaning the Exposure Glass Clean the Exposure Glass using a clean dry cloth Cleaning the Document Feeder Clean the Document Feeder Belt using a dry clean cloth A dirty Exposure Glass or Document Feeder Belt may have an effect on the quality of ...

Страница 157: ...Chapter 9 Specifications ...

Страница 158: ...rovement without notice Included in this chapter are Main Copier Unit on page 9 1 Noise Emission on page 9 2 RADF Unit on page 9 3 LCC 565 option on page 9 3 F 550 Finisher option on page 9 4 F 585 Finisher option on page 9 5 SSF 550 Finisher option on page 9 6 PP 585 Punch Unit option on page 9 6 Agency Certifications on page 9 7 Paper Sizes on page 9 9 Enlargement and Reduction Percentages on pa...

Страница 159: ...om Inch version 25 to 400 in 1 steps Metric version 25 to 400 in 1 steps Copying Speed 5455 55 CP M Letter A4 sideways 5470 70 CP M Letter A4 sideways 34 CP M Ledger A3 Full size Repeat copy mode Resolution Scanning 600 dpi Printing 400 600 dpi Gradation Scanning and Printing 256 levels Warm up Time Less than 330 seconds from Off mode Less than 30 seconds from low power mode First Copy Time 1st Tr...

Страница 160: ...550 sheets each side for a total of 3100 Tray 2 550 sheets Tray 3 550 sheets Bypass 50 sheets 20 28 lb LCC 3500 Power Source North America 120V 60Hz More than 12 A Europe Asia 220V 240V 50 60Hz More than 8 A Power Consumption complete system Warn up approximately 1 29 kw Stand by approximately 0 26 kw During Printing approximately 1 6 kw Maximum less than 1 75 kw Dimensions W x D x H 27 2 x 29 6 x...

Страница 161: ...riginal Standard Position Rear left corner Separation FRR Feed and Reverse Roller Original Transport One flat belt Original Feed Order From the top original Power Source DC 24V from the copier Dimensions W x D x H 600 x 580 x 150 mm 23 6 x 22 8 x 5 9 Weight 12 kg 26 5 lbs Item Description Paper Size Letter A4 sideways Paper Weight 16 lb 24 lb 64 g m2 105 g m2 Tray Capacity 3500 sheets 80 g m2 20lb...

Страница 162: ...y Proof Tray 250 sheets letter or smaller 20 lb 50 sheets legal or larger 20 lb Proof Tray with punch 200 sheets letter or smaller 20 lb 50 sheets legal or larger 20 lb Shift Tray 3 000 sheets letter 20 lb Shift Tray with punch 50 sheets letter 20 lb Staple Capacity Without punch 50 sheets Letter or smaller With punch 30 sheets Legal or larger Staple Position 4 positions top top slant bottom 2 sta...

Страница 163: ...ndex Stack Capacity Proof Tray 500 sheets letter or smaller 20 lb 250 sheets legal or larger 20 lb Shift Tray 3 000 sheets letter 20 lb Shift Tray with punch 2 500 sheets letter 20 lb Shift Tray with staple 1 500 sheets legal or larger 20 lb Staple Capacity Without punch 50 sheets Letter or smaller With punch 30 sheets Legal or larger Staple Position 5 positions top top slant bottom left 2 top 2 s...

Страница 164: ...ets letter 20 lb 500 sheets letter or larger 20 lb Shift Tray with staple 750 sheets letter 20 lb 500 sheets letter or larger Booklet Tray 25 sets 1 5 sheets 20 lb 15 sets 6 10 sheets 20 lb 10 sets 11 15 sheets 20 lb Staple Capacity Without punch 50 sheets Letter or smaller With punch 30 sheets Legal or larger Staple Position 5 positions top top slant bottom left 2 top 2 staples Saddle Stitch one ...

Страница 165: ...xpense Canada RFI This digital apparatus does not exceed the Class A limits for radio noise emissions from digital apparatus as set out in the Radio Interference Regulations of the Canadian Department of Communications Cet appareil numerique ne depasse pas les limites de Categorie A pour les emissions de bruit radio emanant d appareils numereques tel que prevu dans les Reglements sur I Interferenc...

Страница 166: ...e Inc has determined Lanier s 5455 5470 copiers meet the Energy Star guidelines for energy efficiency Energy Star guidelines require that all Energy Star copiers have an OFF MODE feature that automatically turns the copier off after a period of inactivity ensuring night and weekend shut off In addition to the above requirements the 5455 5470 copiers have been successfully been tested with the foll...

Страница 167: ...hes 203 x 330mm EUROPE FOLIO 8 25 x 14 inches 210 x 356mm DIN A0 841 x 1189mm A1 594 x 841mm A2 420 x 594mm A3 297 x 420mm A4 210 x 297mm A5 148 x 210mm A6 105 x 148mm B0 1000 x 1414mm B1 707 x 1000mm B2 500 x 707mm B3 353 x 500mm B4 250 x 353mm B5 176 x 250mm B6 125 x 176mm C0 917 x 1297mm C1 647 x 917mm C2 458 x 648mm C3 324 x 458mm C4 223 x 324mm C5 162 x 223mm C6 114 x 162mm B FORMAT ISO 216 J...

Страница 168: ...ercentages 9 10 Specifications Enlargement and Reduction Percentages Type Inch Version Metric Version Enlargement 400 400 200 200 155 141 129 122 121 115 Full Size 100 100 Reduction 93 93 85 87 78 82 73 71 65 65 50 50 32 35 25 25 ...

Страница 169: ...Glossary ...

Страница 170: ...Chapter Overview Definitions for the most often used terms are listed here ...

Страница 171: ... heavy stock See also Stack Feed Bypass Tray Casual Operator An operator that uses the copier to make copies but does not have Key Operator responsibilities such as adding Toner or calling for service Charge Corona A device located near the Drum that activates the light sensitivity of the Drum and prepares it to be exposed and imaged Cleaning Unit An assembly that cleans any residual image toner f...

Страница 172: ...ray where an original document is placed to feed into an ADF for automatic feeding and copying Document Guide These Guides are located in the Document Feed Tray When correctly positioned against the sides of an original document they help to position the pages of the document Document Receiving Tray A Tray used to accumulate the pages of an original document that have completed the copying process...

Страница 173: ...the factory You can change some of these settings Others can be changed by a Service Technician See also Initial Setting Front Cover The Cover located at the front of the copier designed to allow access to the interior of the copier This allows the operator to add supplies remove paper misfeeds or perform other maintenance as prescribed by the Operator Guide Fused Toner The image usually black tha...

Страница 174: ...ted on the exterior of the copier used to control the power to the copier Original Cover On copiers not equipped with a Document Feeder a Cover protects the Exposure Glass and prevents stray light from entering the copier during the copy process Unless copying a 3 dimensional object the cover should be down Original Direction Indicator This icon instructs the operator which direction to place the ...

Страница 175: ...through the paper path heavier stocks like cover stock feed better Sorter An accessory attached to the output of a copier designed to perform a sorting function The sort function allows you to make multiple copy sets of an original in such a way that the pagination matches the original document Stack Feed Bypass Feed Tray A tray that opens from the side of the machine usually just above the LCC or...

Страница 176: ... it across the Exposure Glass and returns it to the Document Exit Area of the Document Feeder To keep it operating correctly and to prevent the buildup of dirt which can cause dirty copies it must be cleaned periodically User Codes An option usually built into a copier that when activated by a Technician requires the operator to enter a User Code to make copies The copier can contain many accounts...

Страница 177: ...Index ...

Страница 178: ...Chapter Overview Use the index to locate topics listed in the Operator Guide ...

Страница 179: ...ada rfi 9 7 EPA energy star 9 8 USA rfi 9 7 Changing paper size of tray 2 8 4 Chapters 4 32 Cleaning copier 8 14 document feeder 8 14 exposure glass 8 14 Combine copying 4 8 1 sided 16 pages to combine 2 side copying 4 14 1 sided 2 pages to combine 1 side copying 4 9 1 sided 4 pages to combine 1 side copying 4 10 1 sided 4 pages to combine 2 side copying 4 12 1 sided 8 pages to combine 1 side copy...

Страница 180: ...d 4 24 E Energy saver mode entering 6 1 Energy star explained 9 8 Enlargement reduction percentages 9 10 Enlargement reduction ratios auto reduce enlarge 3 9 preset copy ratio keys 3 9 Erase center border 3 18 Exposure modes 3 3 F Feeding stack of originals 3 13 File Merge Printing 6 12 File merge printing 6 12 Finisher 8 8 non sort mode 7 2 sort mode 7 3 stack mode 7 3 staple mode 7 4 using 7 1 F...

Страница 181: ...ided copies 4 36 book to 1 sided copies 4 35 Size 3 11 Size magnification 3 11 Sizes standard paper sizes 9 9 Sizing directional size magnification 1 increments 3 16 directional size magnification inches 3 15 horizontal vertical 3 15 Slip sheets 4 34 Sort mode 7 3 Special originals 3 6 3 7 Specifications 9 1 LCC unit 9 3 main copier unit 9 1 noise emission 9 1 RADF unit 9 3 Stack mode 7 3 Staple m...

Страница 182: ...I 4 ...

Страница 183: ... A COURSE OF DEALING OF USAGE OF TRADE The Express Warranty will not apply to drums cleaning blades fuser cleaning felts toner developer or paper or to defects of damage incurred in transportation or due to accident neglect misuse such as use of harmful or unapproved supplies alterations operator error power surges failure to properly install clean maintain or repair improper operating environment...

Страница 184: ...Customer Vision _ our commitment to your complete satisfaction Lanier Worldwide Inc 2300 Parklake Drive N E Atlanta GA USA 30345 www lanier com your document management partner T1201 2860 ...

Отзывы: