background image

MANUAL BACK UP 

This a toggle switch located below the control panel, behind the louvered 
access door.  In the event of a computer failure, this switch takes control of 
the oven away from the computer and directs the temperature control to a 
mechanical thermostat located next to the switch. 

BACK-UP THERMOSTAT 

Activated when the Manual Back-up switch is set to On.  This thermostat 
controls the oven temperature in the event of a computer failure. 

BACK-UP STEAM


Installed on Steam Injected models only and activated when in the Manual 
Back-up mode. This switch allows the operator to manually inject steam 
into the oven cavity. 
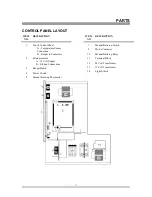
STATUS SCREEN 

The Status Screen informs the operator of the 
ovens current operating condition. 

It can be used, during the baking cycle, as a 
countdown timer, shelf in use, or internal oven 
temperature display (See separate Programming 
Instructions). 

The Status Screen informs the operator when the 
oven is ready to bake or if the oven temperature 
is above or below the programmed temperature. 

Below is a list of display terms and their 
definitions. 

"EntEr" 

The oven is energized and ready for an operator command. 

"PrEHt" 

Stands for PREHEAT.  A product button has been selected and the oven is 
heating to the programmed temperature. 

"COOL"


A product change has been made and the oven's internal temperature is 
below the new product. 

"HOt"


A product change has been made and the oven's internal temperature is 
above the programmed temperature of the new product. 

"SHELF" 

A product selection has been made after the oven has preheated and the 
computer is asking which shelf the product is placed on. 

"HELP" 

There is a fault in the control system. The computer will not operate until 
service is performed. 

"COnt" 

Stands for Continuos.  When this is displayed, the oven has been 
programmed without a cooking time being entered.  The oven will operate 
continuously at the programmed temperature. 

"ErrOr"


An entry has been made during programming which is outside the 
parameters of the computer. 

TYPICAL OPERATION 

Once the Product Buttons are programmed, all of 
the oven's operation is controlled by the 
computer. 

To select a product, simply press the 
programmed Product Button which is labeled for 
the product you wish to cook. 

Once a Product Button is selected, the oven will 
preheat to the preprogrammed temperature. 

The control will not allow the operator to select 
a shelf until the oven has reached its 
programmed temperature. 

Once the programmed temperature is reached the 
Status Screen will display "

REAdY"

 and the 

beeper will sound briefly. 

Only the Product Buttons which are programmed 
at the same temperature as the oven will now be 
activated (the button lamp will flash). 
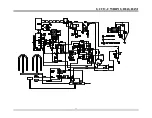
Содержание GCCO-C

Страница 1: ...Lang Manufacturing Company 10 Sunnen Drive St Louis MO 63143 Part Number 60800 13 Rev C Phone 314 687 6315 Fax 314 781 2714 September 1 2011 Installation Operation Maintenance Model GCCO C...

Страница 2: ...s Obtain these instructions from your local gas supplier FOR YOUR SAFETY Do not store or use gasoline or other flammable vapors and liquids in the vicinity of this or any other gas appliance In the ev...

Страница 3: ...1 STACKING THE OVENS 2 FLU EXTENSION 2 GAS CONNECTION 2 ELECTRICAL CONNECTION 2 INITIAL START UP 3 OPERATION 4 GENERAL 4 CONTROL PANEL 4 STATUS SCREEN 5 TYPICAL OPERATION 5 MANUAL BACK UP 6 TEMPERATU...

Страница 4: ...oor or a curbed base maintain a 4 inch back clearance If the oven is set directly against a non combustible back wall maintain a 6 inch clearance to the floor Do not install the oven closer than 3 inc...

Страница 5: ...pe of gas indicated on the data plate Contact the factory if the gas type does not match that which is on the data plate All gas connections must be in accordance with local codes and comply with the...

Страница 6: ...upply wire size must be large enough to carry the amperage load for the number of ovens being installed Wire size information can be found on the oven data plate INITIAL START UP WARNING PRIOR TO STAR...

Страница 7: ...king results during random loading load the oven from the top to the bottom CONTROL PANEL The control panel consist of the follow items LIGHT SWITCH Turns the oven interior lights On and Off POWER SWI...

Страница 8: ...d temperature COOL A product change has been made and the oven s internal temperature is below the new product HOt A product change has been made and the oven s internal temperature is above the progr...

Страница 9: ...cating which product is being baked To check the remaining cook time of a product that is baking press the corresponding Shelf Button The Status Screen will display the remaining time in the cooking c...

Страница 10: ...he Status Screen will scroll through the product program parameters temperature time etc Always start the read sequence with the Status Screen displaying EntEr MANUAL BACK UP Should the computer contr...

Страница 11: ...lso be cleaned with a mild soap and water solution Discoloration or heat tint may be removed with any of the following cleaners Penny Brite Copper Brite Du Bois Temp or Past Nu Steel Always apply thes...

Страница 12: ...allation MOTOR REMOVAL WARNING DISCONNECT THE OVEN FROM POWER Remove the oven racks and rack slides from the oven cavity Remove the four thumb screws located at the corners of the fan baffle Remove th...

Страница 13: ...entire motor assembly into the oven compartment The safety thermostat is bolted to the back side of the motor plate next to the blower motor Remove the screws holding the safety thermostat bracket to...

Страница 14: ...H Output to Contactors 2 Microprocessor A 12 Volt Supply B Ribbon Connections 3 Beeper Board 4 Power Switch 5 Manual Back up Thermostat ITEM NO DESCRIPTION 7 Manual Back up Switch 8 Motor Contactor 1...

Страница 15: ...00 35 Orifice Main Natural Gas 80400 13 Orifice Main Propane 80400 14 Orifice Pilot Natural Gas 80401 10 Orifice Pilot Propane 80401 05 Rack Slide 50200 32 Rack Oven 50200 59 Relay Manual Back up 3060...

Страница 16: ...13 GCCO C WIRING DIAGRAM...

Страница 17: ...ing the warranty period As to warranty service in the territory described above Lang will absorb labor and portal to portal transportation costs time mileage for the first 12 twelve months from the da...

Отзывы: