background image

11

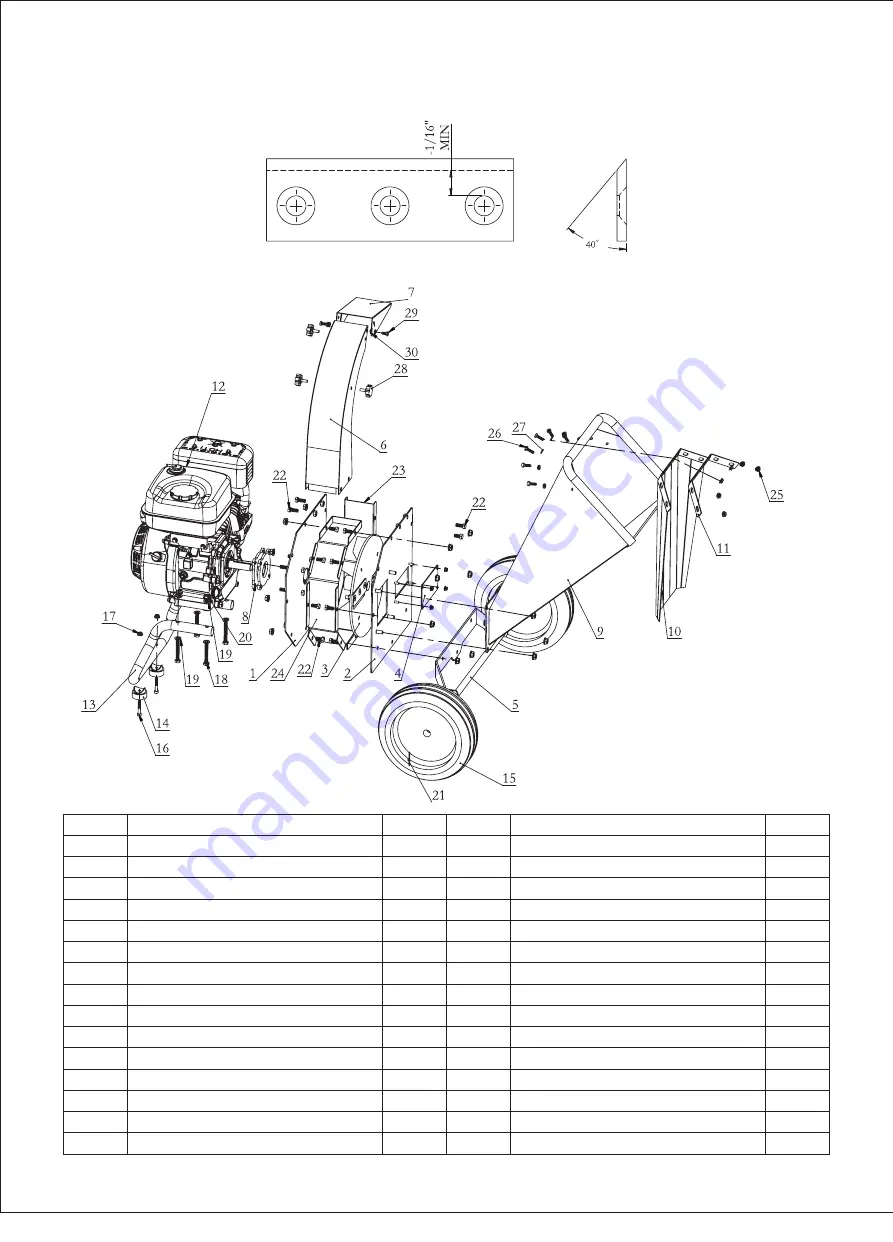
Chipping Knives Sharpening and Replacement

1. The chipping knives should be sharpened or replaced when tree limbs require extra force to feed into the chipper cone.

2. The chipping knives may be sharpened at a 39 degree angle until the distance between the edge of the blade 

bevel and the mounting hole is less than 1/16” (1.6mm). See Figure 6.

Parts Breakdown


Figure 6

Part No.

1
2
3
4
5
6
7
8
9

10
11
12
13
14
15

Description
Back of side plate
Front of side plate
Knife assembly
Window plate
Wheel bracket
Discharge chute
Discharge chute guide
Bearing Seat
In-feed bin
Hopper guard
Guard plate
Engine
Engine support
Stand pad
Wheel

Q’ty

1
1
1
1
1
1
1
2
1
1
1
1
1
2
2

Part No.

16
17
18
19
20
21
22
23
24
25
26
27
28
29
30

Description
Screw M6x40
Locking nuts M6
Flange Bolt M8*60
Flat washer
Flange Locking Nut M8
Split pin
Bolt M8*16
Cowl panel
Cowl panel
Locking nut M6
Bolt M6x20

Flat washer φ6

Star handle
Bolt M6*12
Elastic washer

Q’ty

2
2
8
8

20

2

17

1
1
8
6
8
3
2
2

Size

210x285mm

157G

铜版纸

REV 08/16/18

Содержание LCE12

Страница 1: ...l INSTRUCTIONS before operating Failure to follow the safety rules and other basic safety precautions may result in serious personal injury Save these instructions in a safe place and on hand so that...

Страница 2: ...safety and operating instructions in this manual before attempting to setup and operate your wood chipper 2 Failure to comply with all safety and operating instructions can result in loss of machine c...

Страница 3: ...eel Size IN Wheel Material Wheel Type Net Weight LB Gross Weight LB Assembled Dimension IN Packing Dimension IN LCE12 Max 3 2 15 1 CR12MoV 13 1x10 8 YES 10x3 PU SOLID 87 5 99 34 6x32 2x22 8 30 3x28 7x...

Страница 4: ...roads Stay alert for hidden hazards or traffic PRODUCT SPECIFIC SAFETY DANGER THE CHIPPER SHREDDER HAS SPINNING BLADES THAT CAN AMPU TATE HANDS AND FEET DO NOT PLACE HANDS OR FEET IN THE HOPPER OR CH...

Страница 5: ...rating the machine ENGINE SPECIFIC SAFETY Before cleaning repairing or inspecting shut off the engine and make certain that all moving parts have come to a complete stop Disconnect the spark plug wire...

Страница 6: ...y mouth to drain fuel tank 13 Always have an adult fill the fuel tank and never allow children to fill the engine 14 Never allow an adult or anyone under the influence of drugs or alcohol to fill engi...

Страница 7: ...washer C to tight the stand with the engine base plate 3 Fix the wheel bracket E on the housing with three M8x20 bolts G and three M8 nuts F Install the Wheels See Figure 2 1 Put the wheel B onto the...

Страница 8: ...th four M8 flange nuts B Fixed the discharge chute see Figure 4 1 Place the discharge chute A on the housing and align the fixed hole Fix the discharge chute with three M8 16 bolts B on the housing se...

Страница 9: ...Tree branches must be inserted large end first into the chipper cone Since occasional kick backs may occur always stand off to the side of the unit Allow the self feeding action of the unit to draw th...

Страница 10: ...e engine manual TRANSPORTING AND STORAGE 1 Always observe safe refueling and fuel handling practices when refueling the unit after transportation or storage 2 Never store the unit with fuel in an encl...

Страница 11: ...fall 2 Check that the safety labels are in place and undamaged 3 Sample illustrations and part numbers of the decals can be found on page 6 Replace any damaged or missing decals Inspect Cone Guards 1...

Страница 12: ...nected securely 6 Spark plug fouled 7 No compressions Problem after long storage periods 8 Low engine oil 1 Dirty air filter 2 Choke closed 1 Fuel tank empty or full of impure or low quality gasoline...

Страница 13: ...13 14 15 Description Back of side plate Front of side plate Knife assembly Window plate Wheel bracket Discharge chute Discharge chute guide Bearing Seat In feed bin Hopper guard Guard plate Engine En...

Отзывы: