2-50
F-982-0223
ASSEMBLY
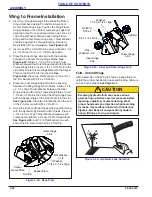
Wing to Frame Installation
1. Insert two Flange Bearings into each Wing Frame
Hinge. Remove existing Pin and Hardware from
Center Frame Hinge Lug. Position the Wing Frame
Hinges between the Center Frame Hinge Lugs and
align the holes. Once positioned place one 1-3/4 x 3 x
10ga Thrust Washer between each Wing Frame
Hinge and Center Frame Hinge Lug. Thrust Washer
should be against the Flange Bearing. Secure by
Re-installing Pin and Hardware.
2. Insert one 5/16 x 2 Roll Pin into one end of each 1-1/4
x 8-1/4 Pin and 1-1/4 x 10-7/8 Pin. Set aside.
3. Place the Outer Hinge Link End with the bushing
between the Center Frame Hinge Plates.
Slide a 1-1/4 x 2-1/2 x 12ga Thrust
Washer between the Outer Hinge Link and the Center
Frame Hinge Plates. Insert 1-1/4 x 10-7/8 Pin into the
side of the Center Frame Hinge Plate with the Keeper
Plate so the Roll Pin fits into the slot.
Place two Flat Washers on the end of
the Pin. Secure with 5/16 x 2 Roll Pin.
4. Place the Inner Hinge Link End with the bushing
between the Wing Hinge Frame Plates. Slide a 1-1/4
x 2-1/2 x 12ga Thrust Washer between the Inner
Hinge Link and the Wing Frame Hinge Plates. Insert
1-1/4 x 8-1/4 Pin into the side of the Wing Hinge Plate
with the Keeper Plate so the Roll Pin fits into the slot.
Place two Flat Washers on the end
of the Pin. Secure with 5/16 x 2 Roll Pin.
5. Swing the Inner and Outer Hinge Links together along
with the Hydraulic Cylinder Rod End Clevis. Place a
1-1/4 x 2-1/2 x 12ga Thrust Washer between each
component and insert 1-1/4 x 8-1/4 Pin through them.
Add 1-1/4 Flat Washers on each
end of the Pin. Secure with 5/16 x 2 Roll Pin
.
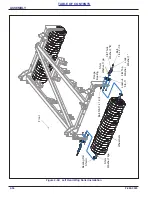
Figure 2-42: Keep Plate
Figure 2-43: Inner and Outer Hinge Link
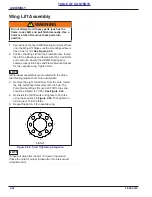
Fold - Unfold Wings
After Assembly of the Wing to Frame Linkage fold and
unfold the wings checking for leaks and binding. (Be sure
air has been purged).
CAUTION
Figure 2-44: Hydraulic Leak Detection
Flat Washer,
1-1/4
Washer,
1-1/4 x 2-1/2 x 12ga
Outer Hinge
Link
Roll Pin
Keeper Plate
Center
Frame Plate
Escaping hydraulic fluid can cause serious
personal injury. Relieve system pressure before
repairing, adjusting, or disconnecting. Wear
proper hand and eye protection when searching
for leaks. Use cardboard instead of hands (See
Figure 2-46.) Keep all components (cylinders,
hoses, fittings, etc.) in good repair.
Roll Pin,
5/16 x 2
Pin,1-1/4 x 8-1/4
Washer,
1-1/4 x 2-1/2 x 12ga
Inner Hinge
Link
Outer Hinge
Link
Cylinder
Flat
Washer,1-1/4
Содержание 3631-30
Страница 4: ......
Страница 8: ...iv F 982 0223 TABLE OF CONTENTS ...
Страница 33: ...ASSEMBLY F 982 0223 2 15 TABLE OF CONTENTS Table provided for general use NOTES ...
Страница 36: ...2 18 F 982 0223 ASSEMBLY TABLE OF CONTENTS Table provided for general use NOTES ...
Страница 45: ...ASSEMBLY F 982 0223 2 27 TABLE OF CONTENTS Table provided for general use NOTES ...
Страница 50: ...2 32 F 982 0223 ASSEMBLY TABLE OF CONTENTS Table provided for general use NOTES ...
Страница 57: ...ASSEMBLY F 982 0223 2 39 TABLE OF CONTENTS Table provided for general use NOTES ...
Страница 63: ...ASSEMBLY F 982 0223 2 45 TABLE OF CONTENTS Table provided for general use NOTES ...
Страница 72: ...2 54 F 982 0223 ASSEMBLY TABLE OF CONTENTS Table provided for general use NOTES ...
Страница 82: ...2 64 F 982 0223 ASSEMBLY TABLE OF CONTENTS Table provided for general use NOTES ...
Страница 89: ...ASSEMBLY F 982 0223 2 71 TABLE OF CONTENTS Figure 2 62 Right Hand Wing Harrow ...
Страница 93: ...ASSEMBLY F 982 0223 2 75 TABLE OF CONTENTS Table provided for general use NOTES ...
Страница 102: ...2 84 F 982 0223 ASSEMBLY TABLE OF CONTENTS Table provided for general use NOTES ...
Страница 114: ...2 96 F 982 0223 ASSEMBLY TABLE OF CONTENTS Table provided for general use NOTES ...
Страница 138: ...4 10 F 982 0223 MAINTENANCE TABLE OF CONTENTS Table provided for general use NOTES ...
Страница 142: ...5 4 F 982 0223 SPECIFICATIONS TABLE OF CONTENTS Table provided for general use NOTES ...


