PAGE 8
Oakley
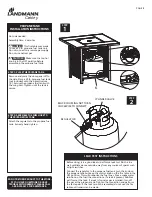
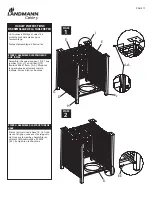
Remove and place the door panel off to
the side. Place a 20 lb. propane fuel tank
(not included) onto the base structure
[ K ]. Secure the propane fuel tank with
the wing bolt. Tighten until the tank is
secure.
This fire table was made
to use a 20 lb. propane fuel tank only.
Do not connect to a remote gas supply.
Do not use natural gas.
Make sure the control
knob is in the OFF position before
assembling the propane fuel tank.
No tools needed.
Assembly time: 5 minutes
NOTICE!!
CAUTION!!
Attach the regulator to the propane fuel
tank. Securely hand tighten.
Before using, it is a good idea to perform a leak test. Do this in a
well-ventilated area outside, away from any sources of sparks such
as light switches.
Connect the regulator to the propane fuel tank, turn the knob on
the propane tank but keep the control knob on the fire table in the
OFF position. This will pressurize the fuel lines. Pour a soapy water
solution on the fuel line connections. If a leak is present, bubbles
will form at the leak. If a leak is found or gas is smelled, turn off
the gas at the propane tank. Tighten the connection and perform
the test again. If the leak cannot be remedied, do not use the fire
table until repairs can be made.
STEP 1: PLACE THE PROPANE TANK
STEP 2: ASSEMBLE THE FUEL HOSE TO
THE PROPANE FUEL TANK
PROPANE TANK
INSTALLATION INSTRUCTIONS
DO NOT RETURN PRODUCT TO THE STORE.
IF YOU HAVE QUESTIONS OR HAVE
TROUBLE WITH ASSEMBLY, PLEASE CALL
1-800-321-3473 FOR ASSISTANCE.
LEAK TEST INSTRUCTIONS
STEP
1
STEP
2
CYLINDER VALVE
REGULATOR
BLACK COUPLING NUT TURN
CLOCKWISE TO CONNECT
K


