background image

Section 1: Assembly & Set-up

RCF2784 & RCR2684 S/N Rotary Cutters 326-364M

7/26/19

21

Table of Contents

Axle Assembly

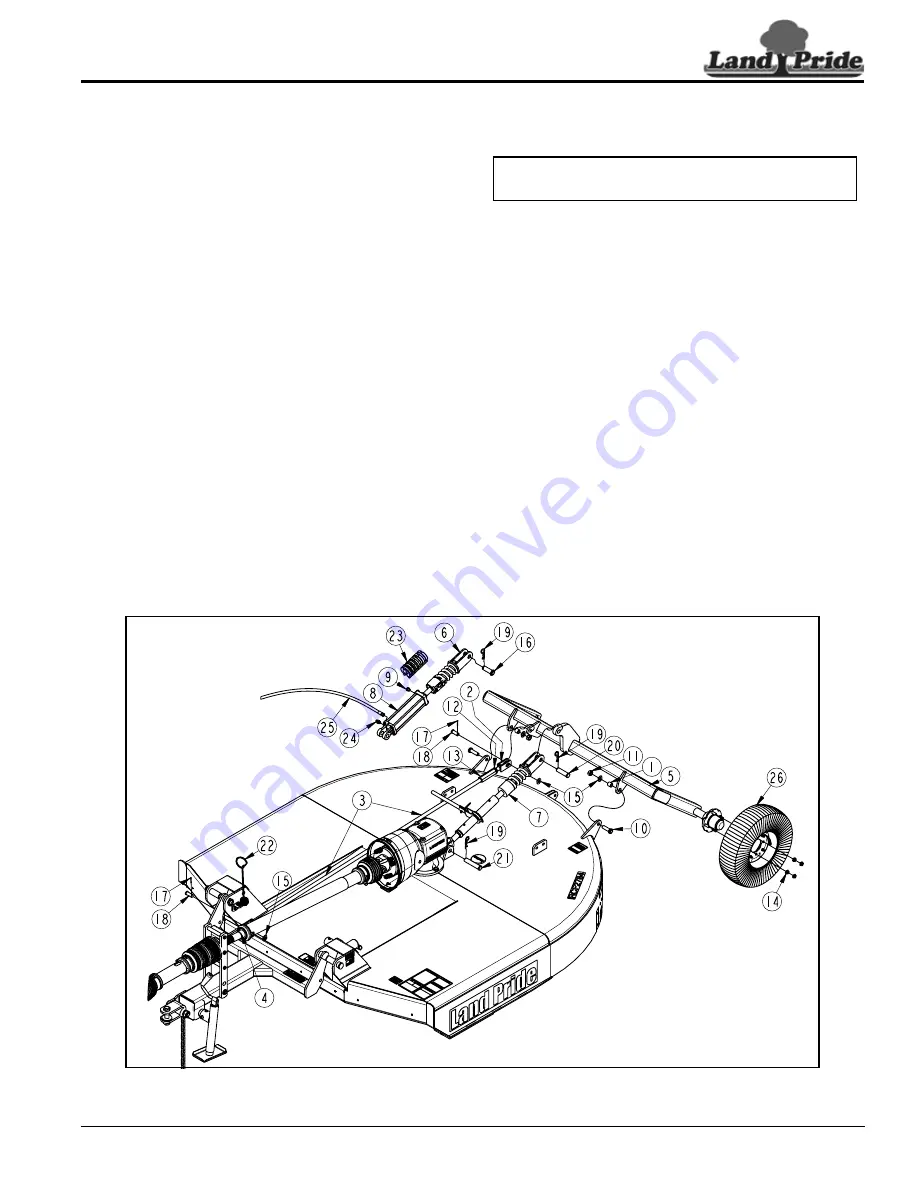
Refer to Figure 1-13:

1.

Install tailwheels (#26) to axle frame (#5) with hex 
flange locknuts (#14). Tighten locknuts to the correct 
torque. 

2.

Attach axle frame (#5) to rear deck lugs with 
3/4"-10 x 2 1/2" GR5 cap screws (#10), spacer 
tubes (#1), flat washers (#15), and locknuts (#11). 
Tighten nuts to the correct torque.

3.

Install ratchet jack (#7) or hydraulic cylinder (#8) to 
deck assembly as follows:

Ratchet Jack Installation:

a. Attach base of ratchet jack (#7) to mounting lugs 

behind gearbox with 1" x 4 3/4" clevis pin (#21) as 
shown. Secure clevis pin with hairpin cotter (#19).

b. Operate ratchet lever to extend or shorten ratchet 

jack until spring cushioned end of ratchet jack 
aligns with hole in axle frame (#5).

c. Insert 1" x 3 3/16" clevis pin (#20) and secure with 

hairpin cotter (#19).

NOTE:  

Tailwheel on right-hand side is not shown to 

allow easier viewing of balloons.

1.

Remove rubber protective sleeve (#23) from gearbox 
input shaft and discard.

2.

Remove coupling bolt (#8) from end of slip-clutch.

3.

Unsnap one end of both access doors (#26) and 
rotate doors open.

4.

Slide slip-clutch end of driveline onto gearbox input 
shaft until holes in slip-clutch align with notch in 
gearbox input shaft. 

5.

Secure driveline (#25) to gearbox input shaft with 
coupling bolt (#8), spring lock washer (#20), and hex 
nut (#14). Tighten hex nut to the correct torque.

6.

Move slip-clutch back and forth several times to 
make certain it is locked onto the gearbox shaft.

7.

Rotate access doors (#26) closed and snap in place.

8.

Insert jackshaft end of driveline (#25) through 
bearing in bearing support assembly (#5).

9.

Pull bearing in bearing support assembly (#5) 
against driveline (#25) and tighten set screw in 
bearing collar against driveline jackshaft.

10. Attach driveline (#24) to jackshaft on driveline (#25) 

by pulling back on pull collar (#29) and pushing yoke 
onto the jackshaft. Release pull collar and continue 
to push yoke forward until pull collar locks in place.

11. Move driveline yoke back and forth several times to 

make sure yoke is locked in place.

Trail-Type Axle Assembly (RCF2784 Only)

Figure 1-13

33269

Содержание Rotary Cutter RCR2684

Страница 1: ...ease see your Land Pride dealer Read the Operator s Manual entirely When you see this symbol the subsequent instructions and warnings are serious follow without exception Your life and the lives of others depend on it Rotary Cutters RCF2784 RCR2684 S N 1180234 326 364M Operator s Manual Printed 7 26 18 30697 RCF2784 70180 30697 RCF2784 70180 RCR2684 ...

Страница 2: ...y ordered the weights and measurements are no longer accurate for your machine Update the record by adding the machine weight and measurements provided in the Specifications Capacities Section of this manual with the Option s weight and measurements Dealer Contact Information Model Number Serial Number Machine Height Machine Length Machine Width Machine Weight Delivery Date First Operation Accesso...

Страница 3: ...784 20 Hitch Assembly 20 Driveline Installation 20 Axle Assembly 21 Pull Type Tractor Hook up RCF2784 23 Assembly of Optional Guards 24 Front Rubber Guard RCF2784 24 Front Chain Guards 24 Rear Chain Guards 24 Pull Type Hydraulic Hook up 25 Purge Hydraulic System 25 Section 2 Adjustments 26 3 Point Leveling Cutting Height 26 Deck Leveling 26 Cutting Height Adjustment 26 Single Dual Tailwheel Adjust...

Страница 4: ... appropriate App on your smart phone open the App point your phone on the QR code and take a picture Dealer QR Locator The QR code on the left will link you to available dealers for Land Pride products Refer to Parts Manual QR Locator on this page for detailed instructions RCF2784 RCR2684 S N 1180234 Rotary Cutters 326 364M Table of Contents See previous page for Table of Contents ...

Страница 5: ... supervision Never allow children to play on the power machine or implement Use extra caution when backing up Before the tractor starts to move look down and behind to make sure the area is clear Safety at All Times Careful operation is you best insurance against an accident All operators no matter how much experience they may have should carefully read this manual and other related manuals before...

Страница 6: ... laws Use towing vehicle and trailer of adequate size and capacity Secure equipment towed on a trailer with tie downs and chains Sudden braking can cause a towed trailer to swerve and upset Reduce speed if towed trailer is not equipped with brakes Avoid contact with any over head utility lines or electrically charged conductors Always drive with load on end of loader arms low to the ground Always ...

Страница 7: ...Wear suitable hearing protection such as earmuffs or earplugs Operating equipment safely requires the operator s full attention Avoid wearing headphones while operating equipment Use Seat Belt and ROPS Land Pride recommends the use of a CAB or roll over protective structures ROPS and seat belt in almost all power machines Combination of a CAB or ROPS and seat belt will reduce the risk of serious i...

Страница 8: ...ica particles This dust can cause serious injury to the lungs silicosis There are guidelines which should be followed if crystalline silica quartz is present in the dust Be aware of and follow OSHA or other local State or Federal guidelines for exposure to airborne crystalline silica Know the work operations where exposure to crystalline silica may occur Participate in air monitoring or training p...

Страница 9: ...Important Safety Information 7 26 19 5 This page left blank intentionally ...

Страница 10: ...nearest dealer visit our dealer locator at www landpride com 3 Some new equipment installed during repair requires safety labels to be affixed to the replaced component as 70181 specified by Land Pride When ordering new components make sure the correct safety labels are included in the request 4 Refer to this section for proper label placement To install new labels a Clean surface area where label...

Страница 11: ...Safety Information RCF2784 RCR2684 S N 1180234 Rotary Cutters 326 364M 7 26 19 7 Table of Contents 818 142C Danger Rotating Driveline 33040 33040 33041 33040 818 543C Danger Guard Missing 818 130C Warning 540 rpm ...

Страница 12: ...nt Safety Information RCF2784 RCR2684 S N 1180234 Rotary Cutters 326 364M 8 Table of Contents 7 26 19 33041 33041 33035 818 556C Danger Thrown Object 818 555C Danger Rotating Blades 818 681C Notice 20 MPH Max ...

Страница 13: ... S N 1180234 Rotary Cutters 326 364M 7 26 19 9 Table of Contents 24597 24597 33041 33041 838 614C RCF2784 2 x 9 Red Reflector 2 places 838 614C RCR2684 2 x 9 Red Reflector 2 places 818 540C Danger Guard Missing 818 552C Danger Rotating Driveline ...

Страница 14: ...ctices will help you get years of satisfactory use from this product Application The medium duty RCF2784 and RCR2684 Rotary Cutters are built and designed by Land Pride for cutting on gentle sloping or slightly contoured right of ways pastures set aside acres and row crop fields The 84 cutting width and Quick Hitch capability make them compatible with 60 to 130 horsepower tractors with 540 rpm pow...

Страница 15: ... Tractor weight See warning below WARNING To avoid serious injury or death Lightweight tractors with rear attached implements may need weights added to the front to maintain steering control Consult your tractor Operator s Manual to determine proper weight requirements and maximum weight limitations Torque Requirements Refer to Torque Values Chart on page 48 to determine correct torque values for ...

Страница 16: ...ment on level solid ground 3 Lower implement to ground or onto non concrete support blocks 4 Put tractor in park or set park brake turn off engine and remove switch key to prevent unauthorized starting 5 Relieve all hydraulic pressure to auxiliary hydraulic lines 6 Wait for all components to come to a complete stop before leaving the operator s seat 7 Use steps grab handles and anti slip surfaces ...

Страница 17: ... 1 3 1 4 Below For Bushing 16 Location Figure 1 2 70184 Vent Plug With Dipstick Location Assembly Of Bushing 16 For Cat III Quick Hitch Hook Up RCR2684 Shown Figure 1 3 Assembly Of Bushing 16 For Cat III 3 Point Hitch Hook Up RCR2684 Shown Figure 1 4 70190 Bushing 16 must be mounted in top hole for Quick Hitch hook up 70189 Bushing 16 must be mounted in bottom hole for 3 Point hook up ...

Страница 18: ...plete Refer to Torque Values Chart for Common Bolt Sizes on page 48 3 Insert tailwheel spindle 9 into pivot tube of A frame 1 and install machine washer 6C over tailwheel spindle Secure tailwheel with 3 8 x 2 1 2 roll pin 8 4 Attach bottom hole of tailwheel adjustment bar 3 to deck rear with 5 8 11 x 2 GR5 cap screw 2C and hex nylock nut 5 Draw nylock nut up tight do not torque tight 5 Attach tail...

Страница 19: ...lete Refer to Torque Values Chart for Common Bolt Sizes on page 48 3 Insert tailwheel spindle 11 into pivot tube of tailwheel frame 1 and install machine washer 9C over tailwheel spindle Secure tailwheel with 3 8 x 2 1 2 roll pin 10 4 Attach bottom hole of tailwheel adjustment bar 2 to deck rear with 5 8 11 x 2 GR5 cap screw 4A and hex nylock nut 6 Draw nylock nut up tight do not torque tight 5 At...

Страница 20: ...nts on page 41 3 Point Tractor Hook up Refer to Figure 1 7 DANGER To avoid serious injury or death A crushing hazard exists while hooking up and unhooking implement Keep people and animals away while backing up to implement or pulling away from implement Do not operate hydraulic controls while a person or animal is directly behind the power machine or near the implement All guards and shields must...

Страница 21: ...d serious injury or death Always follow Tractor Shutdown Procedure provided in this manual before dismounting the tractor Check driveline when lowering implement to make sure it does not interfere with the tractor drawbar at maximum depth If needed shut tractor off and move or remove drawbar to prevent driveline damage NOTE Adapter bushings 12 are used if tractor 3 Point hitch is Cat lll The bushi...

Страница 22: ...e tractor and implement Always check driveline minimum length during initial setup when connecting to a different tractor and when alternating between using a quick hitch and a standard 3 point hitch More than one driveline may be required to fit all applications Shorten Driveline Length Figure 1 9 7 If dimension A is less than 1 shorten driveline as follows Refer to Figure 1 9 a Measure 1 B1 dime...

Страница 23: ...ar tires and other tractor equipment do not contact the cutter frame If there is an interference a Back cutter over the support blocks and lower it onto the blocks b Shut tractor down before dismounting Refer to Tractor Shutdown Procedure on page 12 c Move or remove drawbar if it interferes with the cutter and make any other necessary corrections d Repeat steps 1 4 to verify the cutter does not in...

Страница 24: ...p mounting bracket 3 to the right hand clevis with 3 8 16 x 1 GR5 hex head cap IMPORTANT Be sure bearing lock collar in bearing support assembly 5 is facing driveline 25 screw 11 and locknut 16 Tighten locknut to the correct torque 4 Attach spring hose loop 22 to spring hose loop mounting bracket 3 with 3 8 16 x 1 GR5 cap screw 9 flat washer 17 and locknut 13 Tighten locknut to the correct torque ...

Страница 25: ...otective sleeve 23 from gearbox input shaft and discard 2 Remove coupling bolt 8 from end of slip clutch 3 Unsnap one end of both access doors 26 and rotate doors open 4 Slide slip clutch end of driveline onto gearbox input shaft until holes in slip clutch align with notch in gearbox input shaft 5 Secure driveline 25 to gearbox input shaft with coupling bolt 8 spring lock washer 20 and hex nut 14 ...

Страница 26: ... clevis on spring cushioned end 6 straddles lug on axle frame 5 and holes in clevis aligns with hole in axle frame lug g Insert 1 x 2 3 4 clevis pin 16 and secure with hairpin cotter 19 4 Screw coupler nut 13 onto long leveling rod 3 about 1 3 4 5 Screw jam nut 12 onto the short leveling rod 2 a distance of about 1 3 4 6 Screw short leveling rod 2 into coupler nut 13 until coupler nut is against j...

Страница 27: ...to align clevis hitch 2 with tractor drawbar 1 4 Back tractor up to cutter hitch until holes in drawbar and clevis hitch are properly aligned 5 Attach cutter to tractor drawbar with 1 8 x 4 1 2 GR5 cap screw 3 two flat washers 4 5 as shown lock washer 6 and hex nut 7 Tighten hex nut until lock washer is squeezed flat 6 Lower jack stand 11 until hitch weight is supported by drawbar Protect jack sta...

Страница 28: ...uards 1 2 as shown with 3 8 16 x 1 GR5 carriage bolts 3 and hex whiz nuts 4 2 Tighten nuts to the correct torque Rear Chain Guards Land Pride offers a rear chain guard for the RCF2784 RCR2684 A double chain guard is also offered for the RCF2784 The chain guards are designed to handle heavy applications where cutter blades make contact with solid dense objects Refer to Figure 1 19 1 Remove the stan...

Страница 29: ...ght and or length if driveline interferes See Figure 1 15 on page 23 for correct drawbar dimensions 4 Cycle hydraulic system by extending and retracting lift cylinder several times It may be necessary to purge the hydraulic system of trapped air if operation is sluggish See Purge Hydraulic System below Purge Hydraulic System DANGER To avoid serious injury or death Be sure deck is lowered to the gr...

Страница 30: ...ustment Refer to Figure 2 2 WARNING To avoid serious injury or death Avoid direct contact with cutter blades by wearing a pair of gloves Cutter blades have sharp edges and burrs that can cause injuries 1 With gloves on carefully rotate blades and stump jumper until blade tips are in the position shown 2 Measure distance from cutting tip of front blade to ground surface This distance is the cutting...

Страница 31: ...int lift arms as needed See Cutting Height Adjustment instructions on page 26 Center 3 Point Link Adjustment Refer to Figure 2 5 1 Lower cutter deck to a preset cutting height 2 Adjust length of center 3 Point link until upper center hitch pin is vertically above lower 3 Point hitch pins This arrangement allows for optimum ground contour following performance 3 Lock center 3 Point link in this pos...

Страница 32: ...ening Front To Back Deck Leveling Refer to Figure 2 6 1 Attach cutter to the tractor that will be pulling the cutter and position tractor and cutter on level ground 2 With gloves on carefully rotate blades and stump jumper until blade tips are in the position shown 3 Using tractor control lever adjust deck height so that the front blade tip is 3 to 4 inches above ground Refer to Figure 2 7 on page...

Страница 33: ...t will fill the exposed cylinder rod The following spacers are available Two 1 spacers One 1 1 4 spacer One 1 1 2 spacer One 1 3 4 spacer 5 Return to the tractor and raise Rotary Cutter up Install selected size and number of stroke control spacers on the cylinder rod 6 Lower Rotary Cutter against stroke control spacers and recheck cutting height If needed adjust size and quantity of stroke control...

Страница 34: ...derside of cutter The tractor can be started with power take off engaged Rotary Cutters have the ability to discharge objects at high speeds therefore the use of front and rear safety guards is mandatory when cutting along roadways and in areas where people may be present Stop blade rotation if a bystander is in or around the area Do not use cutter as a fan Cutting blades are not properly designed...

Страница 35: ...t on page 29 The remaining inspections are made by engaging the power take off to check for vibrations WARNING To avoid serious injury or death Stop power take off immediately if vibration continues after a few revolutions during start up and anytime thereafter Wait for all components to come to a complete stop before dismounting from tractor to check for probable causes Make necessary repairs and...

Страница 36: ...tly inspect cutter for loose bolts and nuts Tighten all loose hardware as indicated in the Torque Values Chart on page 48 1 Thoroughly inspect area to be cut for debris and unforeseen objects Mark any potential hazards 2 Follow Blade Engagement instructions above to start cutter blades turning 3 Optimum ground speed depends on density of material being cut horsepower rating of tractor and terrain ...

Страница 37: ...illy terrain Avoid quick or sharp steering corrections Take extra care to ensure that the mower doesn t come into contact with obstacles such as trees buildings or fences Use accessory lights and appropriate reflective devices to provide adequate warning to pedestrians and other vehicle operators when traveling on public roads and in the dark of night Comply with all local state and federal laws I...

Страница 38: ...he rubber guard is more economical and designed for light duty applications The chain guard is designed to handle heavier applications Front Rubber Guard Refer to Figure 4 1 Part Number Description 312 866A Front Rubber Guard Assembly RCF2784 only See Front Rubber Guard RCF2784 on page 24 for proper installation Front Chain Guards Refer to Figure 4 2 Part Number Description 312 869A Front Single C...

Страница 39: ... Wheel 326 327A 3 Point with Dual Tail Wheels See 3 Point Hitch Set up on page 12 for proper hitch installation See 3 Point Single Tailwheel Option on page 14 for proper single tailwheel installation See 3 Point Dual Tailwheel Option on page 15 for proper dual tailwheel installation Pull Type Hitch RCF2784 Refer to Figure 4 6 Part Number Description 326 333A Pull type hitch with Dual Tail Wheels R...

Страница 40: ...perty damage Improper oil level can cause bearing failure and be a fire hazard Maintain proper gearbox oil level to avoid serious injury and property damage Section 5 Maintenance Lubrication Driveline Slip Clutch The drive train is protected from shock loads with a four plate slip clutch The slip clutch must be capable of slippage during operation Always do a Clutch Run In operation at the beginni...

Страница 41: ...disconnect driveline from power take off shaft before servicing underside of cutter The tractor can be started with power take off engaged Always secure equipment with solid non concrete supports before working under it Never go under equipment supported by concrete blocks or hydraulics Concrete can break hydraulic lines can burst and or hydraulic controls can be actuated even when power to hydrau...

Страница 42: ...t sharpen back side of blade f Both blades should weigh the same with not more than 1 1 2 oz difference Unbalanced blades will cause excessive vibration which can damage gearbox bearings and create structural cracks 9 Carefully check cutting edges of blades in relation to blade carrier rotation to ensure correct blade placement Blade rotation is counterclockwise with cutting edge leading Airfoil l...

Страница 43: ...skid shoes mounted on the cutter sides Check both skid shoes for wear and replace if necessary Order only genuine Land Pride parts from your local Land Pride dealer 1 Remove 3 8 hex whiz nuts 3 3 8 plow bolts 2 and skid shoe 1 as shown 2 Plow bolts should be checked for wear and replaced when worn 3 Attach new skid shoe 1 to cutter with existing 3 8 plow bolts 2 and secure with 3 8 hex whiz nuts T...

Страница 44: ...tion 2 Check blades and blade bolts for wear and replace if necessary See Cutter Blade Maintenance on page 37 3 Inspect for loose damaged or worn parts and adjust or replace as needed 4 Repaint parts where paint is worn or scratched to prevent rust Ask your Land Pride dealer for aerosol touch up paint They are also available in touch up bottles with brush quarts and gallon sizes by adding TU QT or...

Страница 45: ...pstick hole until oil flows out of side plug hole Reinstall and tighten side oil plug 2 and vented dipstick 1 Type of Lubrication 80 90W EP Gear Lube Quantity Fill until oil reaches top mark on dipstick or begins to flow out side plug hole in gearbox NOTE Do not overfill Cutter should be level when checking oil Oil expands when hot therefore always check oil level when cold 24 Hours 8 Hours 8 Hour...

Страница 46: ... tube of driveline with a light film of grease and then reassemble Driveline U Joints Type of Lubrication Multi purpose Grease Quantity 6 pumps Driveline Shield Bearings Type of Lubrication Multi purpose Grease Quantity 6 pumps 8 Hours 8 Hours 20 Hours 33050 33050 14618 33050 Ratchet Jack Optional RCR2784 Type of Lubrication Multi purpose Grease Quantity Until grease purges from threads As Require...

Страница 47: ...ity in cm 3 7 6 Diameter Recommended tractor horsepower hp kW 60 130 44 7 96 9 Power take off speed 540 rpm Gearbox ratio 1 1 21 Gearbox construction in cm Speed up beveled gears cast iron housing 1 3 8 3 5 6 spline input shaft and 2 5 1 output shaft Gearbox oil capacity type 6 5 Pints of EP 80 90W gear lube Deck construction All welded deck Deck material thickness ga mm 10 3 4 Side skirt material...

Страница 48: ...fications Capacities RCF2784 RCR2684 S N 1180234 Rotary Cutters 326 364M 44 Table of Contents 7 26 19 33037 RCF2784 132 1 2 3 37 m 40 7 16 1 03 m 130 3 8 3 31 m 159 5 16 4 05 m 89 2 26 m 29 3 4 76 6 cm 40 7 16 1 03 m ...

Страница 49: ...Section 6 Specifications Capacities RCF2784 RCR2684 S N 1180234 Rotary Cutters 326 364M 7 26 19 45 Table of Contents 70207 RCR2684 40 1 4 1 02 m 89 2 26 m 40 1 4 1 02 m 132 3 8 3 36 m 130 1 4 3 31 m ...

Страница 50: ...or a stronger rigid deck Fully welded deck Robotic welded Adds additional strength and deck integrity Extended cutter front For increased material flow and added protection Round back design Helps discharge grass better than enclosed or partially enclosed cutters Also allows for more efficient handling Deck Height 10 1 8 RCF2784 9 7 8 RCR2684 Allows cutter to handle heavy cutting conditions 1 1 2 ...

Страница 51: ... power take off speed See Blade Engagement on page 32 Tractor has Instant off power take off Decrease engine speed slowly to an idle and then disengage power take off See Blade Disengagement on page 32 Blades wearing excessively Cutting on sandy ground Raise cutting height Contacting ground frequently Raise cutting height Blades breaking Hitting solid objects Avoid hitting solid objects Blades com...

Страница 52: ...205 150 285 210 M16 X 1 5 155 115 240 180 335 245 5 8 18 150 110 230 170 325 240 M18 X 2 5 195 145 310 230 405 300 3 4 10 235 170 360 265 510 375 M18 X 1 5 220 165 350 260 485 355 3 4 16 260 190 405 295 570 420 M20 X 2 5 280 205 440 325 610 450 7 8 9 225 165 585 430 820 605 M20 X 1 5 310 230 650 480 900 665 7 8 14 250 185 640 475 905 670 M24 X 3 480 355 760 560 1050 780 1 8 340 250 875 645 1230 91...

Страница 53: ...Misuse also specifically includes failure to properly maintain oil levels grease points and driveline shafts Claims under this Warranty should be made to the dealer which originally sold the product and all warranty adjustments must be made through an authorized Land Pride dealer Land Pride reserves the right to make changes in materials or design of the product at any time without notice This War...

Страница 54: ...Corporate Office P O Box 5060 Salina Kansas 67402 5060 USA www landpride com ...

Отзывы: