background image

5

Positioning


In order to facilitate proper dispenser drainage, ensure 

that the dispenser is level, front to back and side to 

side. Place a level on the top of the rear edge of the 


dispenser. The bubble must settle between the level 

lines. Repeat this procedure for the remaining three 

sides. Level unit if necessary. For optimum perfor-

mance place the unit at a 0° tilt. The maximum tilt is 5°.

Leveling the Dispenser:

1. 

Place machine on a horizontal and sturdy surface.

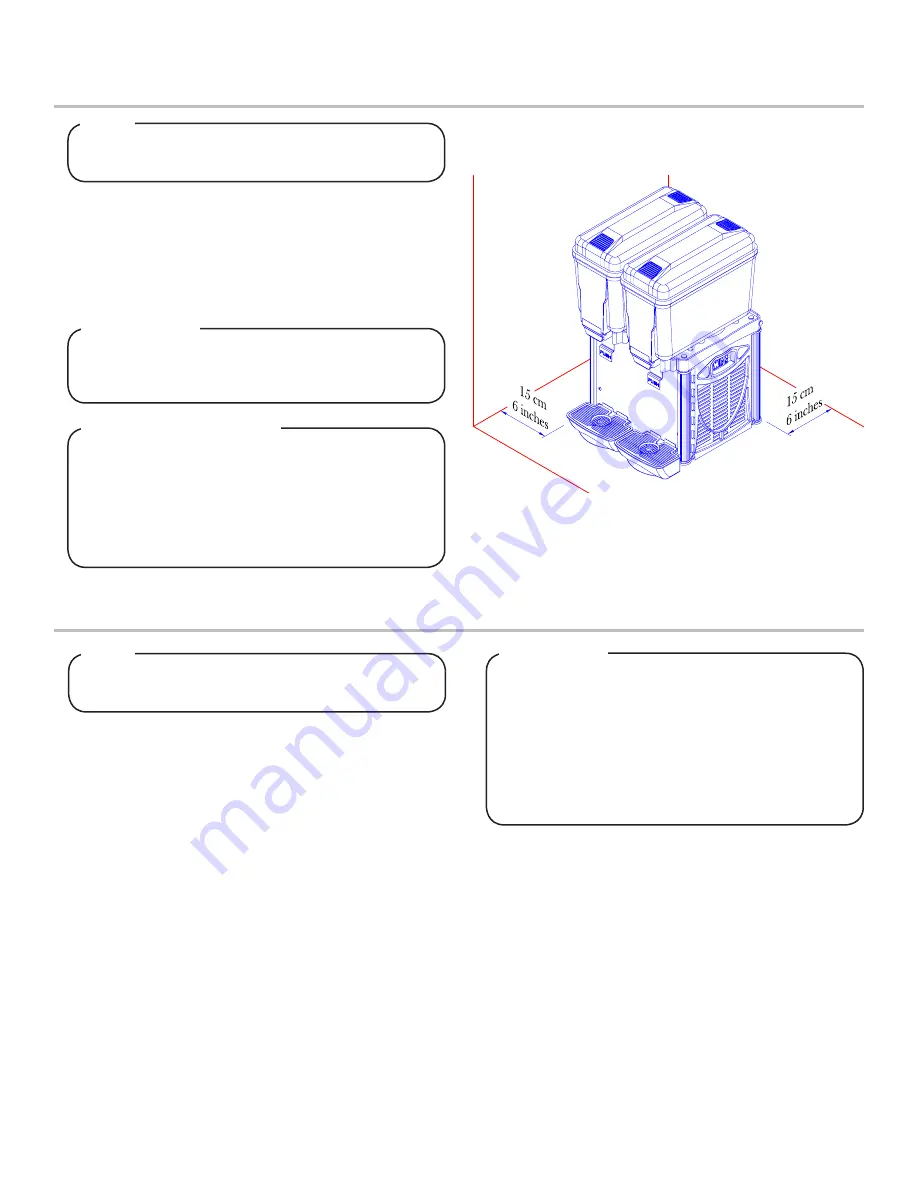
2.  For an improved ventilation maintain a distance of 15cm (6 

inches), between unit and walls or other obstacles.

3.  Increase the distance if the obstacles are an heating source. 
4.  When the dispenser is in place, regulate the legs in order to 

keep it level.


Failure to maintain specified clearance will cause the 


compressor to overheat and will result in compressor 

 failure

ATTENTION


The dispenser should only be installed in a location 

where it can be overseen by trained personnel

NOTE

Electrical Connection

• 

Make sure that the machine is properly connected to an 

efficient grounding system, in compliance with current 

safety standards.

• 

Make sure that the voltage is in acordance with what 

indicated on the “serial number” tag applied on the 

chassis.

• 

Make sure the current available is suffiecient for the 

maximum required by the machine.

• 

If needed, use only approved multiple outlets, in 

compliance with current safty standards.


Before inserting the plug into the eletrical socket, read 

the following precautions:

NOTE


The dispenser must be properly electrically grounded 

to avoid serious injury or fatal electrical shock. The 

power cord has a three-prong grounded plug. If a three-

hole grounded electrical outlet is not available, use an 

approved method to ground the unit. Follow all local 

electrical codes when making connections. Each dis-

penser must have a separate electrical circuit. Do not 

use extension cords. Do not connect multiple electrical 

devices on the same outlet.

WARNING

Содержание Soochee 1100

Страница 1: ...ts reserved Lancer Corporation 6655 Lancer Blvd San Antonio Texas 78219 800 729 1500 Tech Support Warranty 800 729 1550 email custserv lancercorp com web lancercorp com Lancer PN 28 3063 Revision 00 1 October 2019 Operation Manual Model 1100 Refrigerated Beverage Dispenser RBD ...

Страница 2: ...he guidelines and warnings contained herein as they are intended to provide the user with essential information for the continued safe use and maintenance of the product In addition it provides GUIDANCE ONLY to the user on the correct services and site location of the unit Text following the Warning signal indicates a hazardous situation which if not avoided will result in death or serious injury ...

Страница 3: ...l number plate agrees with local current available Each dispenser must have a separate electrical circuit DO NOT use extension cords with this unit DO NOT gang together with other electrical devices on the same outlet WARNING Always disconnect electrical power to the unit to prevent personal injury before attempting any internal maintenance The resettable breaker switch should not be used as a sub...

Страница 4: ...it it is necessary to always carry store and handle the machine in a vertical position following the instructions found on the packaging If the machine was accidentally or purposely placed in a non vertical position during transport before operat ing the machine it should be kept in a straight position for approximately 30 minutes to allow the oil to flow back into the compressor ATTENTION To assu...

Страница 5: ...be installed in a location where it can be overseen by trained personnel NOTE Electrical Connection Make sure that the machine is properly connected to an efficient grounding system in compliance with current safety standards Make sure that the voltage is in acordance with what indicated on the serial number tag applied on the chassis Make sure the current available is suffiecient for the maximum ...

Страница 6: ...o below 75 1 gal NOTE 4 Do not overtake the MAX level line Dispenser Function 1 Make sure that the main switch A is in the OFF position plug in the machine 2 Before starting the machine ensure that the bowl are properly closed with their covers 3 Turn the main switch A to ON position the refrigerant group unit will automatically start 4 To start the mixing action turn to ON position the mixing sys...

Страница 7: ...loves are to be used during cleaning operations Applicable safety precautions must be observed Instruction warnings on the product being used must be followed The cleaning procedures provided herein pertain to the Lancer equipment identified by this manual If other equipment is being cleaned follow the guidelines established by the manufacturer for that equipment NOTE Before carrying out cleanings...

Страница 8: ...h a plastic sheet Servicing 1 Dispenser servicing is simple 2 After disconnecting the dispenser remove panels and clean inside parts especially condenser fins with a brush Dust reduces the performance of the machine so clean at least once a month ATTENTION The dispenser does not require oiling NOTE Any necessary repairs on the machine should be performed exclusively by an authorized repair center ...

Страница 9: ...oken 4 Compressor motor is broken 1 Replace main switch 2 Replace compressor protector 3 Replace compressor relay 4 Replace motor One bowl is not cooling 1 Gas leak into the cooling circuit 2 Condenser is clogged 3 Lack of air flow 4 Tube of the cooling circuit is clogged 5 Filter is clogged 1 Find leak filter it out and re charge the cooling circuit 2 Clean the condenser 3 Increase distance betwe...

Страница 10: ...10 ILLUSTRATIONS AND PART LISTINGS Main Unit Assembly ...

Страница 11: ...ANEL FRONT QUAD RBD 14 30 16568 PANEL FRONT QUAD BOWL MEGA RBD 15 91 4014 MOTOR FAN SINGLE BOWL 220 V RBD 15 91 4015 MOTOR FAN SINGLE BOWL 120 V RBD 15 91 4016 MOTOR FAN DBL TRPL BWL 3 2 GAL DBL QD BWL 5 3 GAL 120V RBD 15 91 4017 MOTOR FAN DBL TRPL BWL 3 2 GAL DBL QD BWL 5 3 GAL 220V RBD 15 91 4018 MOTOR FAN QUAD BOWL 3 2 GAL TRIPLE BOWL 5 3 GAL 120 V RBD 15 91 4019 MOTOR FAN QUAD BOWL 3 2 GAL TRI...

Страница 12: ... 2 0 A 340 W 1 3 HP High 250 psig 85 11124A GRY RBD 1100 115V 5 3GAL TRIPLE GRAY 50 Hz 7 0 A 730 W 1 3 HP Low 104 psig 85 11224A GRY RBD 1100 230V 5 3GAL TRIPLE GRAY 50 60 Hz 2 6 A 630 W 1 3 HP High 250 psig 85 11125A GRY RBD 1100 115V 5 3GAL MEGA 1 GRAY 50 Hz 7 0 A 730 W 1 3 HP Low 104 psig 85 11225A GRY RBD 1100 230V 5 3GAL MEGA 1 GRAY 50 60 Hz 2 6 A 630 W 1 3 HP High 250 psig 85 11126A GRY RBD ...

Страница 13: ...Evaporator E2 Evaporator E3 Evaporator D Distributor Ca Capillary 1 Unloading line 2 Liquid Line 3 Suction Line T Thermostat Soochee 6 1 6 2 X 1 Soochee 5 1 5 2 5 3 Soochee 3 1 3 2 3 3 3 4 Soochee X 2 Soochee 5 4 Soochee 3 2 5 2 6 1 X 1 Soochee 3 3 5 3 Soochee 3 4 5 4 6 2 X 2 ...

Страница 14: ...Lancer Corp 800 729 1500 Technical Support Warranty 800 729 1550 custserv lancercorp com lancercorp com ...

Отзывы: