

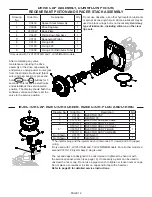
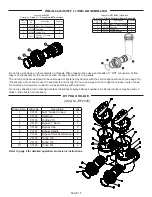


PAGE 9
Current time of day needs to be entered during initial installation, and adjusted when daylight saving time begins or ends.
If an extended power outage occurs and depletes the on-board non-rechargeable coin cell battery, when power resumes
the time of day should be reset and battery replaced.
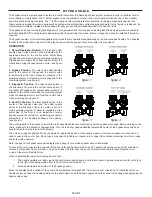
STEP 1
STEP 2
STEP 3
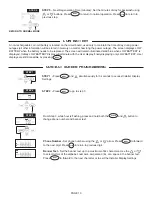
STEP 1
– Press
CLOCK
STEP 2
- Current Time (hour): Set the hour of the day using
or
buttons. AM/PM toggles
after 12. Press
NEXT
to go to Step 3.
STEP 3
- Current Time (minutes): Set the minutes of the day using
or
buttons. Press
NEXT to exit Set Time of Day. Press
REGEN
to return to previous step.
RETURN TO NORMAL MODE
SET TIME OF DAY
ADJUST DAYS BETWEEN BACKWASH,
OR TIME OF BACKWASH
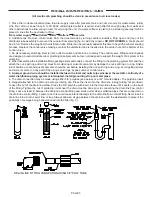
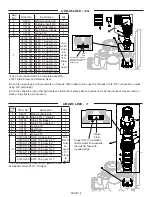
STEP 1
STEP 2
STEP 1
- Press
NEXT
and
simultaneously for 3 seconds to access Installer Display Settings.
STEP 2
– Day Override: Set the maximum number of days between backwashes (REGEN). If
value set to “OFF”, backwash initiation is based solely on volume used. If value is set as a number
(allowable range from 1 to 28) a backwash initiation will be called for on that day even if sufficient
volume of water were not used to call for a backwash. Set Day Override using
or
buttons:
• number of days between backwash (1 to 28); or
• “OFF”.
For 7-LXCTAIR and 7-LXIMAIR models,
STEP 2 Day Override is strongly recommended - to be set at 1 for daily backwashing in order to replenish the air pocket.
Press
NEXT
to go to step 3. Press
REGEN
to return to previous step.
STEP 3
– Next Regeneration Time (hour): Set the hour of day for backwash using
or
buttons. AM/PM toggles after 12. The default time is 12:00 AM (midnight). Press
NEXT
to go to
Step 5. Press
REGEN
to return to previous step.
STEP 3


