background image

PAGE 4

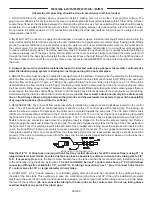
The control valve and fittings are not designed to support 

the weight of the system or the plumbing.
Do not use Vaseline, oils, other hydrocarbon lubricants or 

spray silicone anywhere. A silicone lubricant may be used 

on black o-rings but is not necessary. 

Avoid any type of 

lubricants, including silicone, on the clear lip seals.
Hydrocarbons such as kerosene, benzene, gasoline, 

etc.,  may  damage  products  that  contain  o-rings  or 

plastic components. Exposure to such hydrocarbons 

may  cause  the  products  to  leak.  Do  not  use  the 

product(s)  contained  in  this  document  on  water 

supplies that contain hydrocarbons such as kerosene, 

benzene, gasoline, etc.
This water meter should not be used as the primary 

monitoring  device  for  critical  or  health  effect 

applications.

The  V3151  nuts  are  designed  to  be  unscrewed  or 

tightened  by  hand  or  with  the  special  plastic  wrench 

(V3193). If necessary, pliers can be used to unscrew the 

nut. Do not use a pipe wrench to tighten or loosen nuts. 

Do not place a screw driver in the slots on nuts and/or tap 

with a hammer.
Do not use pipe dope or other sealants on threads. Use 

of pipe dope may break down the plastics in the control 

valve. Use Teflon tape on the threaded inlet, outlet and 

drain fittings. Teflon tape is not necessary on the V3151 

nut connection because of o-rings seals.
After  completing  any  valve  maintenance  involving  the 

drive  assembly  or  the  drive  cap  assembly  and  pistons, 

unplug power source jack from the printed circuit board 

(black wire) and plug back in or press and hold 

NEXT


and 

REGEN

 buttons for 3 seconds. This resets the electronics 

and establishes the service piston position. The display 

should flash the software version and then reset the valve 

to the service position.
Solder  joints  near  the  drain  must  be  done  prior  to 

connecting the drain line flow control fitting. Leave at least 

6” between the drain line control fitting and solder joints 

when  soldering  pipes  that  are  connected  on  the  drain 

line control fitting. Failure to do this could cause interior 

damage to the drain line flow control fitting.

Install grounding strap on metal pipes.

This  water  softener  is  not  to  be  used  for  treating 

water that is microbiologically unsafe or of unknown 

quality without adequate disinfection before or after 

treatment.

GENERAL INSTALLATION 

AND SERVICE WARNINGS

PRE-INSTALLATION

REVIEW

WATER  QUALITY:

  If  sand  or  sediment  is  present  in 

the  water  supply,  a  sediment  filter  should  be  installed 

ahead  of  the  water  softener.  Your  water  softener  has 

been  designed  to  adequately  reduce  hardness  from 

levels  up  to  100  grains  per  gallon.  Ferrous  bicarbonate 

iron  levels  up  to  0.5  ppm  can  also  be  reduced. This  is 

iron that is dissolved in water and not visible to the eye 

in a freshly drawn sample. After standing in contact with 

air,  the  ferrous  iron  will  become  oxidized  to  the  ferric 

state and start to precipitate as a reddish brown floc. It 

can be seen and may cause discolored water. Air must 

not come in contact with water until after it has passed 

through  the  water  softener.  In  some  cases,  additional 

treatment  equipment  prior  to  softening  may  be  needed 

to  treat  water  having  special  characteristics,  such  as: 

ferric  hydroxide  iron,  iron  bacteria,  low  pH,  tastes  and 

odors, etc. Consult your dealer if you have any questions. 

This  water  softener  is  not  to  be  used  for  treating 

water that is microbiologically unsafe or of unknown 

quality without adequate disinfection before or after 

treatment.


WATER PRESSURE: 

A minimum of 20 pounds of water 

pressure  (psi)  is  required  for  regeneration.  Maximum 

125 psi. CAUTION: the softener cannot be subject to a 

vacuum due to loss of pressure (such as a water main 

break or submersible well pump check valve failure).

WATER TEMPERATURE:

 The range of water temperature 

is 40°F to 110°F. DO NOT install any water softener with 

less than 10 feet of piping between its outlet and the inlet 

of a water heater. 

AMBIENT  TEMPERATURE: 

DO  NOT  locate  softener 

where  it  or  its  connections  (including  the  drain  and 

overflow lines) will ever be subject to room temperatures 

under 40°F.

ELECTRICITY:

 An  uninterrupted  120  volt  60Hz  outlet, 

within  15  feet  of  the  softener,  is  required. 

Make  sure 

electrical source is not on a timer or switch.

 All electrical 

connections must be connected according to local codes. 

The  plug-in  transformer  is  for  dry  locations  only.  Surge 

protection is recommended with all electrical connections.

DRAIN:

 All plumbing should be done in accordance with 

local  plumbing  codes.  The  distance  between  the  drain 

and  the  water  softener  should  be  as  short  as  possible. 

Correctly size drain line for the control valve’s drain line 

flow  control  GPM  rating  (see  installation  instructions). 

Avoid  elevating  the  drain  line  above  the  control  valve 

where possible (see installation instructions).

BYPASS: 

A  bypass  valve  should  be  installed  so  that 

water will be available if it should be necessary to shut off 

the pressure in order to service the softener.

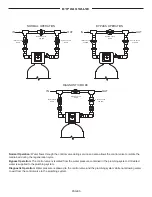
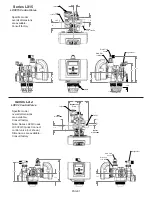
NORMAL OPERATION

BYPASS OPERATION

DIAGNOSTIC MODE

IN

OUT

IN

OUT

IN

OUT

INLET VALVE

OPEN

OUTLET VALVE

OPEN

BYPASS VALVE

CLOSED

INLET VALVE

CLOSED

OUTLET VALVE

CLOSED

BYPASS VALVE

OPEN

INLET VALVE

OPEN

OUTLET VALVE

CLOSED

BYPASS VALVE

OPEN

Click to buy NOW!

PD

F-XCHANGE

w

ww

.docu-track.c

om

Click to buy NOW!

PD

F-XCHANGE

w

ww

.docu-track.c

om

Содержание LX15 Series

Страница 1: ...ble care clear soft water will be the result For servicing and future inspection purposes please file this booklet with your important documents In the event that you need assistance for servicing your water softener please first contact the professional contractor who installed the system ELECTRONIC WATER SOFTENER WITH THE X FACTOR CONTROL VALVE COMMERCIAL SERIES LX15 LX2 LX2QC INSTALLATION OPERA...

Страница 2: ...DATE SERIAL NUMBER INSTALLER NAME PHONE ADDRESS TABLE OF CONTENTS Job Specifications 2 Inspection Resin Loading and Assembly 3 Pre Installation Review 4 General Installation and Service Warnings 4 Bypass Valve Operation 5 Installation Instructions Diagrams 6 9 Placing Softener into Service 10 General Operation 10 Set Time of Day 11 Adjust Hardness Days Between Regenerations or Time of Regeneration...

Страница 3: ...arately The U1007 funnel snaps into 4 and 6 mineral tank openings for stability when pouring gravel and resin The neck of the funnel allows air to escape the mineral tank while gravel and resin are poured in 5 Load the gravel support bed first followed by the resin While filling be careful to keep the riser pipe centered as best you can The resin beads tend to stick to the funnel Filling slowly wi...

Страница 4: ...sand or sediment is present in the water supply a sediment filter should be installed ahead of the water softener Your water softener has been designed to adequately reduce hardness from levels up to 100 grains per gallon Ferrous bicarbonate iron levels up to 0 5 ppm can also be reduced This is iron that is dissolved in water and not visible to the eye in a freshly drawn sample After standing in c...

Страница 5: ... PDF XCHANGE w w w docu track c o m BYPASS VALVE Normal Operation Water flows through the control valve during service and also allows the control valve to isolate the media bed during the regeneration cycle Bypass Operation The control valve is isolated from the water pressure contained in the plumbing system Untreated water is supplied to the plumbing system Diagnostic Operation Water pressure i...

Страница 6: ...line directly into a drain sewer line or trap Always allow an air gap between the drain line and the wastewater receptacle to prevent the possibility of sewage being back siphoned into the softener 5 REGENERATION The brine refill flow control assembly is installed in an easy to access refill elbow located on the control valve The LX15 series refill flow control assembly is attached to the 1 5 cont...

Страница 7: ... Threads Drain Port 1 1 2 NPT Units Are Shipped Without A DLFC Installed Injector Regenerant Line TOT C L 3 50 3 50 9 02 7 85 Drain Port 1 1 2 NPT Drain Flow Control Regenerant Series LX2 LXCV2 Control Valve Specific model overall dimensions are available Consult factory Specific model overall dimensions are available Consult factory Note Series LX2QC uses LXCV2QC Quick Connect control valve not s...

Страница 8: ...FLOW HEIGHT READ INSTALLATION INSTRUCTIONS INSTRUCTIONS SINGLE ONE WATER SOFTENER WITH METER ONE BRINE TANK REGENERATION INITIATION CHOICES METER IMMEDIATE METER DELAYED METER DELAYED IMMEDIATE DAYS OVERRIDE 1 28 AUXILIARY INPUT SEE CUSTOM PROGRAMMING AND APPLICATION MANUAL READ INSTALLATION INSTRUCTIONS REGARDING METER CONNECTION FLEXIBLE CONNECTORS ARE RECOMMENDED BETWEEN WATER SOFTENER AND SYST...

Страница 9: ...N LINES A B C METER SYSTEMS ORDERED WITH NHBP OPTION ARE FACTORY PRE PROGRAMMED FOR NHBP CONNECT NHBP MOTOR CABLE TO THE PC BOARD TWO PIN CONNECTOR LABELED MAV MTR BEFORE PLUGGING IN CONTROL VALVE A NHBP PROGRAMMED CONTROL VALVE MUST RECOGNIZE THE NHBP CONNECTION OTHERWISE ERROR CODE 106 WILL DISPLAY IF PROGRAMMING IS NECESSARY REFER TO CUSTOM PROGRAMMING AND APPLICATION MANUAL ALT A ALT B A PORT ...

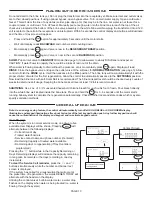
Страница 10: ... recommended The brine tank salt level should be checked every couple of weeks to determine salt usage Keeping the brine tank salt level at least 1 2 full is recommended SANITIZING Use 2 oz of 5 unscented household chlorine bleach for each cubic foot of resin Pour bleach directly into the white brine well located inside the brine tank Press and hold the REGEN for 5 6 seconds until the motor starts...

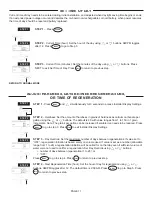
Страница 11: ... Set the amount of hardness in grains of hardness as calcium carbonate per gallon using the or buttons The default is 20 with value ranges from 1 to 150 in 1 grain increments Note The grains per gallon can be increased if soluble iron needs to be reduced Press NEXT to go to step 3 Press REGEN to exit Installer Display Settings STEP 3 Day Override Set the maximum number of days between regeneration...

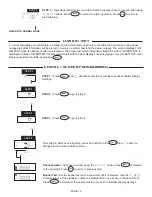
Страница 12: ...turn to previous digit Banner Text Set the banner text up to a maximum of 44 characters Use the or to select letters of the alphabet numbers ampersand or a space in the banner text Press NEXT to forward to the next character or to exit the Installer Display Settings STEP 1 STEP 2 STEP 3 STEP 4 A non rechargeable coin cell battery is located on the circuit board used only to maintain the time of da...

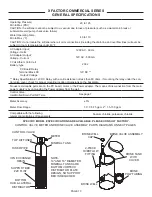
Страница 13: ... the backplate No user serviceable parts are on the PC board motor or the Power adapter The means of disconnection from the main power supply is by unplugging the Power adapter from the wall Control Valve Inlet Outlet Drain Port NPT size See page 7 Meter Accuracy 5 Meter Flow Range 1 5 0 5 75 gpm 2 1 5 150 gpm Compatible with the following typical concentrations of regenerants Sodium chloride pota...

Страница 14: ...o brine connection elbows adjustable float air check assembly with 60 riser 1 riser adapter and float rod guide Maximum Operating Pressure 125 psig 862 kPa Temperature Range 40 110 F 4 43 C PRODUCT FEATURES High flow rates in both refill and draw position Plastic valve and air check Brine Valve molded from composite plastics to ensure strength and durability Easily adjustable float design with loc...

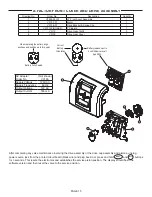
Страница 15: ...tery align positives and push down to fully seat Battery replacement is 3 volt lithium coin cell type 2032 Correct Battery Orientation 1 2 3 5 6 4 X FACTOR FRONT COVER AND DRIVE ASSEMBLY After completing any valve maintenance involving the drive assembly or the drive cap assembly and pistons unplug power source jack from the printed circuit board black wire and plug back in or press and hold NEXT ...

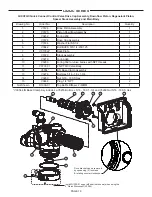
Страница 16: ... V3135 O ring 228 1 3 V3407 Piston Downflow Assembly 1 4 V3174 Regenerant Piston 1 5 V3423 Backplate Dowel 1 6 V3430 Spacer Stack Assembly 1 7 V3178LP Back Plate 1 8 V3419 O ring 347 1 9 V3641 O ring 225 for valve bodies with NPT threads 1 10 V3950 01 1 5 NPT Valve Body Gen 2 1 11 V3468 Test Port Plug 1 4 NPT 2 12 D1300 Top Baffle Diffuser 1 5 50MM 1 LX15 SERIES 12 5 4 3 1 11 10 9 2 8 6 7 ...

Страница 17: ...452 O ring 230 1 4 V3728 Drive Cap Assembly 1 5 V3724 Washer Flat SS 1 4 4 6 V3642 Bolt BHCS S S 1 4 20X1 25 4 7 V3178LP Back Plate 1 8 V3729 Stack Assembly 1 9 V3419 O ring 347 1 10 V3641 O ring 225 for valve bodies with NPT threads 1 11 V3700 01 2 NPT Valve Body 1 12 V3468 Plug 1 4 NPT 2 13 D1300 Top Baffle Diffuser 1 5 50MM 1 1 13 9 10 11 8 7 5 4 3 6 2 12 Drive bracket can be removed by squeezi...

Страница 18: ...29 Stack Assembly 1 9 V3279 O ring 346 1 10 V3280 O ring 332 for valve bodies with NPT threads 1 11 V3737 01 2 NPT QC Valve Body 1 12 V3054 4IN Base Clamp Assembly 1 13 V3276 Bolt Hex 5 16 18 x 1 3 4 1 14 V3269 Nut 5 16 18 SS Hex 1 15 V3468 Plug 1 4 NPT 2 Not Shown D1300 01 Top Baffle Diffuser 2 63MM 1 V3054 4IN Base Clamp Asy includes a V3276 Bolt Hex 5 16 18 X 1 3 4 and V3269 Nut 5 16 18 SS Hex ...

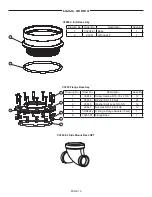
Страница 19: ...48 1 V3055 Flange Base Asy Drawing No Order No Description Quantity 1 V3444 Screw Hexcap 5 16 18 x 2 SS 12 2 V3293 Washer SS 5 16 Flat 24 3 V3445 Washer Split Lock 5 16 SS 12 4 V3447 Nut Hex 5 16 18 Full SS 12 5 COR60FL O Ring 6 Flange Adapter Park 1 6 V3261 01 Flange Base 1 V3260 02 Side Mount Base NPT 2 1 3 6 5 1 2 4 ...

Страница 20: ...ly 0 5 GPM 1 11 V3163 O ring 019 1 12 H4612 Regenerant Elbow w Flow Control 1 13 JCPG 8PBLK Nut Compression 1 2 Black 1 14 JCP P 8 Insert Polytube 1 2 1 15 V3182 Refill Flow Control 0 5 GPM 1 16 H4615 Retaining Clip 1 17 V3724 Washer Flat Stainless Steel 4 18 V3642 Bolt BHCS Stainless Steel 1 4 20x 1 1 4 4 19 V3195 01 Refill Port Plug 1 Contains a V3182 0 5 gpm flow control V3968 contains one D124...

Страница 21: ... Ring 211 1 13 V3105 O Ring 215 1 14 V3150 Split Ring 1 15 V3151 Nut 1 QC 1 16 V3149 FTG 1 PVC Male NPT Elbow for Models LX2 LX 2QC 450 thru 1200 1 Not Shown V3189 FTG 3 4 1 PVC SLVNT 90 for Models LX2 LX 2QC 120 thru 300 1 Use H4915 fitting kit for 1 2 O D polytube connection If brine tube length exceeds 6 feet use H4916 fitting kit for 5 8 polytube connection increasing polytube size to 5 8 O D ...

Страница 22: ...y C Stamped C 24 V3010 2D 2 Injector Assembly D Stamped D 30 V3010 2E 2 Injector Assembly E Stamped E 36 V3010 2F 2 Injector Assembly F Stamped F 42 V3010 2G 2 Injector Assembly G Stamped G 48 V3010 2X 15X Injectors contain V3010 15 2 injector adapter with 1 5 injector inside V3010 2X injectors and the V3010 15ADAPTER contain V3283 O RING 117 and a V3284 O RING 114 The V3010 15 ADAPTER can be used...

Страница 23: ... 1 4 V3150 WS1 Split Ring 1 5 V3105 O ring 215 1 6 V3163 O ring 019 1 7 H4615 Locking Clip 1 8 V3983 WS2 DLFC Adapter 1 9 V3190 xx See DLFC Section 1 Inline Plastic 9 25 GPM MxF Stainless Steel 9 85 GPM 3 2 6 4 5 1 Direction of Flow 2 5 4 6 1 3 9 8 7 Direction of Flow All drain line ow control housings are shipped without ow control washers See drain line ow control washer section for available ow...

Страница 24: ...ng Drain Line Flow Control Disassembly and Inspection Depending on the flow control installed on the unit remove the red plastic retaining clip plastic flow control or the 4 screws stainless steel flow control to expose the flow control and retainer The flow controls can be removed by flexing the washer with a small screwdriver being careful not to mar the plastic seat The flow control and retaine...

Страница 25: ...rbine by 1 Turn the bypass for the system on and relieve the pressure on the system before removing the meter 2 Press downward on the remote meter assembly to relieve tension on the retaining clip V3632 Remove the clip and take the meter assembly out of the housing 3 Remove the bend from the two exposed tips of the retaining clip V3501 and remove clip 4 Service or replace the V3118 03 WS15 2 Turbi...

Страница 26: ... wires off the motor Visually inspect the motor for free spinning and remaining brush life visible through slots on the side of the motor Check the pinion gear for endplay If the pinion gear is pushed tight against the motor housing eliminating endplay slide it away from the housing so the end of the shaft is flush with the end of the gear The PC board can be removed separately from the drive brac...

Страница 27: ...embly must be removed to access the piston s The drive cap assembly is threaded into the control valve body and seals with an o ring To remove the drive cap assembly use the special plastic wrench V3193 02 Figure 1 or insert a to flat bladed screwdriver into one of the slots around the top 2 of the drive cap assembly so it engages the notches molded into the drive backplate around the top 2 of the...

Страница 28: ...e and connect all plugs After completing any valve maintenance press and hold NEXT and REGEN buttons for 3 seconds or unplug power source jack 4 pin black cable and plug back in This resets the electronics and establishes the service piston position The display should flash all wording then flash the software version and then reset the valve to the service position 4 Spacer Stack Assembly Disassem...

Страница 29: ...ontrol o ring on the flow control retainer or the o ring on the fitting Reassembly Insert the flow control into its seat confirming correct flow control orientation Reseat the flow control retainer and reassemble the fitting see diagram in the exploded view section Do not use Vaseline oils or other unacceptable lubricants on o rings A silicon lubricant may be used on the o ring on the elbow or the...

Страница 30: ...meter f Defective PC Board f Replace PC Board 4 Control valve regenerates at wrong time of day a Power outage a Reset time of day If PC Board has battery back up present the battery may be depleted See Front Cover and Drive Assembly drawing for instructions b Time of day not set correctly b Reset to correct time of day c Time of regeneration set incorrectly c Reset regeneration time d Control valv...

Страница 31: ...f possible increase pump switch cut in to 25 psi b Incorrect injector size b Replace injector with correct size for the application c Restricted drain line c Check drain line for restrictions or debris and clean 11 Excessive water in regenerant tank a Improper program settings a Check refill setting b Plugged injector b Remove injector and clean or replace c Drive cap assembly not tightened in pro...

Страница 32: ... NEXT and REGEN buttons for 3 seconds to resynchronize software with piston position or disconnect power supply from PC Board for 5 seconds and then reconnect c Main drive gear too tight c Loosen main drive gear Press NEXT and REGEN buttons for 3 seconds to resynchronize software with piston position or disconnect power supply from PC Board for 5 seconds and then reconnect d Improper voltage being...

Страница 33: ...n reconnect c MAV NHBP motor not fully engaged with reduction gears c Properly insert motor into casing do not force into casing Press NEXT and REGEN buttons for 3 seconds to resynchronize software with piston position or disconnect power supply from PC Board for 5 seconds and then reconnect d Foreign matter built up on piston and stack assemblies creating friction and drag enough to time out moto...

Страница 34: ...PAGE 34 NOTES ...

Страница 35: ...PAGE 35 ...

Страница 36: ...PAGE 36 A DIVISION OF C B TOOL CO 1340 MANHEIM PIKE LANCASTER PA 17601 3196 TEL 717 397 3521 FAX 717 392 0266 www lancasterwatergroup com E mail info lancasterwatergroup com 4 20 ...

Отзывы: