38
Call 1-888-370-6531 for Technical Support
8.3 Chimney Flue Installation Instructions
Flue Installation Instructions
(Kit #: 81010010 - Thru the Roof, Rubber Boot)
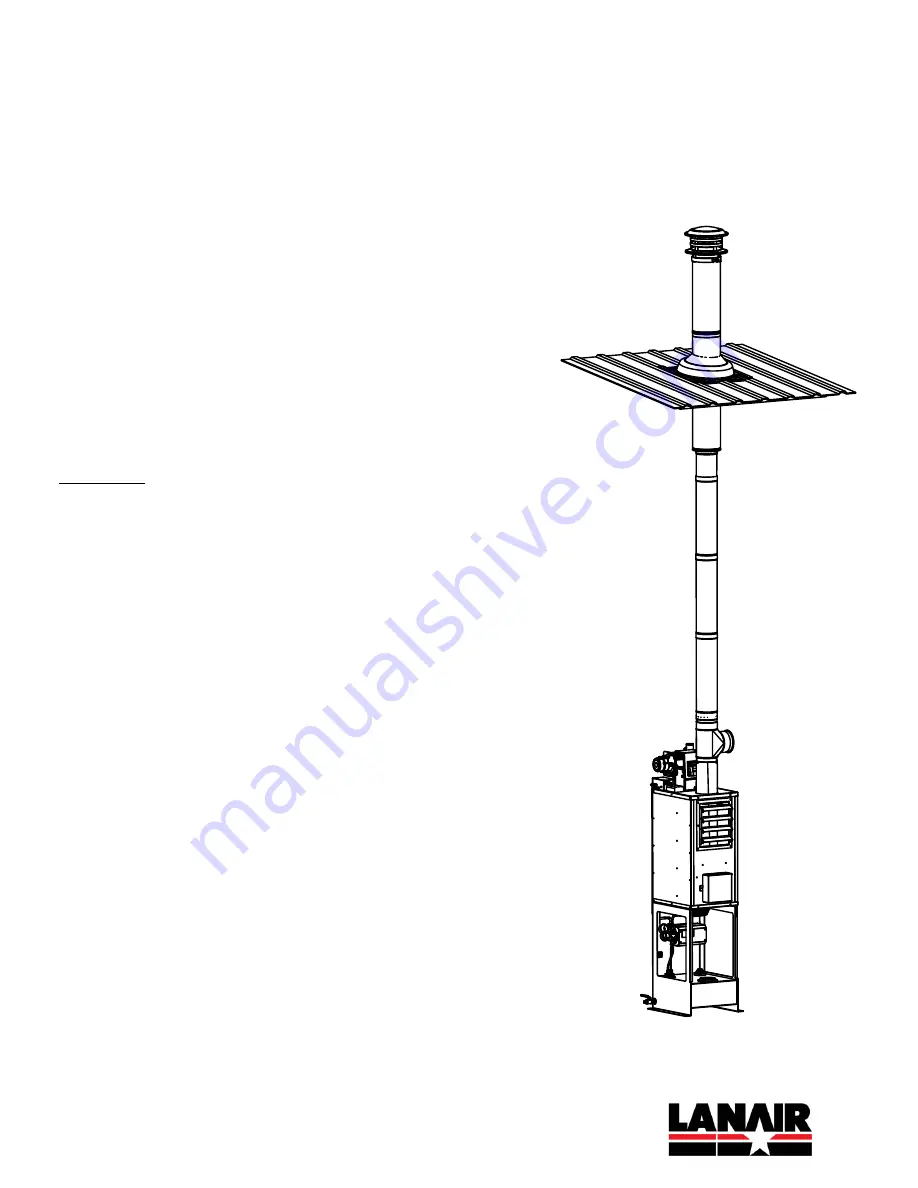
These instructions describe how to install the flue kit directed vertically
from the heater outlet directly through the roof (up to 16’ from floor) and
supported on the exterior by the roof. If your installation situation
differs (such as flue passing through ceiling or attic space, non-vertical
segments, or interior support required) please contact Technical Support
for additional parts and installation instructions. Refer to the diagram on
page 4 for the parts supplied.
Please read and understand the Installation and Operation Manual that
was provided with your heater completely before attempting to install
or operate your equipment.
WARNING: Flue installation should only be attempted by qualified
personnel. Use appropriate equipment and safety measures when
working at heights.
If you need to run your flue through the wall, rather than through the
roof as shown in these instructions, a thru-the-wall flue kit will be
required. If you did not purchase one, please contact technical support
to order the additional parts needed.
INSIDE
1.
Locate the heater on the floor and ensure a minimum clearance of 6
inches between the back of the heater cabinet and the wall. Ensure
there is a clear path from the exhaust outlet on top of the heater to
the roof. NOTE that there must be 18 inches of clearance between
single wall (black pipe) and anything combustible, and 2 inches of
clearance between double-wall pipe and anything combustible.
OUTSIDE (ON ROOF)
2.
Confirm that there are no obstructions in the area where the flue
will exit the building. Ensure there are no vents or air intakes near
the flue exit location that could draw exhaust into the building.
NOTE that the flue must extend 2 feet higher than anything within
10 feet of it.
INSIDE
3.
Using a plumb line, locate the point on roof directly vertical from the exhaust outlet on the heater. Drill a pilot
hole through roof. If the roof has ridges, try to center on a ridge or between two ridges.
Содержание 81010751
Страница 2: ......
Страница 41: ...8 Appendices 8 1 Wiring Diagram ...
Страница 42: ......
Страница 43: ...34 Call 1 888 370 6531 for Technical Support 8 2 Primary Control Instructions ...
Страница 44: ...35 Call 1 888 370 6531 for Technical Support Not used with RES 75 kBTU h units ...
Страница 45: ...36 Call 1 888 370 6531 for Technical Support No latch up with RES 75 kBTU h units ...
Страница 46: ...37 Call 1 888 370 6531 for Technical Support ...


