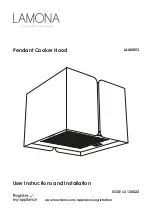
background image

3

Exclusive to Howdens

Dear Customer
Congratulations on your choice of 

LAMONA


domestic appliance.

 Please read these instructions before use to 

ensure safe and economical operation of 

the appliance.

 Please keep these instructions in a safe 

place for your future reference.

 If you have any questions, or if you are not 

sure about any information contained in this 

booklet please contact us - details at the 

end of the booklet

.

This appliance is intended to be used  

in household and similar domestic 

applications, see guarantee page for 

Welcome

Warning and Safety information 

p.4

Before using the cooker hood 

p.4

Metal surfaces of the cooker hood and 

condensation 

p.4

SAFETY 

p.4

General safety 

p.4

Children and general safety 

p.5

Safety when working with electricity 

p.5

Electrical connections 

p.5

Waste Electrical and  

Electronic Equipment 

p.5

Danger of toxic fumes 

p.5

Contents

1. Cooker hood overview


p.6

Control panel overview 

p.6

2. Installation


p.7

Methods of extraction 

p.7

Ducting mode 

Recirculation mode 

Installing the cooker hood 

p.9

Electrical connection 

p.14

3. Operating the cooker hood


p.15

Control panel 

p.15

4. Care and Maintenance


p.16

General cleaning 

p.16

Replacing lamps 

p.17

5. Problem Solving

7. Guarantee


p.19

Important  

information or useful 

hints and tips,

Warning for hazardous 

situations with regard 

to life and property.

Warning for  

electric shock.

Throughout this manual the 

following symbols are used.

Содержание LAM2853

Страница 1: ...User Instructions and Installation LAM2853 www howdens com appliance registration Pendant Cooker Hood ISSUE v2 120422...

Страница 2: ......

Страница 3: ...tal surfaces of the cooker hood and condensation p 4 SAFETY p 4 General safety p 4 Children and general safety p 5 Safety when working with electricity p 5 Electrical connections p 5 Waste Electrical...

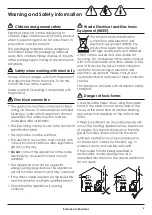
Страница 4: ...es Commercial use will void the guarantee The manufacturer shall not be liable for any damage caused by improper use installation or handling errors General safety This product is not intended to be u...

Страница 5: ...The appliance must not be used with energy saving plug devices The appliance will not function correctly and may overheat If the mains cable needs to be replaced this Check that the appliance is work...

Страница 6: ...6 www howdens com Lamp Power Speed 1 Speed 2 Speed 3 LED indicator Light Light Cooker hood body Control panel 1 Cooker hood overview Control panel overview...

Страница 7: ...ventilation can be guaranteed There must be adequate ventilation in the room when the cooker hood is used at the same time as an appliance burning gas or other fuels Connect the external ducting kit...

Страница 8: ...www howdens com FRONT FRONT Electric cable hole FRONT On opening the packaging remove and identify each component part Carefully place each part on a clean scratch free surface Do not component parts...

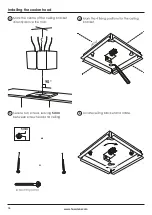
Страница 9: ...in overheating and serious damage to your appliance It is recommended that the installation is carried out by two people 2 Maximum distance to ceiling 1 Minimum distance above hob Before drilling or c...

Страница 10: ...om 90 FRONT 5mm Installing the cooker hood 5 Secure two screws leaving 5mm between screw head and ceiling 6 Locate ceiling bracket and rotate 3 Mark the centre of the ceiling bracket directly above th...

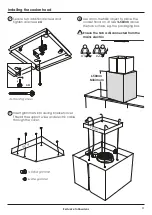
Страница 11: ...screws and tighten all screws x4 9 Insert grommets into ceiling bracket cover Thread the support wires and electric cable through the cover 8 Use a non metallic object to place the cooker hood on at...

Страница 12: ...ceiling bracket x4 10b Thread back into the inside of the ceiling bracket 10a Thread from the inside of the ceiling bracket 11a Adjust the support wires 11b Ensure cooker hood is level 11 Adjust the...

Страница 13: ...x4 12a Fit screws to secure 12 Secure the support wires 13 Connect electric cable The electric cable should be connected 14 Position the ceiling bracket cover Do not trim the support wires Installing...

Страница 14: ...same time The terminations labelled SUPPLY are the connections for the internal house wiring and the terminations labelled LOAD are for connection to the appliance IMPORTANT The wires in the mains le...

Страница 15: ...or Power Speed 1 Press button to switch cooker hood On Off LED shows green Speed 2 Press button to activate speed 2 LED shows red Speed 3 Press button to activate speed 3 LED shows red Lamp Press lamp...

Страница 16: ...anty months or sooner depending on the type of cooking being performed should be washed regularly using a neutral detergent to crockery and kitchen utensils before reinstalling on the hood 1 Push latc...

Страница 17: ...etaining clip Install by reversing the process Reconnect the power supply Replacing lamps The lamps on this model are and replacement should be carried out by an authorised service agent which will gi...

Страница 18: ...ype of food being cooked and the duration Using lids on pans can help reduce the amount of steam being released and subsequent condensation TECHNICAL INFORMATION General Total power consumption 272 W...

Страница 19: ...idental damage misuse or alterations which are likely to affect the product The guarantee is invalid if the product is tampered with or repaired by any unauthorised person The guarantee in no way affe...

Страница 20: ...any has a policy of continuous product development and manual Subject to the Terms and Conditions of Trading a copy of the Howdens Terms and Conditions is available upon request Copyright 2022 Howden...

Отзывы: