Camera Handheld PTZ-FALCON PTZ
User Manual
Страница 1: ...Camera Handheld PTZ FALCON PTZ User Manual ...
Страница 2: ...obe Reader Windows users can use the shortcut key Ctrl F and Mac users can use Command F to search for keywords Click the Catalog to jump Users can understand the content structure of the document through the catalog and click on the title to jump to the corresponding page Print document This document supports high quality printing ...
Страница 3: ... all the items in the FALCON PTZ package according to the Item List Please read the User Manual carefully and Watch the instructional video on the FALCON PTZ product page of the official website http www szlaing com Read the Disclaimer and Safe Operation Guidelines carefully to understand your legal rights and responsibilities If you have any questions or problems in the process of installing usin...
Страница 4: ...4 Know FALCON PTZ 5 Handheld PTZ 5 Preparation 6 Install the adjustment bracket 6 Assemble the handheld PTZ 6 Place the PTZ on the adjustment bracket 7 Install the camera 7 tilt axis adjustment 8 Adjust Balance 9 Preparation for adjustment 9 Tilt axis adjustment steps 9 Roll axis adjustment steps 10 Precautions for use 11 Safety Use 11 Maintenance 11 After sales service 11 ...
Страница 5: ...ontrol mode and thestability of the Steadicam arm but the load is only half of Steadicam You can also choose the Easyrig hanger method to make shooting creation more convenient Features 1 Zero gravity gimbal control precision 2 Three axis motion isolation can independently control the pan tilt and roll 3 Adapt to small and large cameras 4 Seamless switching between mobile shooting and fixed camera...
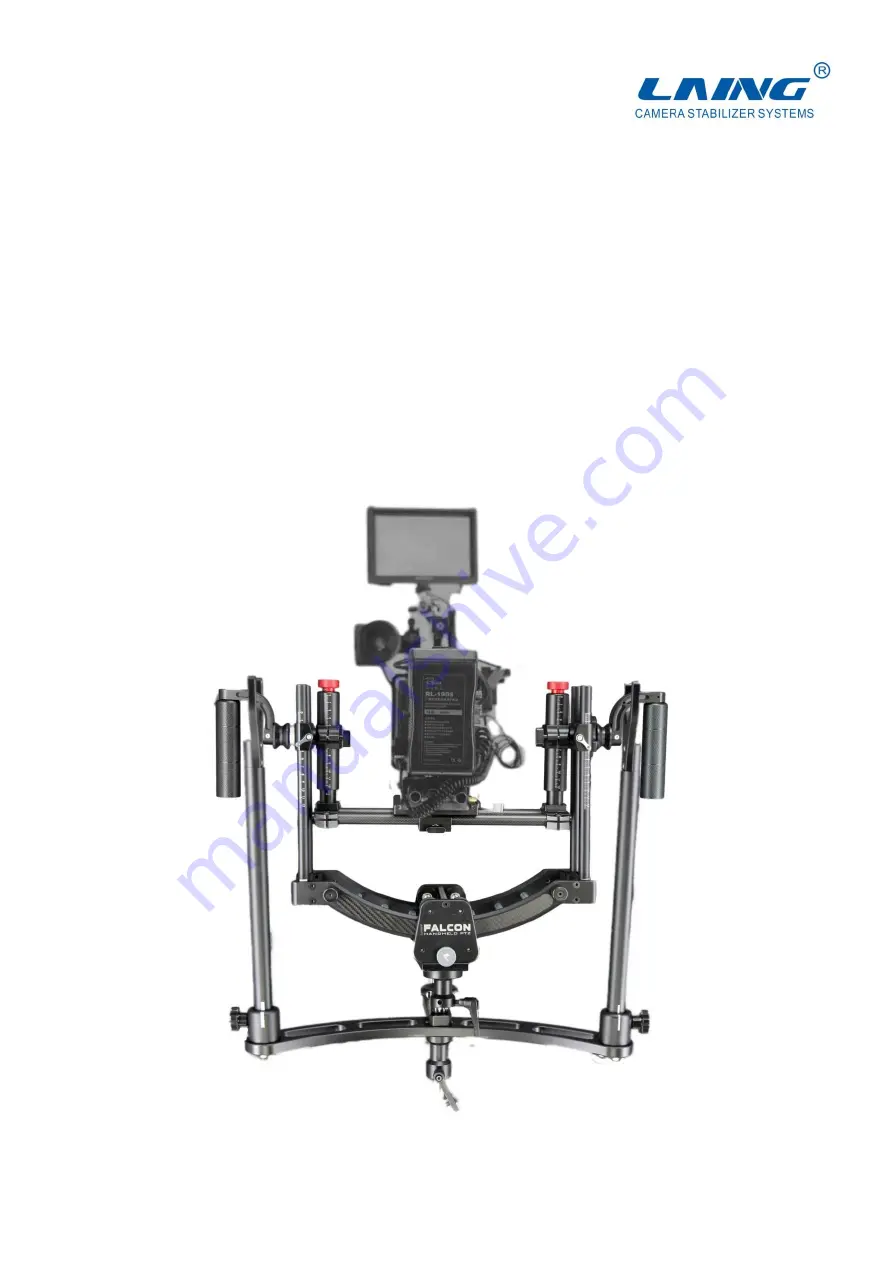
Страница 6: ...ke and damping adjus tment Pan Tilt Center Position Locking Pin Roll Drop rate adjustment the center of gravity can be adjusted up and down while working Bottom Reversible Handle Removable interchangable with knobs included Item List Product Name FALCON PTZ Model FALCON PTZ Quantity 1 Unit Item Part Name Unit QTY Notes Standard option 1 Handheld PTZ set 1 Standard 2 Adjusting bracket set 1 Standar...
Страница 7: ... Arm pin locking screw 5 Lifting adjustment button 6 Lifting fixed button 7 Tilt fixed button 8 Plate locking 9 Base fixed button 10 Bracket bearing 11 Tilt limited block 12 Roll positioning button 13 Tilt damping adjustment button also can lock tilt 14 Anti dropping pin for the plate 2 5 6 7 1 4 3 11 9 10 ...
Страница 8: ...port post on both sides of the bottom plate and the reference lines should be aligned the thickness of the reference lines of the two support post are inconsistent so don t install it wrong Assemble the handheld PTZ 1 The handheld PTZ is separated into several parts and placed in the protective box as shown in the picture and needs to be assembled before use 2 Take out the component 1 and place it...
Страница 9: ...s the picture Install the camera FALCON PTZ is available for the most of majority of cameras on the market Installation steps 1 Firstly take out the plate and select the corresponding camera fixing screw camera fixing screw 3 8 16 or 1 4 20 install the plate at the bottom of the camera Adjust the position of the plate according to the center of gravity of the camera For example if the center of gr...
Страница 10: ...l lock and make the plate lock you will hear a click As shown in Figure 3 d The camera and plate can be moved back and forth to adjust the balance the safety block can prevent the camera from sliding out fastened and locked As shown in Figure 4 Tilt axis adjustment If you find that the up down space is insufficient when installing the camera you can adjust the tilt axis and the up down position of...
Страница 11: ...e lens cap and insert the memory card complete all the connections and ensure that the camera is fully prepared for shooting otherwise the balance effect will be affected 3 In the process of adjusting the balance make sure that the power of the camera is turned off Step1 Tilt axis adjustment 1 Loosen the tilt axis lock and rotate the left and right adjustment knobs at the same time Clockwise the c...
Страница 12: ...pan axis and loose the base fixing button If the camera tilts to the left the base moves to the right otherwise it moves to the left 2 Tighten the fixing knob Tilt the camera 45 to the left or right if the camera can stay steadily it means that the balance has been adjusted Loose ...
Страница 13: ...parts 3 The equipment connection top stage and component installation place should be kept clean If there is debris or oil residue on the connection of the equipment after disconnecting the power wipe it with a damp cloth dampened with a neutral detergent Do not wipe with a rough surface or corrosive detergent or scrape with a knife to avoid damage the protective layer of the surface Product after...
Страница 14: ... 2021 鸾翼科技 版权所有 This manual is subject to update without notice You can check the latest version of User Manual on the official website of Laing http www szlaing com ...