4. OPERATION
27
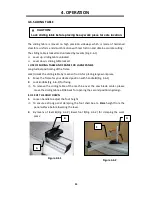
4-2. SCORING BLADE ADJUSTING
I.
SCORING BLADE HEIGHT ADJUSTING
1.
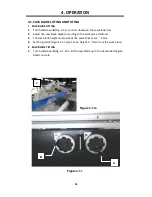
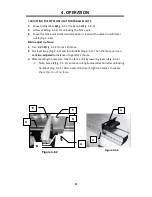
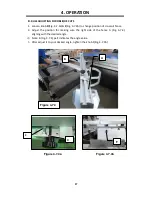
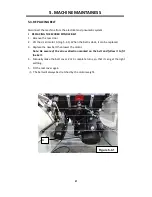
Loosen nut
A
(Fig. 4-2.1)
2.
Turn the knob
B
(Fig. 4-2.1) till the scoring blade has reached to the height
desired, then tighten nut
A
(Fig. 4-2.1)
3.
The projection adjusting range varies from 0 to 5mm
※
NOTE: When it is not necessary to use the scoring blade, make it lower than the
table.
II.
ALIGHING THE SCORING BLADE WITH THE SAW BLADE
:
1.
The operator has to do some cutting tests.
2.
Loosen nut
C
(Fig. 4-2.1)
3.
Turn draw bar
D
(Fig. 4-2.1) to the desired position, and tighten nut
C (
Fig. 4-2.1)
turn clockwise, the scorer move to left turn counter clockwise , the scorer move
to right
4.
The range for traverse adjustment of the scorer is approx. +/-2mm
※
NOTE: Test cut to check the alignment is necessary.
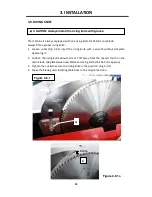
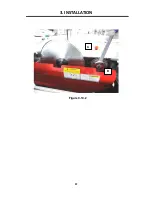
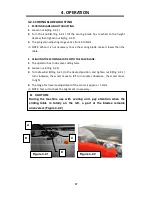
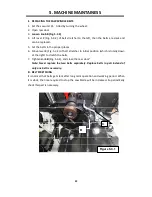
CAUTION:
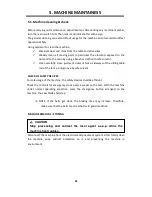
During the machine use with scoring unit, pay attention when the
sliding table is totally on the left, a part of the blades remains
uncovered. (Figure 4-2.2)
Figure 4-2.1
A
B
D
C
Figure 4-2.2
Содержание P12 10
Страница 26: ...3 INSTALLATION 22 Figure 3 10 2 D C ...
Страница 52: ......
Страница 53: ......
Страница 54: ...MPSP12 10 0135 ASSEM 1 1 23 1 ...
Страница 58: ...MPSP12 10 0135 ASSEM 1 2 4 5 ...
Страница 60: ...MPSP12 10 0135 ASSEM 3 1 5 7 ...
Страница 63: ...MPSP12 10 0135 ASSEM 3 2 6 10 ...
Страница 65: ...MPSP12 10 0135 ASSEM 3 3 5 12 ...
Страница 67: ...MPSP12 10 0135 ASSEM 4 10 14 ...
Страница 69: ...MPSP12 10 0135 ASSEM 5 7 16 ...
Страница 72: ...MPSP12 10 0135 ASSEM 6 1 19 ...
Страница 74: ...MPSP12 10 0135 ASSEM 6 2 21 ...
Страница 76: ...MPSP12 10 0135 ASSEM 6 3 23 ...
Страница 78: ...MPSP12 10 0135 ASSEM 7 6 3200mm 25 ...
Страница 80: ...MPSP12 10 0135 ASSEM 8 1 27 ...
Страница 82: ...MPSP12 10 0135 ASSEM 9 3 29 ...
Страница 85: ...MPSP12 10 0135 ASSEM 10 3 32 ...
Страница 89: ...MPSP12 10 0135 ASSEM 12 6 4 36 ...
Страница 92: ...MPSP12 10 0135 ASSEM 12 10 39 ...
Страница 98: ...MPSP12 10 0135 ASSEM 14 4 5 45 ...

