background image

55

55

55

USE OF THE UNIT


Take the vat out of freezer. Warning: do not touch the inside of 
the frozen vat with your fi ngers if they are wet because they 
can stick to the metal. Use a dry cloth.


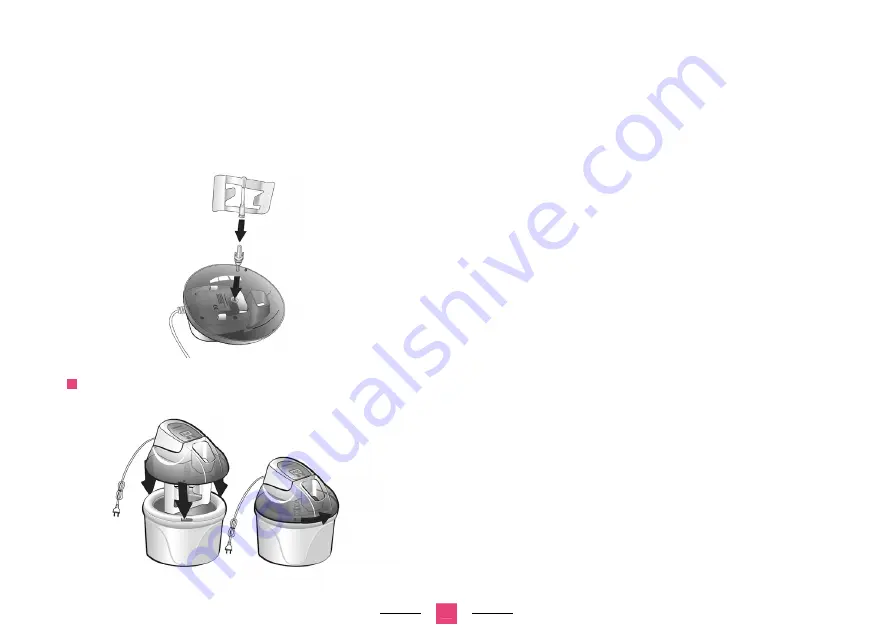
Put the blade in place.


  Lock in the cover with motor block on the vat.


Plug in the unit.


Press the on/off button.


Select the preparation time. To do this, successively push the 
time adjustment button which ranges from 5 to 45 minutes. 
With each pressing of the button, 5 minutes are added to the 
preparation time. By default, the screen displays 40 minutes.  


  30 to 40 minutes are needed for the preparation to set.


NB: the outside temperature has an impact on the ice 
cream setting time. The hotter it is, the longer it will 
take the ice cream to set. The recipe, the preparation 
quantity and the initial temperature of the preparation 
will also have an impact on the preparation time.


Once the time has been chosen, the blade will start turning 
3 seconds later.


The preparation time remaining will then be displayed on 
the screen and the preparation will thicken.    


Pour the preparation, previously refrigerated, through the opening 
located on the cover. 

Warning: do not pour the preparation 

unless the blade is turning to avoid the preparation 
sticking to the walls.


  Only fi ll the vat half full, because the volume of the preparation 

will increase. 

Warning: never put your fi ngers or a utensil 

into the opening on the cover.


You can add, when you want to, chocolate chips, fruit, small 
pieces of cookies, etc. during the preparation, through the 
opening of the cover. 

Содержание Sorbetiere

Страница 1: ...C est moi qui l ai fait Mode d emploi Gebruiksaanwijzing Betriebsanleitung Istruzioni per l uso Modo de empleo Instruction book...

Страница 2: ...clairage 3 Bouton d part arr t 4 Bouton de r glage du temps 5 Couvercle avec ouverture 6 Axe 7 Pale 8 Cuve Contenance 1 5 L 9 Couvercle de stockage 10 Cordon 11 Patins antid rapants 12 Cuill re glace...

Страница 3: ...d une personne responsable Ne pas laisser pendre le cordon port e de main des enfants V rifier que le c blage de votre installation lectrique est compatible avec celui de l appareil Il est recommand d...

Страница 4: ...atts CORDON Il faut examiner attentivement le c ble d alimentation avant toute utilisation Si celui ci est endommag il ne faut pas utiliser l appareil Le cordon ne doit tre remplac que par son service...

Страница 5: ...u moins 12 heures La cuve doit tre stock e verticalement pour une bonne r partition du liquide de cong lation Sortez la cuve au dernier moment une fois votre pr paration pr te et r frig r e Pour savoi...

Страница 6: ...renne Attention la temp rature ext rieure a une influence sur le temps de prise de la glace Plus il fera chaud plus la glace mettra du temps pour prendre La recette la quantit de pr paration ou encore...

Страница 7: ...evient trop paisse le sens de rotation de la pale va s inverser Si cela se r p te sans interruption arr ter l appareil c est que la glace est pr te Attention si le moteur est en surchauffe l appareil...

Страница 8: ...cles avec de l eau ti de et savonneuse Ne pas laver les l ments au lave vaisselle Bien s cher chaque l ment Attention bien s cher l int rieur de la cuve avant de la remettre au cong lateur En effet s...

Страница 9: ...sucre ter les gousses de vanille de la casserole Ajouter progressivement le m lange lait et cr me au m lange ufs et sucre en fouettant Verser dans la casserole et faire cuire le m lange feu doux sans...

Страница 10: ...es amandes et les pistaches s par ment au four 15 minutes 160 C Les laisser refroidir et moudre finement Ajouter le sucre M langer Ajouter l huile et m langer jusqu ce que le m lange soit parfaitement...

Страница 11: ...s muni d une grille fine craser les cerises afin d obtenir une pur e fine et liminer les morceaux de peau Dans une casserole pr parer le sirop en portant bullition l eau et le sucre puis laisser refro...

Страница 12: ...scherm met achtergrondverlichting 3 Knop start stop 4 Knop voor tijdregeling 5 Deksel met opening 6 As 7 Blad 8 Bak Inhoud 1 5L 9 Bewaardeksel 10 Stroomkabel 11 Anti slip strips 12 IJslepel IJsmachin...

Страница 13: ...et snoer niet binnen bereik van kinderen hangen Controleer of de bekabeling van uw elektriciteitsinstallatie compatibel is met die van het apparaat Wij adviseren u het apparaat aan te sluiten op een a...

Страница 14: ...leen 230 Volt 50Hz 12 Watt STROOMKABEL Controleer de stroomkabel zorgvuldig voor elk gebruik Gebruik het apparaat niet met een beschadigde stroomkabel Om elk risico voor de gebruiker te vermijden mag...

Страница 15: ...al geplaatst worden voor een goede verdeling van de koelvloeistof Haal de bak op het laatste moment uit de vriezer nadat uw mengsel klaar en gekoeld is Schud de bak om te horen of de koelvloeistof goe...

Страница 16: ...js klaar is Let op de omgevingstemperatuur heeft invloed op de bereidingstijd van het ijs Hoe warmer het is hoe langer de bereidingstijd Het recept de hoeveelheid en de begintemperatuur van ijsmengsel...

Страница 17: ...het apparaat dan uit het betekent dat het mengsel dik genoeg dus klaar is Let op als de motor oververhit raakt zal het apparaat op de veiligheidsstand overschakelen en stoppen Zet het apparaat in dit...

Страница 18: ...schoon met lauwwarm zeepsop Reinig de onderdelen niet in de vaatwasser Maak elk onderdeel goed droog Let op dat u de binnenkant van de bak goed droog maakt voordat u deze terugplaatst in de vriezer Al...

Страница 19: ...en Klop in een kom de eigelen met de suiker op Verwijder de vanillestokjes uit de pan Voeg geleidelijk al kloppend het room melkmengsel toe aan de eigelen met de suiker Giet dit in de steelpan en warm...

Страница 20: ...Rooster de amandelen en pistachenoten gescheiden in de oven 15min op 160 C Laat ze afkoelen en maal ze fijn Voeg de suiker toe Meng het geheel Voeg de olie toe en meng goed tot er een homogene massa...

Страница 21: ...en door een fijne roerzeef om een gladde puree te krijgen zonder velletjes Maak in een steelpan de suikersiroop door het water en de suiker aan de kook te brengen en laat deze afkoelen Meng de gepuree...

Страница 22: ...mit Hintergrundbeleuchtung 3 Ein Aus Knopf 4 Zeitschalter 5 Deckel mit ffnung 6 Achse 7 Schaufel 8 Beh lter Inhalt 1 5L 9 Aufbewahrungsdeckel 10 Schnur 11 Rutschfeste Unterlagen 12 Eisl ffel Speiseeis...

Страница 23: ...on benutzen Die Ger teschnur nicht in Kinderh he h ngen lassen Kontrollieren Sie ob Ihre Stromanlage mit den Ger temerkmalen bereinstimmt Wir empfehlen das Ger t an eine Anlage mit einer Reststromdiff...

Страница 24: ...l ffel aus Edelstahl mit Polypropylengriff 230 Volt 50Hz 12 Watt GER TESCHNUR Vor jedem Gebrauch das Stromkabel aufmerksam kontrollieren Wenn es besch digt ist darf das Ger t nicht benutzt werden Um G...

Страница 25: ...eh lter senkrecht gestellt werden Den Beh lter erst im letzten Moment herausnehmen wenn Ihre Eiszubereitung fertig und vorgek hlt ist Sie k nnen feststellen ob der Eisbeh lter ausreichend gefroren ist...

Страница 26: ...eitung werden 30 bis 40 Minuten ben tigt Achtung auch die Au entemperatur beeinflusst das Festwerden des Eises Je w rmer es ist umso mehr Zeit braucht das Eis zum Festwerden Rezept Zubereitungsmenge u...

Страница 27: ...g des Motors zu verhindern wenn die Eismasse zu fest wird Wenn dieser Drehsinnwechsel fortlaufend eintritt das Ger t ausschalten dann ist das Eis fertig Achtung wenn der Motor berhitzt ist schaltet da...

Страница 28: ...icht im Geschirrsp ler reinigen Jedes Teil gut trocknen Trocknen Sie den Beh lter sorgf ltig von innen bevor Sie ihn wieder in ihrTiefk hlger t stellen Wenn er innen noch feucht ist gefriert dasWasser...

Страница 29: ...Die Vanilleschoten aus dem Topf entfernen Die Mischung aus Milch und Sahne nach und nach unter den Eier Zucker Schaum schlagen Die Masse In den Topf gie en und bei milder Hitze unter st ndigem R hren...

Страница 30: ...oder Mandel l Mandeln und Pistazien getrennt im Ofen grillen 15 Minuten bei 160 C Abk hlen lassen und fein mahlen Zucker untermischen l hinzuf gen und so lange mischen bis eine gleichf rmige Paste ent...

Страница 31: ...mixen Die Kirschen in einer flotten Lotte mit dem feinen Sieb zermahlen so dass ein feines Fruchtmus ohne Hautst cke entsteht Wasser und Zucker in einem Topf zu Sirup kochen abk hlen lassen Kirschmus...

Страница 32: ...minato 3 Pulsante ON OFF 4 Pulsante di regolazione del tempo 5 Coperchio con apertura 6 Asse 7 Pala 8 Vasca Capienza 1 5L 9 Coperchio di stoccaggio 10 Cavo 11 Pattini antisdrucciolevoli 12 Cucchiaio d...

Страница 33: ...ruzioni di una persona responsabile Non lasciare mai il cavo pendere a portata di mano dei bambini Verificare che il cablaggio del vostro impianto elettrico sia compatibile con quello dell apparecchio...

Страница 34: ...ificare attentamente il cavo di alimentazione prima di ogni utilizzo In caso di guasto non bisogna usare l apparecchio Il cavo deve essere sostituito soltanto da parte di dal suo servizio di assistenz...

Страница 35: ...o 18 C per almeno 12 ore La vasca deve essere stoccata verticalmente per una buona ripartizione del liquido di congelazione Uscire la vasca all ultimo momento non appena la vostra preparazione pronta...

Страница 36: ...parazione Attenzione la temperatura esterna influisce sul tempo di solidificazione del gelato Pi far caldo pi il gelato metter tempo per solidificare La ricetta la quantit di preparazione o la tempera...

Страница 37: ...se la preparazione diventa troppo spessa il senso di rotazione della pala s invertir Se questo si ripete senza interruzione spegnere l apparecchio ci significa che il gelato pronto Attenzione se il m...

Страница 38: ...ti nella lavastoviglie Asciugare bene ogni parte Attenzione asciugare bene l interno della vasca prima di rimetterla nel congelatore In effetti se rimane acqua questa congeler ed impedir poi alla pala...

Страница 39: ...pentola Aggiungere progressivamente il miscuglio latte e panna al miscuglio uova e zucchero e battere il tutto Versare nella pentola e far cuocere il miscuglio a fuoco lento mescolando sempre fino a...

Страница 40: ...o di mandorla Far tostare le mandorle e i pistacchi separatamente al forno 15 minuti a 160 C Lasciarli raffreddare e macinare finemente Aggiungere lo zucchero Mescolare Aggiungere l olio e mescolare...

Страница 41: ...n macinaverdura dotato di una griglia fine schiacciare le ciliegie per ottenere un fine pur ed eliminare i pezzettini di buccia In una pentola preparare lo sciroppo portando ad ebullizione l acqua e l...

Страница 42: ...troiluminaci n 3 Bot n marcha parada 4 Bot n de ajuste del tiempo 5 Tapa con abertura 6 Eje 7 Pala 8 Cuba Capacidad 1 5L 9 Tapa de almacenamiento 10 Cord n 11 Patas antideslizantes 12 Cuchara para hel...

Страница 43: ...es de una persona responsable No dejar que el cord n cuelgue al alcance de los ni os Comprobar que el cableado de la instalaci n el ctrica es compatible con el del aparato Se recomienda conectar el ap...

Страница 44: ...necesario examinar atentamente el cable de alimentaci n antes de cualquier utilizaci n Si ste est da ado no hay que utilizar el aparato El cord n s lo debe cambiarlo su servicio posventa o una persona...

Страница 45: ...nos 12 horas La cuba debe almacenarse verticalmente para que exista una buena distribuci n del l quido de congelaci n Sacar la cuba en el ltimo momento una vez la preparaci n est lista y refrigerada P...

Страница 46: ...que la preparaci n cuaje Cuidado la temperatura exterior influye en el tiempo de cuajado del helado Cuanto m s calor haga m s tiempo tardar el helado en cuajar La receta la cantidad de preparaci n o...

Страница 47: ...raci n se hace demasiado espesa el sentido de giro de la pala se invertir Si se repite de forma ininterrumpida detener el aparato es porque el helado est listo Atenci n si el motor est recalentado el...

Страница 48: ...ab n No lave los elementos en el lavavajillas Secar bien cada elemento Prestar atenci n para secar el interior de la cuba antes de volver a meterlo en el congelador En efecto si queda agua se va a con...

Страница 49: ...z car Retirarlasramasdevainilladelacacerola A adirprogresivamente la mezcla de leche y de nata a la mezcla de huevos y az car batiendo Verter en la cacerola y cocinar la mezcla a fuego suave sin dejar...

Страница 50: ...almendra Tostar las almendras y los pistachos por separado en el horno 15 minutos a 160 C Dejar que se enfr en y molerlos finos A adir el az car Mezclar A adir el aceite y mezclar hasta que la mezcla...

Страница 51: ...e lim n natural Con un molino para verdura provisto de un tamiz fino aplastar las cerezas para obtener un pur fino y sin trozos de piel En una cacerola preparar el jarabe llevando a ebullici n el agua...

Страница 52: ...reen with backlighting 3 Start stop button 4 Time adjustment button 5 Cover with opening 6 Pin 7 Blade 8 Vat Volume 1 5 L 9 Storage cover 10 Cord 11 Anti skid pads 12 Ice cream scoop Ice cream maker R...

Страница 53: ...e or instructions of a responsible person Keep the cord out of reach of children Make sure that the wiring of your electrical system is compatible with that of the unit It is recommended that you conn...

Страница 54: ...he power cord carefully before using it If it is damaged don t use the unit The cord should only be replaced by its after sale service or a person who is qualified and approved by LAGRANGEin order to...

Страница 55: ...d vertically for a good distribution of the freezing liquid Take out the vat at the last moment once your preparation is ready and refrigerated To check to see whether your vat is properly frozen shak...

Страница 56: ...me The hotter it is the longer it will take the ice cream to set The recipe the preparation quantity and the initial temperature of the preparation will also have an impact on the preparation time Onc...

Страница 57: ...uption stop the unit it means that the ice cream is ready Attention if the motor is overheated the unit will trip out and stop If this happens turn off the unit and unplug it and then let it cool for...

Страница 58: ...reful to completely dry the interior of the vat before putting it back in the freezer If water remains in it it will freeze and then prevent the blade from turning If the motor block needs to be clean...

Страница 59: ...xture to the egg and sugar mixture while beating Pour it into the pan and cook the mixture over a low heat stirring constantly until the foam has disappeared and the mixture covers the spoon Then put...

Страница 60: ...Toast the almonds and the pistachios separately in the oven 15 minutes at 160 C Let them cool and then finely grind them Add the sugar Mix Add the oil and mix until the mixture is perfectly homogeneou...

Страница 61: ...vegetable mill equipped with a fine screen crush the cherries in order to obtain a fine pur e and to eliminate the pieces of skin In a pan prepare the syrup by bringing to a boil the water and the sug...

Страница 62: ...17 Chemin de la Plaine ZA les Plattes BP 75 69390 VOURLES France www lagrange fr conso lagrange fr 17 Chemin de la Plaine ZA les Plattes BP 75 69390 VOURLES France www lagrange fr conso lagrange fr...

Отзывы: