

Fax: 765-423-4111 . www.lafayetteinstrument.com . E-mail: [email protected]
Model 09494 User’s Manual
5
5
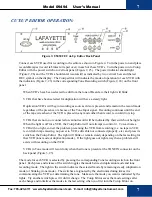
BEARCLAW OPERATION:
The Bearclaw remote is easy to connect and use. It connects to either audio inputs (found on most VCR’s)
or microphone inputs using 3.5MM mono or stereo inputs (found on most camcorders). It produces audio
signals that you record on the videotape’s audio track. The audio signal or “tone” is used by the Cutup
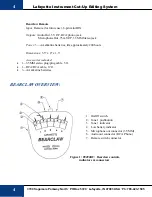
Editor to switch recording on and off automatically. There are five push-button switches with indicators on
the top of the Bearclaw remote (see Figure 1). While it is operating, the light in a switch blinks when its
button is pressed, indicating the selected tone. Each button has a unique “tone” that is output to both the
RCA phono jack (Figure 1, #6) as an audio signal and the 3.5 MM jack (Figure 1, #5) as a microphone level
signal. Connect one of these signals to the VCR or camcorder using the supplied RCA-RCA plug cable (3-
382-008) or the 3.5MM plug-plug cable (3-382-015). When using the RCA jack, plug the RCA cable into
the VCR’s audio input jack.
On stereo VCR’s either cannel or both may be used to record the “tones”. Tones can be recorded on either
Hi-Fi audio tracks or normal tracks. The tone signal must be recorded on a channel by itself, without mixed
audio or excessive noise. The tones are audio signals that can be heard during playback. A test recording
can be played back to verify that the tone is being recorded by listening for it on the audio channel that it
was recorded on. Make sure no other audio except clear tones are presented on the channel you are using
for the tone signal. Tapes that were not recorded with the tone signal can be edited with the tone system by
using the audio dub function explained in detail later. Record the video you wish to edit while categorizing
the excerpts by selecting tones that you record on the audio tracks with the Bearclaw pushbuttons.
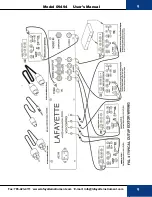
Camcorders usually connect to the Bearclaw using the 3.5MM microphone out jack (Figure 1, #5). Plug
one end of the 3.5MM cable (3-382-015) into this connector and the other end of the cable into the external
microphone jack of the camcorder. The external microphone jack is usually located near the camcorder
microphone. Most camcorders (including 09971 and Panasonic’s AG-455) automatically switch to the
external microphone when one is plugged in. Some may require a selection switch for audio input to be
changed to select the external microphone. See your camcorder’s manual or call for assistance. Record
video while selecting tones as described above.
When using audio dub to place tones on an already recorded tape, the audio signal goes to the normal audio
track on Hi-Fi VCR;s such as the 09948, 09950, and 09958 or Panasonic’s AG-1960 or AG-1970. These
VCR’s select the Hi-Fi tracks first if they have any signal on them. For these VCR’s you will have to
manually select the normal track by using the Infrared remote audio output button or the audio output
button on the door of the VCR (09958 and ag-1970 only). Read the Audio Dub section in your VCR’s
operation manual for more details on audio dubbing.
To audio dub with most VCR’s including all models previously referred to, place the prerecorded tape in
the VCR after making sure the record tab is intact. Place a small piece of tape over the hole if the tab has
been removed. Connect the Bearclaw as described above for recording. Place the VCR in play then pause
so it produces a still picture. Press the audio dub button while in play/still and its indicator should light.
Press the pause button to begin recording. The VCR display will show the Play arrow and the audio dub
indicator will remain lit. Select tones during dubbing while watching the video.