background image


INSTRUCTIONS FOR THE INSTALLER 


2.  

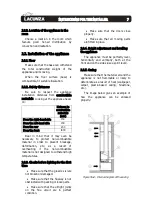
Key to casing diagram: 
   1 Ceiling 
   2 Flue 
   3 Incombustible material (Inner hood 
insulation) 
   4 Insulating deflector made of 
incombustible material 
   5 Wall 
   6 Fresh-air inlet (1,000 cm

2

   7 Hot-air outlet  (1,000 cm

2


Figure No.5 -


Exterior diagram of the casing 

In  order  to  enable  suitable  air 

circulation  and  correct  operation,  the 
casing  must  have  a  fresh-air  inlet  with  a 
minimum section of 1,000cm

2

 beneath the 

level of the actual appliance and a hot-air 
outlet  measuring  at  least  1,000cm

2

  above 

it  (just  before  the  insulating  deflector 
inside  the  casing).  These  inlet  and  outlet 
sections must ensure air renewal in such a 
way as to avoid damage to parts inside the 
hood due to excess temperature. 

A  further  hot-air  ventilation  grille  is 

also recommended between the insulating 
deflector on the hood and the ceiling. 

On  non-central-heating  appliances 

(without  back  boiler),  Lacunza  does  not 
recommend  enveloping  the  outside  of 
appliances with insulation. 

The  installer  must  fit  the  necessary 

inspection  accesses  (trap  doors,  hatches, 
etc.)  so  that  everything  inside  the  hood 
that  may  need  maintenance  work  or 
replacement can be accessed at any time, 
e.g.  counterweight  system,  hydraulic 
components,  heating  circuit  safety 
components. 

2.3.6.


Connection to the flue 

The  appliance  must  be  connected  to 

the  chimney  flue  using  special  piping 
designed  to  resist  the  products  of 
combustion 

(e.g. 

stainless 

steel, 

enamelled steel, etc.). 

To  connect  the  flue  to  the  socket 

flange,  insert  the  piping  inside  the  flange 
and  seal  the  joint  with  fire  sealant  or  fire 
cement to make it completely airtight. 

The installer must ensure that the pipe 

connected to the appliance is well secured 
and  there  is  no  chance  of  it  coming  free 
from  its  housing  (e.g.  as  a  result  of 
dilatation due to temperature, etc.).  

2.3.7.


Piping air to other rooms (Andrea 

/ Abodi) 

It  is  possible  to  pipe  some  of  the  heat 

generated  to  other  rooms  in  the  house 
using  the  appliance.  This  does  not  mean 
that the appliance works  more efficiently, 
but it does mean that the heat it creates is 
distributed better. For this purpose, in the 
top  surface  of  the  appliance  there  are  2 
potential hot-air outlets with diameters of 
120mm  on  the  top  shell  of  the  appliance. 
Pipes  can  be  fitted  from  these  outlets  to 
other rooms. If you intend to do this, bear 
the following points in mind. 


Do  not  break  the  scored  steel 

circles completely. Simply bend them in 
order  to  facilitate  the  conduction  of 
heat to the pipe. 

Содержание Sara

Страница 1: ...Sara Lorea Abodi Andrea Instruction Book...

Страница 2: ...installation 6 2 2 1 Ventilation of the room 6 2 2 2 Location of the appliance in the room 7 2 3 Installation of the appliance 7 2 3 1 Floor 7 2 3 2 Safety distances 7 2 3 3 Checks before lighting for...

Страница 3: ...2 1 4 1 2 Inside the appliance 16 4 1 3 Flue socket 16 4 1 4 Firebox glass 16 4 2 Maintenance of the chimney flue 16 4 3 Important advice 16 TROUBLESHOOTING 17 5 BASIC BREAKDOWNS 18 6 DECLARATION OF...

Страница 4: ...the legislation applicable in each country and this instruction book 1 1 General characteristics Unit Sara Lorea Abodi Andrea Nominal Heat Output N H O to atmosphere kW 20 19 Efficiency at N H O 80 76...

Страница 5: ...the fuel fuel loads fuel load frequencies flue draught and system of installation indicated in this Instruction Book Failure to respect these conditions may lead to problems with the appliance deteri...

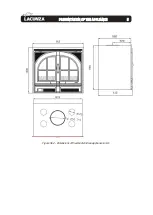
Страница 6: ...PRESENTATION OF THE APPLIANCE 5 1 Figure No 2 Dimensions of the Abodi Andrea appliance in mm...

Страница 7: ...s absolutely crucial to ensure the suitable renewal of the air in the room in which the appliance is fitted The room must always have at least two permanent grilles or openings to the exterior in orde...

Страница 8: ...vent breakage deformation etc as a result of overheating if the non combustible material is not designed to withstand high temperatures 2 3 3 Checks before lighting for the first time Make sure that t...

Страница 9: ...replacement can be accessed at any time e g counterweight system hydraulic components heating circuit safety components 2 3 6 Connection to the flue The appliance must be connected to the chimney flue...

Страница 10: ...rect updraught The diameter of the pipe must be the same as the diameter of the flue socket on the appliance over its entire length in order to ensure correct operation The flue must prevent the entry...

Страница 11: ...wn must clear the highest point of any neighbouring building or obstacle located within a 10m radius of the chimney outlet by more than 1m Figure No 7 Distances between the chimney crown and objects w...

Страница 12: ...um diameter of 150mm Finely chopped wood produces greater heat output but also burns more quickly Optimum fuels Beech Other fuels Oak chestnut ash maple birch elm etc Pine and eucalyptus logs are low...

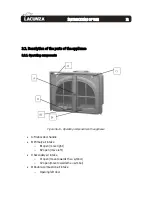
Страница 13: ...components Figure No 10 Operating components on the appliance A Firebox door handle B Primary air intake o B1 open move right o B2 open move left C Secondary air intake o C1 open move towards the symb...

Страница 14: ...when the appliance has been lit three or four times and has adapted to its flue If it does not disappear then check the flue draught length and diameter of the flue flue insulation airtightness and t...

Страница 15: ...the parts which make up the appliance Do not be alarmed by noises of this kind In order to obtain maximum output open all the air intakes to the firebox and in order to obtain minimum output tend tow...

Страница 16: ...d the appliance inside the shell This air can be piped to other rooms IMPORTANT This appliance is not covered by our warranty unless directly connected to the mains electricity supply in accordance wi...

Страница 17: ...are not to apply the glass cleaner directly onto the glass as it could come into contact with the door seal cord and damage it Also make sure that the cleaning liquid does not enter the moving part of...

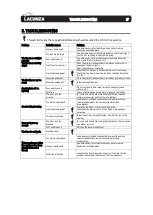
Страница 18: ...hips carpentry scraps plywood pallets etc Cold flue Heat up the flue by burning a piece of paper in the firebox Smoke during burning The room is at low pressure In rooms with Controlled Mechanical Ven...

Страница 19: ...BASIC BREAKDOWNS 18 6 BASIC BREAKDOWNS 6 NO TRADUCIR EL TEXTO DE ESTA IMAGEN...

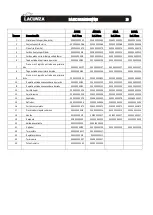
Страница 20: ...0850 500000000850 500000000850 10 Registro entrada aire secundario izquierdo 500000000123 500000000123 500000000123 500000000123 11 Registro entrada aire secundario derecho 500000000122 500000000122 5...

Страница 21: ...DECLARATION OF PERFORMANCE 20 7 DECLARATION OF PERFORMANCE 7...

Страница 22: ...DECLARATION OF PERFORMANCE 21 7...

Страница 23: ...DECLARATION OF PERFORMANCE 22 7...

Страница 24: ...DECLARATION OF PERFORMANCE 23 7...

Страница 25: ...CE MARK 24 8 CE MARK 8...

Страница 26: ......

Страница 27: ...LACUNZA KALOR GROUP S A L Pol Ind Ibarrea s n 31800 Alsasua Navarra Spain Tel 00 34 948 56 35 11 Fax 00 34 948 56 35 05 e mail comercial lacunza net Website www lacunza net EDITION 0...

Отзывы: