30
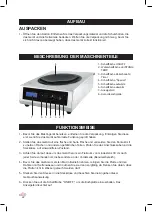
PARTS LIST
OPERATION
1.- Take out the machine and all the accessories. Take off the wrapping before you use the
electrical appliance. Do not throw the wrapping away until you have checked that the
appliance is functioning properly.
2.- Make sure you place the appliance on a hard, flat surface. Avoid contact with excessively
hot areas or other dangerous elements. Check that the connection wire and the power point
are in perfect condition.
3.- Make sure that there is a space of more than 30 cm around the appliance on each side,
especially at the front (the user's area).
4.- Before switching on the machine for the first time, clean the surface and the frame of the
plaque with soapy water and then dry them. Remember that the plaque must not be
submerged in water.
5.- Connect the plug to the socket according to the values indicated in this manual.
6.- Press the "ON/OFF" to turn the cooktop on. The display screen lights up.
7.- Press the POWER/TEMP. button to select the desired function. The default cooktop start-up
temperature is 2000 W or 120ºC. We suggest using the POWER configuration to boil water
and TEMPERATURE to fry.
8.- You can control the power with the increase / decrease buttons (500W~3500W)
9.- Press the POWER/TEMP. selector to control by TEMPERATURE. The default temperature is
120ºC, but you can control the temperature with the increase / decrease buttons
(60ºC~240ºC).
10.- One of the main advantages of using the timer function is for the cooktop to stop
automatically after the set time. For this use the timer button and you can set the cooking
time on the screen by pressing the increase / decrease buttons. Then press the timer
button (clock) again to start the count-down.
1. ON / OFF button
2.- POWER/TEMP selector
3.- Timer button
4.- Block button
5.- Decrease button
6.- Increase button
7.- Screen
8.- Ceramic cooktop
8
1
2
3
4
5
6
7


