manualshive.com logo in svg
background image

2. Quick Start

page 12

LaCie 319 LCD Monitor

User’s Manual

2. Quick Start

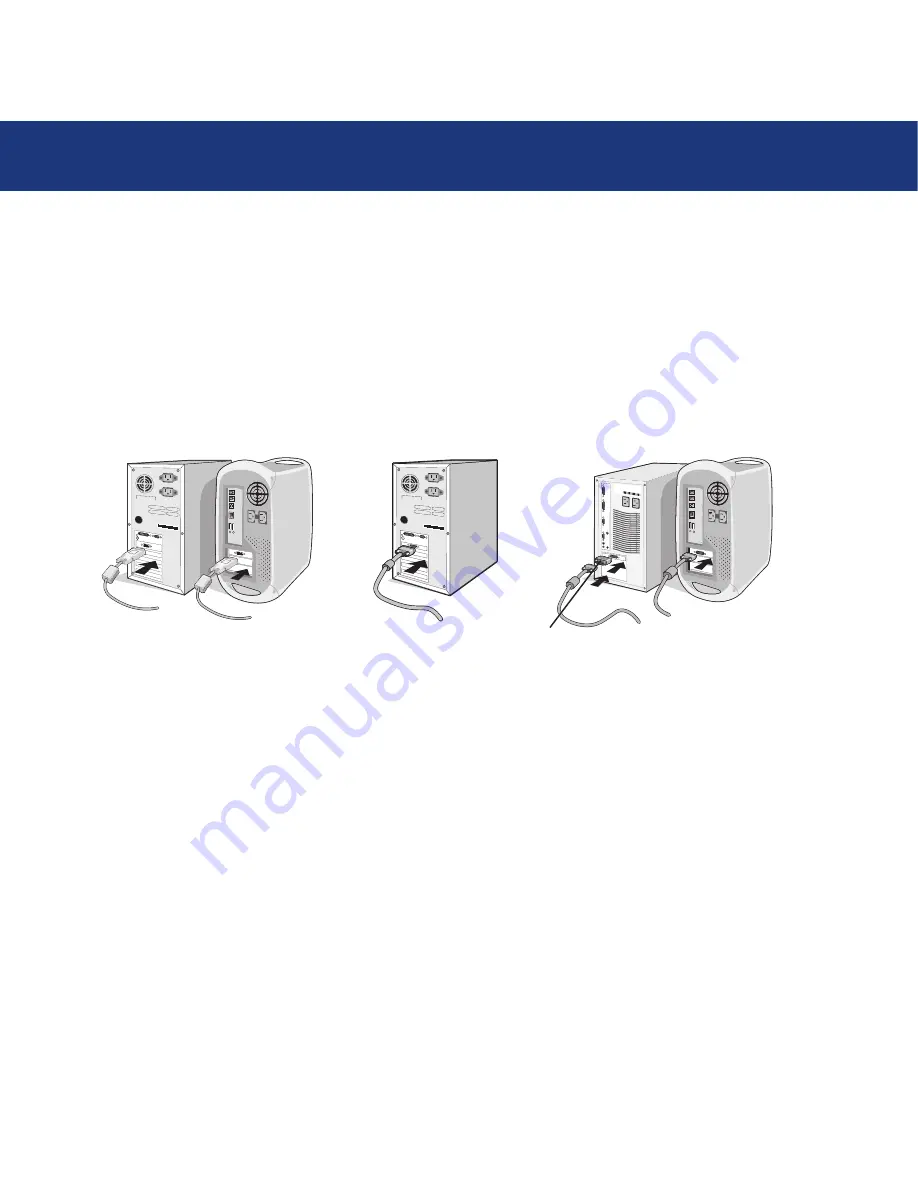
To attach the LaCie LCD Monitor to your system, follow these instructions:
1. Turn off the power to your computer.
2. 

For the PC or MAC with DVI digital output:

Connect the DVI signal cable to the connector of the display card in your

system (Figure A.1). Tighten all screws.

For the PC with Analog output:

Connect the 15-pin mini D-SUB to DVI-A signal cable to the connector of the display

card in your system (Figure A.2).

For the MAC:

Connect the Macintosh cable adapter to the computer, then attach the 15-pin mini D-SUB signal

cable to the Macintosh cable adapter (Figure B.1).

NOTE:

Some Macintosh systems do not require a Macintosh cable adapter.

3.  Connect the DVI signal cable to the connector on the back of the monitor. Place the video signal cable (Figure C.1).

Connect only either VGA or DVI to input 2.

NOTE:

Incorrect cable connections may result in irregular operation, damage display quality/components of LCD module

and/or shorten the module’s life.
Collect cables and keep them in the stand with attached cable cover. The cable cover can be attached on the front or 
back side of Tilt Stand 

(Figure C.1, C.2)

.

Please check Tilt, Rise and Lower monitor screen and screen rotation when you manage cables.

4. Connect one end of the power cord to the AC inlet on the back of the monitor and the other end to the power outlet

(Figure C.1)

.

NOTE:

Please refer to Caution section of this manual for proper selection of AC power cord.

5.  The Vacation Switch on the left side of the monitor must be turned on. Turn on the monitor with the front power button

(Figure D.1)

.

NOTE:

The Vacation Switch is a true on/off switch. If this switch is on the OFF position, the monitor cannot be turned on

Figure A.1

Figure B.1

Macintosh

Cable Adapter

(not included)

Figure A.2

Содержание LCD Monitor 319

Страница 1: ...st a specific page or section To Exit From the Menu bar at the top of your screen select File Quit Icons Used In This Manual These icons describe the type of information being given Previous Page Next...

Страница 2: ...al Table of Contents Foreword 3 Precautions 5 Environmental Regulations 8 Specifications 10 1 Package Contents 11 2 Quick Start 12 3 Setting Up Your LaCie 319 LCD Monitor 14 3 1 Controls 16 4 Troubles...

Страница 3: ...idential installation This equipment generates uses and can radiate radio frequency energy and if not installed and used in accordance with the instructions may cause harmful interference to radio com...

Страница 4: ...rmful interference to radio communications However there is no guarantee that interference will not occur in a particular installation If this equipment does cause harmful interference to radio or tel...

Страница 5: ...lified personnel under the following conditions When the power supply cord or plug is damaged If liquid has been spilled or objects have fallen into the monitor If the monitor has been exposed to rain...

Страница 6: ...FER SERVICING TO QUALIFIED SERVICE PERSONNEL Caution When operating the LaCie 319 LCD Monitor with a 220 240V AC power source in Europe use the power cord pro vided with the monitor In the UK a BS app...

Страница 7: ...n anti glare filter Clean the LCD monitor surface with a lint free non abrasive cloth Avoid using any cleaning solution or glass cleaner Adjust the monitor s brightness and contrast controls to enhanc...

Страница 8: ...ment ergonomics usability emission of electrical and magnetic fields energy consumption and electrical and fire safety The environmental demands concern restrictions on the presence and use of heavy m...

Страница 9: ...sometimes found in batteries relays and switches Mercury damages the nervous system and is toxic in high doses Requirements state that batteries may not contain any Mercury It also demands that no mer...

Страница 10: ...ing Angles 178 Connections VGA DVI D DVI I Power Consumption 48 W In Power Save Mode 2W Weight 9 7 kg Weight without stand 6 3 kg Ergonomy Pivot 90 Tilt Swivel Height adjustable Compatible with VESA 1...

Страница 11: ...ds Video signal cable 15 pin mini D SUB male to DVI A Video signal cable DVI D to DVI D cable Cable cover CD ROM includes complete User s Manual in PDF format Pivot Software CD blue eye pro calibratio...

Страница 12: ...ignal cable Figure C 1 Connect only either VGA or DVI to input 2 NOTE Incorrect cable connections may result in irregular operation damage display quality components of LCD module and or shorten the m...

Страница 13: ...d to the DVI I connector Input1 of the monitor Otherwise the MAC may not turn on 6 Turn on the computer No touch Auto Adjust automatically adjusts the monitor to optimal settings upon initial setup fo...

Страница 14: ...ise the screen place hands on each side of the monitor and lift up to the highest position Figure RL 1 To rotate screen place hands on each side of the monitor screen and turn clockwise from Landscape...

Страница 15: ...ing the monitor to the stand Figure S 2 Turn the stand to 180 counterclockwise you will hear two clicks Remove the screws from the bottom Figure S 3 and lift off the stand The monitor is now ready for...

Страница 16: ...e highlighted control menu to the factory setting NOTE When RESET is pressed in the main and sub menu a warning window will appear allowing you to cancel the RESET function by pressing the EXIT button...

Страница 17: ...M ROTATION Portrait Analog input only Adjusts the horizontal or vertical size by increasing or decreasing this setting If the Auto Adjust function does not give you a satisfactory picture setting a fu...

Страница 18: ...nd the direction increase or decrease will be shown by the color bars Please do not modify manually if you are performing color critical work NATIVE Original color presented by the LCD panel that is u...

Страница 19: ...nput mode must be set to DIGITAL in DVI SELECTION of OSM by pressing SELECT button then CONTROL button when the DVI signal cable is con nected to the DVI I connector Input1 of the monitor Otherwise th...

Страница 20: ...24 HOT KEY You can adjust the brightness and contrast directly When this function is set to ON you can adjust the brightness with or contrast with or key while the OSM menu is off The standard OSM can...

Страница 21: ...curs when a residual or ghost image of a previous image remains visible on the screen Unlike CRT monitors LCD monitors image persistence is not perma nent but constant images being displayed for a lon...

Страница 22: ...es being displayed for a long period of time should be avoided To alleviate image persistence turn off the monitor for as long as the previous image was displayed For example if an image was on the mo...

Страница 23: ...cie com se contact LaCie United Kingdom Ireland Contact Us At http www lacie com uk support request LaCie Grand Export Contact Us At http www lacie com intl contact LaCie Belgium Contact Us At http ww...

Страница 24: ...r of the LaCie 319 LCD Monitor is defaced or missing The broken part is a replacement part such as a pickup tray etc The tamper seal on the LaCie 319 LCD Monitor is broken LaCie will not under any cir...

Отзывы: