


56
C
HAPTER
3
Maintenance
distance, press on the green
(or yellow) button then
immediately push the red
button to stop the packer. Pull
out the red button and repeat
the process until the packer
reaches the desired position.
12.
Tack weld a piece of steel tubing
to the floor rail and to the front of
the sliding shoe (Figure 83.
“Sliding shoe”);
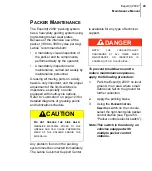
Figure 83. Sliding shoe
13.
Then start the engine, engage
the hydraulic pump and slowly
retract the packer by pressing
the yellow button and the red
button;
14.
The sliding shoes will come out
from under the packer as it is
retracting (Figure 84. “View from
behind the packer when fully
retracted”);
15.
Remove the old sliding shoes
and plate. Make sure to remove
the weld on the floor guide using
a grinder.
16.
Align the new sliding shoe in
front of the packer and slowly
extend the packer to make the
sliding shoe go under the
packer;
17.
Once the sliding shoes are back
in place, weld the shoes and the
plates (Figure 83. “Sliding
shoe”);
18.
If the wear pads at the top of the
packer need to be replaced,
refer to “Wear Pads
Replacement” on page 57
19.
Retract the packer;
20.
Weld the four (4) sliding shoes
and both plates to the packer
(Figure 84. “View from behind
the packer when fully retracted”);
21.
Test the packer for proper
operation.
22.
If the packer is binding, to find
out where the interference is,
apply primer paint on the floor
guide.
23.
Run the packer a few times.
24.
The location where the paint
comes off indicates the surface
to be grinded.
Sliding
Shoe
Floor Guide
Welds
Содержание expert 2000
Страница 1: ......
Страница 2: ......
Страница 3: ...MAINTENANCE MANUAL 12 14 2006 Part 55379 ...
Страница 4: ......
Страница 10: ...viii Table of Contents ...
Страница 96: ...86 CHAPTER 3 Maintenance Figure 141 Proximity switch front view ...
Страница 99: ...89 Expert t 2000TM Maintenance Manual Figure 142 Main hydraulic valve Tailgate Packer Body Hoist Crusher Panel ...
Страница 118: ...108 CHAPTER 3 Maintenance Figure 170 Ball valve in closed position ...
Страница 140: ...130 CHAPTER 4 Lubrication PACKER ...
Страница 141: ...131 Expert t 2000TM Maintenance Manual BODY CHASSIS HINGES ...
Страница 142: ...132 CHAPTER 4 Lubrication HOPPER SECTION STANDARD VERSION ...
Страница 143: ...133 Expert t 2000TM Maintenance Manual CRUSHER PANEL ...
Страница 144: ...134 CHAPTER 4 Lubrication FULL WIDTH TAILGATE ...
Страница 154: ...144 CHAPTER 5 Troubleshooting ...
Страница 156: ...146 Appendix CONNECTORS Commonly used Electrical Connectors Deutsch AMP ...
Страница 160: ...150 Appendix Lights Symbol Description Part number 6 12V STROBE LIGHT ELL02765 12V AMBER FLASHING LIGHT ELL02855 ...
Страница 168: ...158 Appendix ...
Страница 170: ...160 Appendix ...
Страница 171: ......
Страница 172: ......


