Lx 500
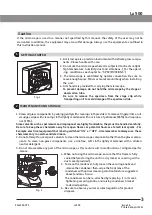
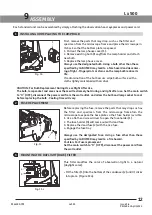
PROCEDURE FOR LED REPLACEMENT
4
Fig. 12
1
2
6
3
4
5
7
9
8
5
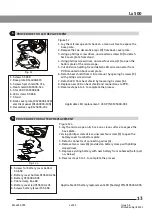
PROCEDURE FOR BATTERY REPLACEMENT
Fig. 12.a
1
2
4
5
3
6
9144000-795
Lx 500
Issue 1.6
Printed on April,2022
13
Figure 12
1. Lay the microscope on its back on a clean surface to expose the
base plate .
2. Remove the two decorative caps (9) from back cover plate .
3. Using a phillips screw driver, unscrew two screws (9) to detach
back cover plate from stand .
4. Using phillips screw driver, unscrew four screw (1) to open the
bottom plate of the microscope .
5. Cut LED wire holding tie and detach LED wire connector from
PCB mounted on back cover plate .
6. Detach heat shield from critical mount by opening 3 screws (3)
with phillips screw driver .
7. Detach LED from heat shield by loosening 3 screws (6).
8. Replace new LED on heat shield and connections to PCB .
9. Reverse steps 6 to 1, to complete the process .
Applicable LED replacement : LED P/N 9135000-901
1. Screws SS 658
2. Base plate 9144000-815
3. Screws heat shield SS 714
4. Heat shield 9135000-524
5. Star LED 9135000-901
6. LED screws SS 658
7. Stand
8. Back cover plate (9126000-102)&
electrical panel (91260000-103)
9. Decorative cap 8123000-202
1. Screws for battery cover bottom
SS 658
2. Battery cover bottom 9135100-204
3. Battery 9135000-903
4. Cable clamp EL-488
5. Battery cover led 9135100-201
6. Screws battery (cover) SS 658
Figure 12a
1.Lay the microscope on its back on a clean surface to expose the
base plate .
2.Using phillips screw driver, unscrew four screw (1) to open the
battery cover from bottom plate .
3. Detach connector of connecting wires (4) .
4. Remove two screws (6) provided on battery clamp with phillips
screw driver .
5. Replace existing battery with new battery from Labomed (refer part
no. below)
6. Reverse steps 5 to 1, to complete the process .
Applicable LED battery replacement:LED (battery) P/N 9135000-903


