background image

Lx POL

17

10

CENTRATION

PREPARATION FOR CENTRATION

1

KOEHLER ILLUMINATION CENTRATION

2

ABBE CONDENSER CENTRATION

2

9151000-795

 Lx POL 

Issue 1.3

Printed on April,2019

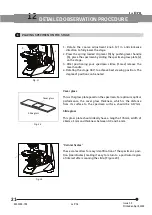
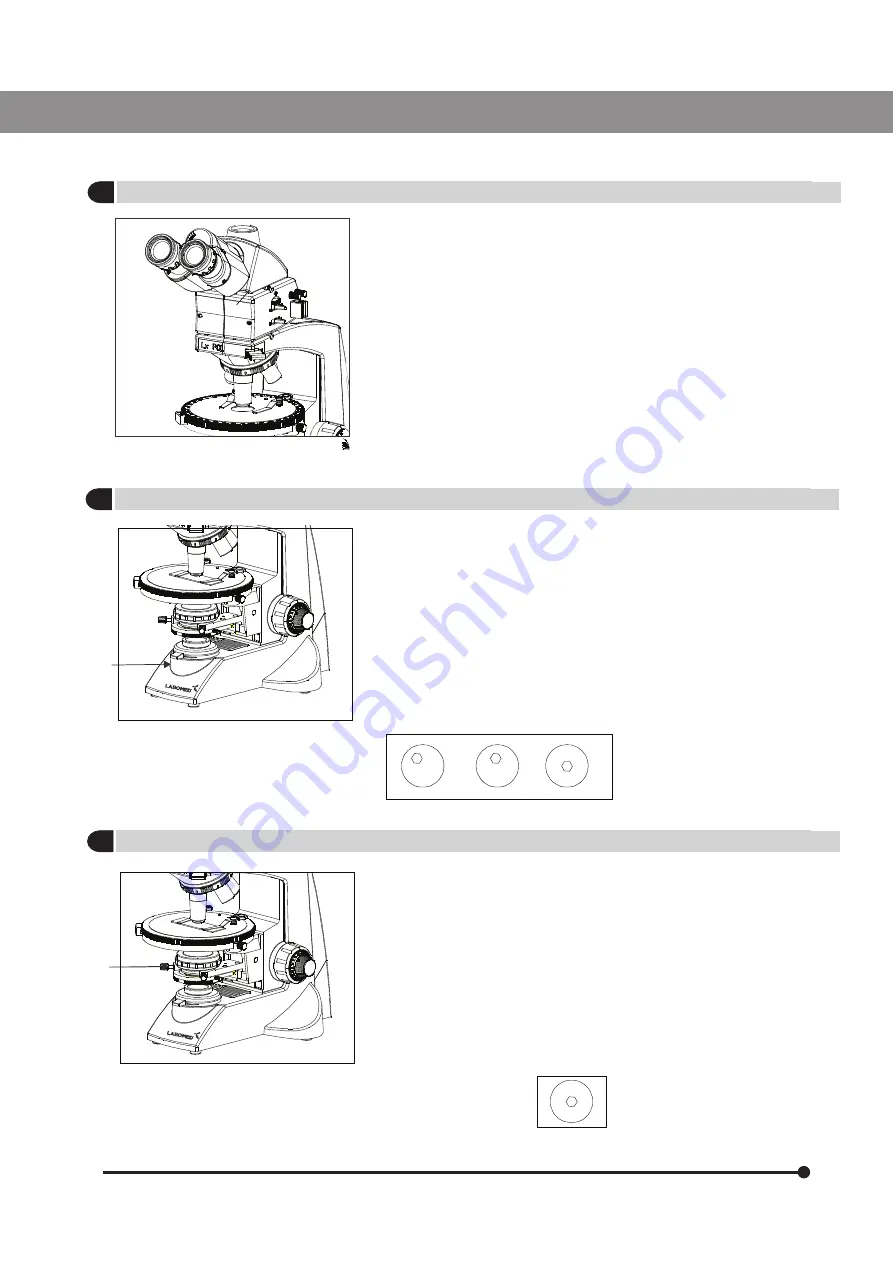
Step: 1

Disengage the Analyzer and Bertrand Lens by switching the operat-
ing lever to “O” position as shown in Fig. 13. Fully open the aperture 
diaphragm of the condenser by rotating its ring to the extreme left.

Lower the microscope stage. Place a POL specimen on the stage. 
Swing in the 10x objective into working position. Raise the Micro-
scope stage using the coarse adjustment knob until you reach its 
positive stop. Use the fine adjustment knob to bring the POL speci-
men into focus by lowering down the stage.

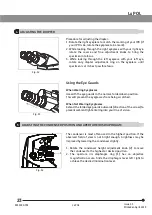
Step: 2

Swing in the 10x objective into working position. Flip in top lens of 
condenser in light path. Close the Koehler field diaphragm so that 
its closed isirs leaves image is present within the field of view. Use 
the condenser focusing knob to bring the image into sharp focus. 
Operate the condenser centering screws simultaneously to Center 
the image of the field diaphragm Ref. Fig 22 (a), (b), (c). After 
centration open the field diaphragm until the Image (iris leaves)
disappears just beyond the field of view.

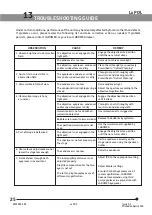
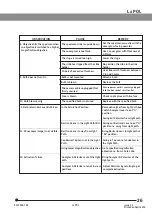
Step:3


Look through 10x Objective & Eye Pieces cross hair scale. Close the 
condenser diaphragm until approximately 20-25% of the iris leaves 
fill the field of view. Adjust the centering of the diaphragm by main-
taining condenser centering screws simultaneously with reference
to Eye Piece cross hair scale Ref. Fig.23 (a). 

Note: When changing the objective, adjust the condenser field
diaphragm with respect to each objective.

Fig. 23

Fig. 21

Fig. 22

Fig. 23 (a)

(a)

(b)

      (c) 

22

22

22

Содержание L POL Series

Страница 1: ...1 3 Printed on April 2019 Lx POL Research Microscopy User Manual To ensure proper use of this instrument as well as to avoid injury while operating Instrument understanding this manual completely before use is highly recommended ...

Страница 2: ...DETAILED INTRODUCTION OF ASSEMBLIES 12 14 a Abbe Condenser b Round Stage c Centerable revolving nose piece d Objectives e Eye pieces f Bertrand Lens 9 INITIAL SETUP 15 16 a Observation Head b Eye Pieces c Mounting the Day Light Blue Filter d Connecting Power Cords 10 CENTRATION 17 18 a Preparation for centration b Kohler illumination centration c Abbe Condenser centration d Objective centration e ...

Страница 3: ...imen on stage b Adjusting the focus c Adjusting the Interpupillary Distance d Adjusting the Diopter e Adjusting the Condenser position and Aperture Iris Diaphragm f Switching the objectives g Using the 100x Immersion Objective 13 TROUBLESHOOTING GUIDE 25 26 14 SPECIFICATIONS 27 ...

Страница 4: ... quadruple nose piece has the provision of centering for all objectives The round ball bearing Rotatable Stage has smooth 360degree travel and has 1 degree graduations on the scale which provides accurate location of the specimen High power illumination is delivered through our well crafted Universal Power Supply and operates on 100V 240V AC constant input Halogen bulb 6V 20W has an average life s...

Страница 5: ...ge to the euipment Warning against risk of electric shock Main switch is ON Main switch is OFF If the microscope is used in a manner not specified by this manual the safety of the user may not be warranted In addition the equipment may also suffer damage Always use the equipment as outlined in this instruction manual I GENERAL CLEANING Your Microscope has been engineered for a long and safe operat...

Страница 6: ... use Meathanol Observe sufficient caution in handling Methanol Place the Objective and or eyepieces on a dust free surfaces e g aluminum foil All other optical components to be cleaned should be as accessible as possible 3 Blow all loose dust particles away with a dust blower 4 Remove all water soluble dirt with distilled water If this is unsuccessful repeat using a solution of diluted hand soap l...

Страница 7: ...lb to cool before touching I GENERAL INSTRUCTIONS 1 Install microscope on a sturdy level table or bench and avoid any restriction of air vents in the base of the unit Do not place microscope on a flexible surface as this could result in blocking the air vents and cause overheating 2 Always use the power cord provided by LABOMED If the proper power cord is not used product safety performance cannot...

Страница 8: ...ulb Using a bulb other than those specified by LABOMED may lead to a fire hazards Fingerprints or stains on the lamp bulb reduce its life If contamination occurs wipe bulb surface with a cloth slightly moistened with alcohol Applicable Bulb 6V20W Halogen Bulb P N CX 013 Caution For Fuse Replacement Set the main switch to O OFF disconnect the power cord from the wall outlet Before replacing the fus...

Страница 9: ...Nosepiece Polarizing Objectives Specimen Holder Vernier Scale Polarizer Koehler mount Coarse and fine focus knob Polarizer locking screw Bertrand lens focusing knob Bertrand lens on off Allen keys for objective centering Parking for additional wave plates 2 Analyzer on off Stage locking screw Circular stage with vernier Port of wave plate Day light blue filter Abbe Condenser Condenser Centering Scre...

Страница 10: ... Circular stage with vernier Port of wave plate Analyzer on off Parking for additional wave plates 2 Allen keys for objective centering Trinocular viewing tube 30 inclined Bertrand lens focusing knob Bertrand lens on off Intermediate Analyzer Kit Bertrand Lens centering screw Specimen Holder Vernier Scale Abbe Condenser Polarizer Day light blue filter Polarizer locking screw Condenser Centering Scr...

Страница 11: ...UNPACKING YOUR MICROSCOPE 8 Lx POL 5 9151000 795 Lx POL Issue 1 3 Printed onApril 2019 Power Cord Microscope Arm Observation Head Eye Pieces ...

Страница 12: ...Power Cord Allen Wrench 3mm Polarizing attachment Paired Eyepieces 6V 20W Halogen bulb Binocular viewing tube 30 inclined Eyepieces Intermediate Analyzer Kit Bertrand Lens centering screw Centerable Revolving Nosepiece Polarizing Objectives Specimen Holder Vernier Scale Polarizer Koehler mount Coarse and fine focus knob Polarizer locking screw Bertrand lens focusing knob Bertrand lens on off Allen ...

Страница 13: ... 100x SL OIL RP PH 10x RP PH 20x RP PH 40x SL RP PH 100x SL OIL RP FL 4x RP FL 10x RP FL 40x SL RP FL 20x RP FL 50x SL OIL RP FL 100x SL OIL RP 100x OIL IRIS HALOGEN BULB LED MOUNT RECHARGEABLE BATTERY BLUE FILTER GREEN FILTER ATLAS CMOS CAMERA CMB CAMERA ADAPTER IVU TOUCH SCREEN VEGA CMOS CAMERA PHASE TURRET 10 Lx POL OPTIONAL ACCESSORIES 7 9151000 795 Lx POL Issue 1 3 Printed onApril 2019 ...

Страница 14: ...5 Lx POL Issue 1 3 Printed onApril 2019 1 Mount the Video adapter 1 2 on Trinocular observation head 2 Mount Camera Module System on Video adapter 10X eyepieces are provided To replace 1 Pull out the 10x eyepieces out from the observation heads ocular tube 2 Insert desired eyepieces in empty ocular tube Fig 6 Fig 5 Fig 4 ...

Страница 15: ... position for comfortable observation experience Lx POL Polarizer is also equipped with a mechanism of swing in out the polarizer from the light path Lx POL round stage has both the key feature of rotatability centerability Fig 9 Lx POL round stage is equipped with the key features of rotatability and centerability Fig 9 It provides a 360 degree circular rotation which allows the user to study the...

Страница 16: ... Piece Cover 3 Port for Lamda Plate Centerable revolving turret is also equipped with a Nose Piece cover which provides a click stop lockable port for Gypsum Lambda wave plates fig 10 a This feature provides comfort while using different Lambda Wave Plates It is ideally located in between specimen the Analyzer It allows to introduce compensator retardation plates between the cross polarizer which ...

Страница 17: ...al plane to ensure exact adjustment of the illumination aperture diaphragm and to view interference images These images form in the objective rear focal plane when an optically anisotropic specimen is viewed between cross polarize using a high numerical aperture objective condenser combination It is ideally located between analyzer and eye pieces for an easy in and out movement from the light path...

Страница 18: ... Cover Cap from Observation Head Dovetail and mount the Observation Head by engaging the dovetail provided at the bottom of the head into the dovetail cavity on on the analyzer attachment 4 Tighten the Head Locking Screw 2 after positioning the Obser vation head as desired See figure 15 Insert the eyepieces into the ocular tube of Observation Head using following procedure 1 Remove the protective ...

Страница 19: ...ble stage for holding the POL speci men Attach the Power cord and plug it into a grounded electrical outlet 1 Flip the main switch to I ON as shown in Figure 20 2 Rotating the light intensity adjustment knob in the direction of the arrow increases brightness and rotating knob in the opposite direction decreases brightness The intensity bar next to the knob indicates the direction of the intensity ...

Страница 20: ...ng position Flip in top lens of condenser in light path Close the Koehler field diaphragm so that its closed isirs leaves image is present within the field of view Use the condenser focusing knob to bring the image into sharp focus Operate the condenser centering screws simultaneously to Center the image of the field diaphragm Ref Fig 22 a b c After centration open the field diaphragm until the Im...

Страница 21: ...otate the round stage 360 degree until the prominent point of the specimen is furthest away from the center of the Eye Piece crossline it may even be outside the field of view Fig24 b iii Adjust the image with the centering screws over the objective until the prominent point of the specimen is midway between the center of the Eye Piece crossline Fig 24 c iv Adjust the specimen so that the prominen...

Страница 22: ...ening Polarizer locking screw 1 Bring an objective of your choice between 20x to 100x in the light path Bring the Pol specimen into focus 2 Keep the Abbe condenser in its lowest position 3 Open the aperture diaphragm 4 Swing in lever of Bertrand lens to BL Ref Fig 14 Part 2 and focus image by rotating Bertrand Lens focusing knob Ref Fig 14 Part 1 Note If the conoscopic image is dark then move the ...

Страница 23: ...ion Adjust objective centration and stage cent ration with respect to Eye Piece cross hair scale Engage Polarizer Analyzer filters in the light path and use Bertrand Lens and Wave plates Adjust the observation tube and eyepieces Adjust the interpupillary distance Adjust the dioptric setting Adjust the light intensity Observe Specimen Main switch Fuse Holder 20 Lx POL 11SUMMARY OF POLARIZED LIGHT O...

Страница 24: ...r glass This is the glass plate paced on the specimen For optimum optical performance the cover glass thickness which is the distance from its surface to the specimen surface should be 0 17mm Slide glass This glass plate should ideally have a length of 76mm width of 26mm 1mm and thickness between 0 9 and 1 4mm Vernier Scales These scales allow for easy identification of the specimen s posi tion co...

Страница 25: ...epieces in stereo vision This greatly helps to reduce fatigue and discomfort during observation While looking through the eyepieces move both eye tubes lateral ly until the left and right fields of view coincide completely The position of index dot indicated the inter pupiliary distance value Note your interpupillary distance so that it can be quickly referred to in the future This is happen when ...

Страница 26: ...g Eyeglasses Use with the eye guards in the normal folded down position This will prevent the eyeglasses from being scratched When Not Wearing Eyeglasses Extend the folded eye guards outwards direction of the arrow to prevent ambient light entering into your line of vision The condenser is most often used in the highest position If the observed field of view is not bright enough brightness may be ...

Страница 27: ...ly to agitate the oil 4 The condenser of this microscope manifests the full perfor mance when oil is placed between the slide glass and the front lens of condenser If oil is not placed there the observed image may appear dark 5 After use remove oil from the objective front lens by wiping with lens tissue slightly moistened with an ether 70 alcohol 30 mixture Caution If immersion oil makes contact ...

Страница 28: ...ersion oil is not used with an immersion objective Use immersion oil as suggested Bubbles are present in immersion oil Remove the bubbles by agitation The specified immersion oil is not used Use the immersion oil supplied by LABOMED 5 Part of image is defocused Engage the objective into position until the nose turret clicks The specimen is not set properly on the stage Set the specimen correctly o...

Страница 29: ...lyzer Polarizer out of the light path Analyzer Polarizer are not in cross positions Adjust Polarizer by rotating to get complete extinction Bring Analyzer Polarizer of the light path The specified bulb is not used Replace with the specified bulb Swing out Polarizer from light path Swing out Bertrand Lens to out O position i e away from light path 8 Objective hits the specimen when an objective is ...

Страница 30: ...older Spring Loaded stage clips 6 Condenser Type Abbe condenser daylight filter detachable N A 1 25 Aperture iris diaphragm Built in 7 Dimensions Weight 405mm L x 210mm W x 425mm H 7 kg net 8 Electrical Halogen 6V 20W Upto 2 000 hours 9 Operating environment Indoor use Altitude Max 2000 meters Ambient temperature 5 to 40 C 41 to 104 F Maximum relative humidity 80 for temperature up to 31 C 88 F De...

Страница 31: ...Phone 510 445 1257 Fax 510 991 9862 Email sales laboamerica com www laboamerica com EU REP A28240 LABOMED ISO 9001 Labomed Europe Essebaan 50 NL 2908 LK Capelle a d IJssel The Netherlands Tel 31 0 10 4584222 Fax 31 0 10 4508251 E mail info labomedeurope com ...

Отзывы: