LaboGene CoolSafe Touch 700636 Скачать руководство пользователя страница 7

Instruction manual for CoolSafe 


01012016QA01 

Item No. 700636 

CopyRight © 2016


Page 

7

 of 

35


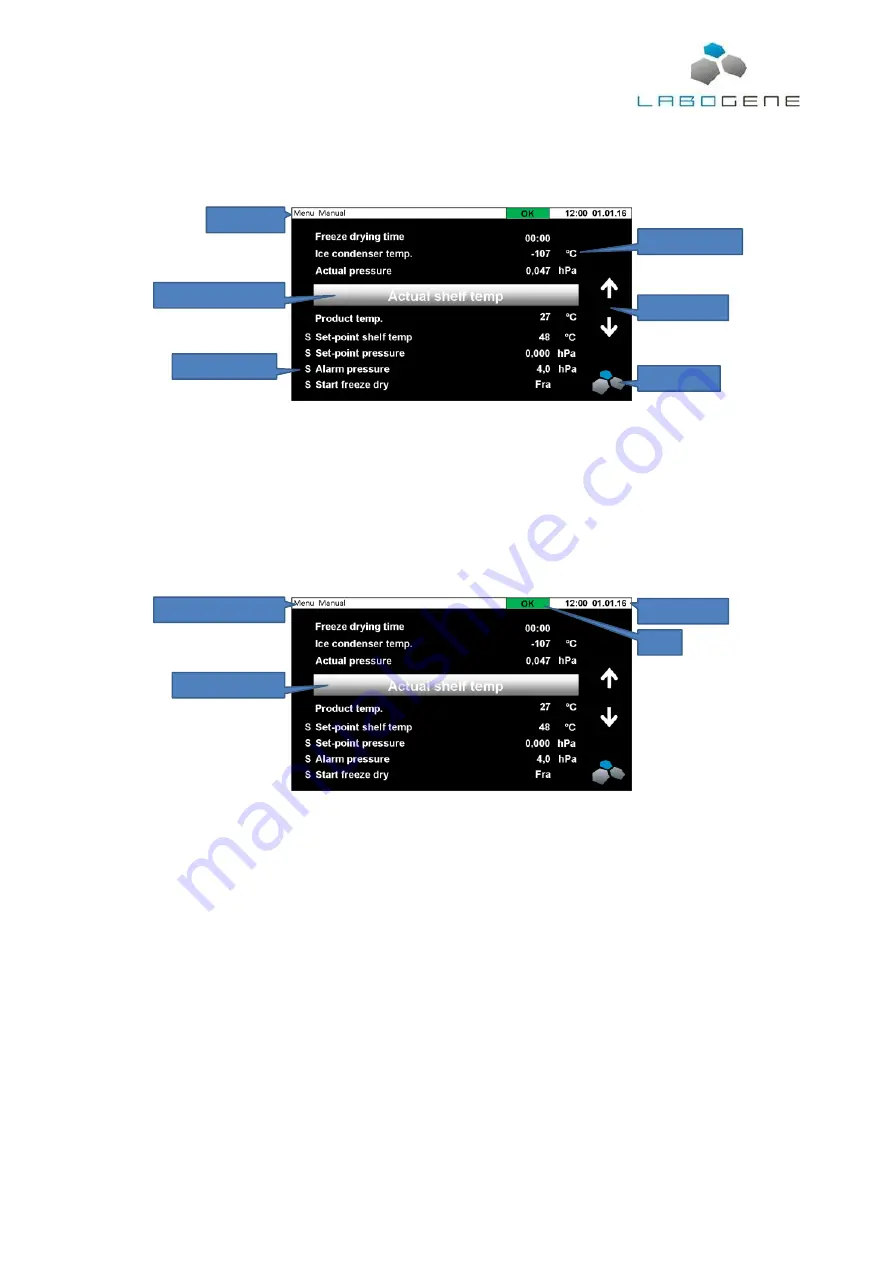
information panel for status and alarm messages. Navigation is easy. To enter menu items just press 
lightly on the touch panel. If the menu holds more items than can be shown in one screen, use the 
UP and DOWN arrows on the right side of the display to scroll through the menu items.  


Navigation is easy. To enter menu items just press lightly on the touch panel. If the menu holds more 
items  than  can  be  shown  in  one  screen,  use  the  UP  and  DOWN  arrows  on  the  right  side  of  the 
display to scroll through the menu items. To return to the previous menu press the LaboGene logo 
placed in the lower right hand corner of the screen. 
 
When  a  menu  item  is  selected  or  in  focus,  the  text  is  magnified.  The  text  will  be  either  yellow, 
indicating that the menu item is information only or the text is white, indicating that more details can 
be displayed by pressing the menu item selected. 


The status line at the top of the display shows the running mode of the freeze dryer, i.e. Manual or 
Auto running freeze drying process, the actual stage of the freeze drying process, i.e. standby, pre-
freezing,  primary  drying  and  secondary  drying.  Next  the  status  of  the  freeze  dryer  or  the  current 
freeze drying process is displayed in a colour coded area, green for OK, yellow for OK but not ready 
to proceed and red for error or alarm situation. At the end time and date is shown.  

4.2 

Valves and connections 

The  CoolSafe  is  equipped  with  a  number  of  valves  and  connections that  makes the freeze  dryer 
function  and  operate  correctly.  Each  must  be  set  correctly  and  plugged  in  correctly  to  make  the 
CoolSafe operational. 

4.2.1 

Power supply and ON/OFF switch 

The CoolSafe is designed to be plugged into a standard wall socket with build in earth and minimum 
10 A fuse.  
 
The CoolSafe is delivered with a country specific power cable, which is connected to the unit on the 
lower left hand side on the back panel. The main ON/OFF switch is placed on the front panel of the 
unit. When switched on the switch is illuminated green.  
 

Status line


Selected menu item


Parameter name


Parameter value


Scroll up/down


Level up key


Running mode Manual


Menu item in focus


Time and date


Status


Содержание CoolSafe Touch 700636

Страница 1: ...01012016QA01 Item No 700636 CopyRight 2016 Page 1 of 35 INSTRUCTION MANUAL CoolSafe Touch...

Страница 2: ...dium or minor injuries or physical damage This document is the original instruction manual in accordance with the current Machinery Directive This document is the reference for any translation of this...

Страница 3: ...1 Current shelf temperature 15 6 3 2 2 Alarm pressure 16 6 3 3 Edit programme 16 6 3 3 1 Pre freeze 16 6 3 3 2 Alarm pressure 17 6 3 3 3 Primary drying 1 5 and 6 9 17 6 3 3 4 Secondary drying 18 6 4 R...

Страница 4: ...rying session Easy operation with a built in vacuum valve connecting the condenser and vacuum pump and allowing the condenser to cool down and the vacuum pump to warm up separately ensuring an efficie...

Страница 5: ...equirements for electric equipment control and laboratory use EN 61010 1 which assumes that two separate faults do not occur simultaneously 3 Installation 3 1 Installation of CoolSafe Make sure that t...

Страница 6: ...on Make sure to mount the correct manifold chamber and shelf arrangements and always check that all connections are tight 4 Functional description The CoolSafe Touch including a vacuum pump and a cham...

Страница 7: ...unning mode of the freeze dryer i e Manual or Auto running freeze drying process the actual stage of the freeze drying process i e standby pre freezing primary drying and secondary drying Next the sta...

Страница 8: ...e dryer with the delivered clamps 4 2 3 Power supply for heating of and temperature signals from shelves option The rack and shelves placed on top of the condenser is connected to the control system t...

Страница 9: ...ssure regulation The pressure regulation works from the display of the controller Here a set point of the pressure during the freeze drying is defined If a set point of e g 1 hPa is entered the contro...

Страница 10: ...vailable This is used for connecting a computer running the LaboGene freeze drying software from which the freeze dryer can be controlled The software offers a graphical user interface showing the com...

Страница 11: ...em No 700636 CopyRight 2016 Page 11 of 35 6 User interface On start up the screen below will be showing until the control system is up and running When the system is fully loaded and initialized the m...

Страница 12: ...Manual menu Touch screen as opened Item Action Scroll up and down using the arrows to the right to select the menu item you want to see or change Freeze drying time Time elapsed since start of freeze...

Страница 13: ...press to reset error counter Press the LaboGene logo to return to the main menu Press the LaboGene log for 2 3 seconds to lock the display for input Unlock press again 6 2 1 Current shelf temperatures...

Страница 14: ...ot turned on before this pressure is reached If the pressure raise above this pressure during operation the shelf heating will be turned off to protect the product being freeze dryed Decrease set poin...

Страница 15: ...ure Actual pressure View the current pressure in the ice condenser Actual shelf temp Press to see list of Current shelf temperatures Product temp View the current product temperature Set point shelf t...

Страница 16: ...Pre freeze Press to edit pre freeze process Alarm pressure Press to set alarm pressure Primary drying 1 5 Press to edit primary drying process Primary drying 6 9 Press to edit primary drying process S...

Страница 17: ...3 seconds to lock the display for input Unlock press again 6 3 3 2 Alarm pressure Touch screen as opened Item Action Decrease set point by 0 1 hPa Torr Accept change in set point Increase set point by...

Страница 18: ...Gene logo to return to the primary drying menu Press the LaboGene log for 2 3 seconds to lock the display for input Unlock press again 6 3 3 4 Secondary drying Touch screen as opened Item Action When...

Страница 19: ...process Heating elements in the condenser will start melting the ice on the condenser wall Can either melt it completely or just enough to free the ice block from the condenser wall The block can the...

Страница 20: ...d the release valve will be closed 6 7 Setup Touch screen as opened Item Action Language selection Press to select the language displayed in the control system Pressure selection Press to select the p...

Страница 21: ...LaboGene logo to return to the setup menu Press the LaboGene log for 2 3 seconds to lock the display for input Unlock press again 6 7 4 Set time date Touch screen as opened Item Action When activatin...

Страница 22: ...u Press the LaboGene log for 2 3 seconds to lock the display for input Unlock press again 6 9 Info Touch screen as opened Item Action Software version controller The current software version installed...

Страница 23: ...fore stage 2 is started up This is to ensure that pressure in the stage 2 system is keep within the allowable pressure limits In case the ice condenser temperature is below 70 C for instance after a s...

Страница 24: ...atically be the auto reset function If the safety pressure sensor is activated 3 times in a 20 minute period it must be reset by powering the compressor down and turning it on again N A 8 Preparations...

Страница 25: ...ressure regulation optional allows programming and regulation of the vacuum to set values in each of the 10 freeze drying steps Entering a zero value for pressure no regulation is applied This can be...

Страница 26: ...anifolds 1 The manifold is connected to the conus in the lid Make sure this connection is tight Check that all rubber valves are closed A or in vacuum release position C and that the flange and lid ar...

Страница 27: ...ualise the vacuum in condenser use the release function 8 4 Freeze drying using chambers Warm shelves Cold shelves 1 Make sure that the vacuum valve is closed 2 Mount the chamber and shelf arrangement...

Страница 28: ...he drying cycle Never let the depth of sample exceeds its diameter especially in vials flasks trays etc Maintain the vacuum pump regularly oil changes must be made as per manufacturer s instructions P...

Страница 29: ...mp and the nozzle Make sure the clamp is tight and that the hose is pushed well onto the nozzle and that the clip on the hose is tight 2 Check the other end of the vacuum hose where it connects to the...

Страница 30: ...ave an impact on the structure of the material being dried Freeze drying is achieved using equipment that controls temperature and pressure in the environment of the product and is a 3 step process In...

Страница 31: ...2 5 Total volume of Condenser L 4 Weight net kg 40 Cabinet dimensions DxWxH mm 500x400x520 Cabinet material Polyestercoatedsteel Condenser material StainlesssteelAISI316 Cooling media R507 Vacuum Val...

Страница 32: ...ch screen for control options Yes USB port for LaboGene software SD card for data Yes 11 2 CoolSafe 95 C and 100 C CoolSafe Touch 95 15 Unit Part no 700057 Digital read out of temperature Yes Digital...

Страница 33: ...Gene software SD card for data Yes 11 3 CoolSafe 110 C CoolSafe Touch 110 4 Unit Part no 700049 Digital read out of temperature Yes Digital read out of pressure Yes Ultimate temperature at 20 C room t...

Страница 34: ...Instruction manual for CoolSafe 01012016QA01 Item No 700636 CopyRight 2016 Page 34 of 35 13 Declaration of conformity...

Страница 35: ...46 13 0 1 986 22 2 0 835 44 0 0 081173 4 0 4 371 13 2 1 951 22 4 0 819 46 0 0 064112 4 2 4 298 13 4 1 915 22 6 0 803 48 0 0 050383 4 4 4 226 13 6 1 880 22 8 0 789 50 0 0 039387 4 6 4 154 13 8 1 847 23...

Отзывы: