34
Service Manual - NeoTherm 500
For the low gas pressure switch only -
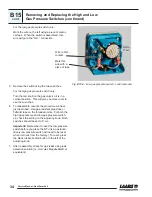
Mark the wire on the left using a piece of electri-
cal tape. When the switch is assembled, this
wire will go to the “N.O.” connection.
Wire to N.O.
contact
Mark this
wire with a
piece of tape.
Fig. B15-4 - Low gas pressure switch - cover removed
5. Remove the switch using the two wrenches.
For the high gas pressure switch only -
Turn the red knob on the gas valve so it is in a
vertical position. This will give you more room to
use the wrenches.
6. To reassemble, reverse the procedure we have
just described. Use gas-resistant pipe dope or
Teflon® tape on the threaded joints. For both the
high gas pressure and low gas pressure switch-
es, check the setting on the adjusting knob. Both
switches should be set to 3” w.c..
Important!
Remember to reset the low-pressure
switch before you place the NT unit in operation.
(Every low pressure switch will need to be reset
when it arrives from the factory.) To reset, press
the black rubber-booted button to the left of the
adjusting knob.
7. After reassembly, check for gas leaks using leak
detection solution (i.e. Hercules Megabubble® or
equivalent).
Set to
3” w.c.
B15
cont.
Removing and Replacing the High and Low
Gas Pressure Switches (continued)
Содержание NeoThem NTH
Страница 2: ......
Страница 10: ...Service Manual NeoTherm 500 viii ...
Страница 68: ...58 Service Manual NeoTherm 500 ...
Страница 115: ...105 Service Manual NeoTherm 500 Appendix 3 Wiring Diagram App3 ...
Страница 116: ...106 Service Manual NeoTherm 500 ...
Страница 117: ......


