


Countdown Timer
Resolution:
- 1 second resolution
Range:
- 99 hours 59 minutes 59 seconds
Operation Mode:
- Countdown to zero and stop at zero
Timer Sounds:
- Beeps once when count to last 10, 5 and 1 minute
- Beeps once for every second when count to last 5
seconds,
- Sounds for 2 seconds when count to zero
Pacer Mode
Range:
- 40 bpm to 180 bpm
Pacer Sounds:
- Pacer beep
Dual Time Mode
Time System:
- AM, PM, Hour, minute, second, and display with
bar graph animation at the rate of 1 second
Calendar:
- Month and date
Current Time Mode
Time System:
- AM, PM, Hour, minute, second, and display
with bar graph animation at the rate of 1 second
- 12-hour or 24-hour format
Calendar:
- Month, date and day of week display
- Auto-Calendar function for leap year and day
of week
Alarm Mode
Alarm Type
:
- 1 daily alarms, hourly chime
Alarm Sound
:
- Sounds for 20 seconds at preset time of real time
clock
Chronograph Mode
Resolution:
- 1/100 second
Range:
- 9 hours 59 minutes 59.99 seconds
Lap memory:
- 42 lap memories (maximum)
13.0 Specifications
Compass Mode
Back Light
Back Light Type:
- Electro-Luminescent (EL) back light
Others:
- Auto back light
Battery
Battery Type:
- Single 3V lithium battery (CR2032)
Resolution:
- 1
8
display (digital)
- 1 of 60 pointers (graphical)
- 16 compass points
Display Range:
- 0 to 359
8
(digital)
- 1 to 60 pointers (graphical)
Others:
- Digital bearing reading Lock
- Digital backward bearing
13.0 Specifications
TM
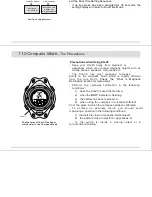
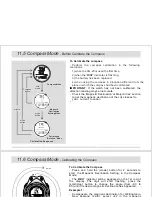
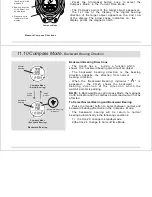
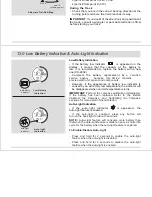
To Check the Track Course Correct
-
If you are hiking on a track, the
XG-20
can keep
your track course correct.
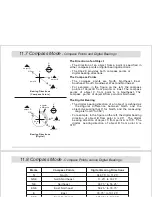
- For example, the correct track is from point A to point D
as it is mentioned on the map on the left.
Before the Track
- M a r k t h e p o i n t s ( i d e n t i f i a b l e l a n d m a r k s ) o n a
topographic map where the track turns its direction or t h e
track branches its way, such as the point A, B, C and D.
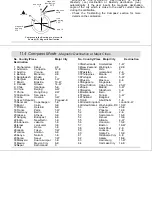
- Check the bearing directions on a topographic map of
the following points:
1)point B from point A (315 ),
2)point C from point B (0 ),
3)point D from point C (225 ), and
4)point E from point D (315 ).
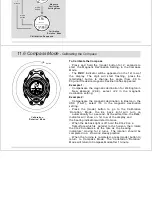
During the Track
- Check that you are in the correct bearing direction at the
turning points or where the trail branches its way.
IMPORTANT
: If you doubt of the directions and positions of
the track, consult a wrangler or park administration officer
before starting your track.
8
8
8
8
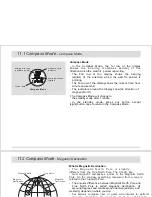
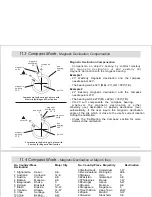
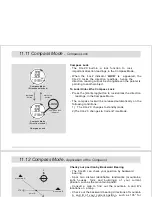
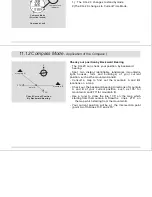
11.13 Compass Mode
- Application of the Compass II
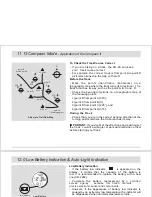
12.0 Low Battery Indication & Auto-Light Indication
4110 m
1110 m
2120 m
3120 m
point A
(starting point)
point B
A Sample Trail On A Map
point D
point E
(finish point)
point C
315
8
225
8
0
8
315
8
0
8
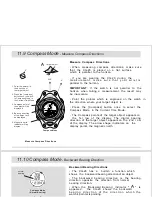
Low Battery Indication
- If the battery low indicator is appeared on the
display, it means that the capacity of the battery is
low. It is recommended to replace the battery with a new
one (CR-2032).
- Complete the battery replacement by
- However, if the appearance of battery low indicator is
caused by an extremely low temperature, the indicator will
be disappeared when normal temperature returns.
IMPORTANT:
Auto-Light Indication
- If the auto-light indicator is appeared, the
auto-light feature is enabled.
a certified
service agency, because this
XG-20
contains
precise electronic sensor and components.
Perform the compass calibration immediately,
if the battery has been replaced. Refer to the 'Before
Calibrate the Compass' and 'Calibrating the Compass'
sections for more detail of the calibration.
- If the auto-light is enabled, press any button will
turn on the back light for about 3 seconds.
NOTE:
Auto-Light feature will consume more battery than
that when the auto-light feature is disable, hence a shorter life
cycle for the battery when the auto-light feature is enabled.
To Enable/Disable Auto-Light
- Press and hold for 2 seconds to enable the auto-light
feature when the auto-light is disabled.
- Press and hold for 2 seconds to disable the auto-light
feature when the auto-light is enabled.
TM
low battery
indicator
Low Battery
Indication
auto-light
indicator
Auto-light
Indication
Содержание XG-20
Страница 40: ...XG 20...
Страница 42: ......
Страница 43: ...XG 20 XG 20 avec un XG 20 dans un endroit sec...
Страница 44: ......
Страница 45: ......
Страница 46: ......
Страница 47: ......
Страница 48: ......
Страница 49: ......
Страница 50: ......
Страница 51: ......
Страница 52: ......
Страница 53: ......
Страница 54: ......
Страница 55: ......
Страница 56: ......
Страница 57: ...XG 20 XG 20...
Страница 58: ......
Страница 59: ...XG 20 XG 20 XG 20...
Страница 60: ......
Страница 61: ...XG 20 indique le p le nord magn tique Par contre XG 20 dispose d une possibilit de r glage sp ciale...
Страница 63: ......
Страница 64: ...XG 20 dispose de deux possibilit s XG 20 pour la premi re fois...
Страница 65: ...XG 20...
Страница 66: ...XG 20 dispose de deux possibilit s...
Страница 67: ...XG 20...
Страница 68: ...XG 20 XG 20 au bras pendant le mesurage XG 20 dispose d une fonction...
Страница 69: ...XG 20 XG 20...
Страница 70: ...XG 20 dispose d une fonction...
Страница 71: ...XG 20...
Страница 72: ...XG 20...
Страница 73: ......
Страница 74: ......
Страница 75: ......
Страница 80: ......
Страница 81: ......
Страница 82: ......
Страница 83: ......
Страница 84: ......
Страница 85: ......
Страница 86: ......
Страница 87: ......
Страница 88: ......
Страница 89: ......
Страница 90: ......
Страница 91: ......
Страница 92: ......
Страница 93: ......
Страница 94: ......
Страница 95: ...del XG 20 el XG 20 el XG 20...
Страница 96: ......
Страница 97: ...del XG 20 el XG 20 el XG 20...
Страница 98: ......
Страница 99: ......
Страница 100: ......
Страница 101: ......
Страница 102: ...el XG 20 EI XG 20 cuenta con ambas posibilidades...
Страница 103: ...el XG 20 sobre una superficie plana que...
Страница 104: ...EI XG 20 cuenta con ambas posibilidades...
Страница 105: ...el XG 20 sobre una superficie plana que...
Страница 106: ...el XG 20 sobre el XG 20 durante la medici n en el brazo el XG 20 dispone de una...
Страница 107: ...El XG 20 cuenta una funci n que se ala la marcaci n el XG 20 puede verificar su posici n mediante...
Страница 108: ...el XG 20 dispone de una...
Страница 109: ...el XG 20 puede verificar su posici n mediante...
Страница 110: ...el XG 20...
Страница 111: ......
Страница 112: ......
Страница 113: ......