La Crosse Technology WS-8610 Скачать руководство пользователя страница 15

15


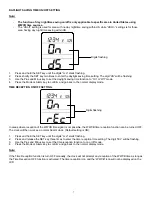
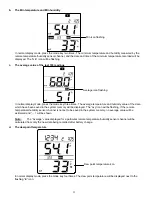
To set the low temperature alarm: 
 

1.  In normal display, press the Plus or Minus key to select a temperature/humidity sensor (the temperature/humidity 

sensor at the indoor weather station or one of the remote temperature/humidity sensors) 

2.  Press and hold the Alarm key for about 3 second to enter high humidity alarm setting. Then press shortly the Alarm 

key three more times to enter the low temperature Alarm setting. The temperature digits, low limit icon and the alarm 
icon will start flashing. 


3.  Press the Mode key to select to “activate” or “deactivate” the low temperature alarm. (“Alarm On” icon displayed 

represents the alarm is on)  

4.  Press the Plus or Minus key to set the desired value of the low temperature alarm point. 
5.  Press SET key to return to the normal display. 
 

Note:


The alarms allow you to set individually the high or low threshold as you require. For example, you can set the 
thresholds for temperature to 85°F (high) and 65°F (low), while only activating high temp alarm and deactivating low 
temp alarm. In this case, the alarm will not trigger when temperature is lower than 65°F yet will trigger when temp is 
higher than 85.0°F. 


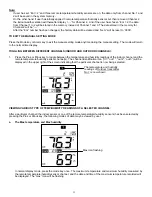
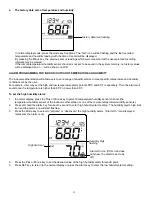
When the temperature or humidity is sensed to be out of the pre-set threshold value, the alarm will sound and the 
alarm icon will be present on LCD. You may press any key to stop the buzzer. If no key is pressed, the buzzer will 
beep for two minutes however the alarm signal icon will flash until the temperature or humidity is within the pre-set 
range again. 


Once an alarm is triggered, the display switches to the latest triggered temperature/humidity sensor channel. In 
addition, the high/ low limit icon and IN/ OUT icon is flashing as long as the alarm condition is met.  


If an alarm is triggered, the alarm icon will be flashing until the temperature and/or humidity is back to the conditions 
within the preset threshold values. 
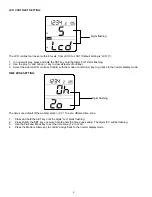
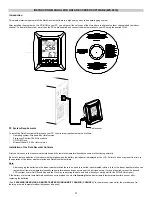


Low limit icon

Temperature digits 
flashing 

The Alarm icon and the corresponding 

high or low alarm icons will flash once 

the current temperature or humidity is 

out of the pre-set threshold value 

Содержание WS-8610

Страница 1: ...time of reception Indoor and outdoor humidity display as RH with MIN MAX records Data logging function can store up to 3000 sets of temperature humidity data Connectable to PC Com port data can be tra...

Страница 2: ...es working error may result Note After changing the batteries in the indoor weather station there is no need for user to reset the indoor weather station In fact the indoor weather station can remembe...

Страница 3: ...After the batteries have been installed the indoor weather station will search for the signal for a duration of 5 minutes If there is no temperature or humidity reading in the OUTDOOR LCD after 5 minu...

Страница 4: ...justment increase or decrease in different manual settings and alarm setting Mode key MODE In normal display mode press to toggle between the following view mode a Maximum record of a selected channel...

Страница 5: ...de for the following a LCD contrast setting b Time zone setting c Daylight saving time on off setting d Radio controlled time reception on off setting e 12 24 hour format setting f Time setting Hour a...

Страница 6: ...he mode or Alarm AL key to go back to the normal display mode TIME ZONE SETTING The time zone default of the weather station is 0 To set a different time zone 1 Press and hold the SET key until the di...

Страница 7: ...splay mode TIME RECEPTION ON OFF SETTING In areas where reception of the WWVB time signal is not possible the WWVB time reception function can be turned OFF The clock will then work as a normal Quartz...

Страница 8: ...ld the SET key until the digits Lcd starts flashing 2 Press and release the SET key five times to enter the hour setting The hour digit in the time LCD will be flashing 3 Use the Plus and Minus key to...

Страница 9: ...will be flashing 5 Use the Plus and Minus key to set the month 6 Press the SET key one more time to confirm the month and advance to the day setting The day digit will be flashing 7 Use the Plus and...

Страница 10: ...to 3 setting them either in re learnt or removed state Note Once a channel is removed the indoor weather station will be disconnected from the channel and the data transmitted by this channel cannot...

Страница 11: ...ELS INDOOR AND OUTDOOR CHANNELS 1 Press the Plus or Minus key to toggle between the temperature and humidity readings of the indoor channel and the remote temperature humidity sensor channel s The cha...

Страница 12: ...the data which have been saved in the system memory will be displayed The avg icon will be flashing If the remote temperature humidity sensor channel is not set to be saved in the system memory no av...

Страница 13: ...t at 85 F and 65 F respectively Then the alarm will sound once the temperature is higher than 85 F or lower than 65 F To set the high humidity alarm 1 In normal display press the Plus or Minus key to...

Страница 14: ...e Alarm key to enter the high temperature alarm setting To set the high temperature alarm 1 In normal display press the Plus or Minus key to select a temperature humidity sensor the temperature humidi...

Страница 15: ...nd 65 F low while only activating high temp alarm and deactivating low temp alarm In this case the alarm will not trigger when temperature is lower than 65 F yet will trigger when temp is higher than...

Страница 16: ...ond The maximum and minimum temperature humidity data and the time of record will be reset to the current value CLEARING THE MAX MIN TEMPERATURE AND HUMIDITY DATA OF ALL REMOTE TEMPERATURE HUMIDITY SE...

Страница 17: ...minutes followed by the full segment display You are then required to remove and re insert the batteries to complete the restart of the unit After batteries are re inserted the station will automatica...

Страница 18: ...ck the following items 1 The distance of the indoor weather station or remote temperature humidity sensors should be at least 6 feet 2 meters away from any interfering sources such as computer monitor...

Страница 19: ...t over the desired location 3 Through the screw holes of the bracket mark the mounting surface with a pencil 4 Screw mounting bracket onto the mounting surface Ensure that the screws are flush with th...

Страница 20: ...s to the units Return it to their original point of purchase for repair by a qualified engineer Opening and tampering with the units may invalidate their guarantee Do not expose the units to extreme a...

Страница 21: ...contained in your owner s manual 5 damage resulting from the performance of repairs or alterations by someone other than an authorized La Crosse Technology Ltd authorized service center 6 units used f...

Страница 22: ...sensors are functioning normally Be sure to replace batteries of the indoor weather station when the battery low indicator is displayed at the LCD Failure to do so may result in errors in the operatio...

Страница 23: ...language English German or French 6 Follow the steps as instructed by the Install menu to finish the installation 7 A shortcut icon Data Recorder as shown below will appear on your PC desktop after s...

Страница 24: ...in the Options mode 1 Click the Extras in the menu bar Then user may advance to the Options menu 2 In the Options mode the following parameters can be altered Display format a Language English German...

Страница 25: ...ote This history file carries data only for the Data Recorder program and can only be viewed with this program If you need to use the data in another program for instant Microsoft Excel you will need...

Страница 26: ...3 The number of channels shown will be the number that you have set in the indoor weather station for the Number of remote temperature humidity sensors to be saved in the system memory 2 Click the Da...

Страница 27: ...l the stored data will be cleared Exporting data to PC saving the data in a user generated file in PC You may save the data in a file so that it can be used in other programs later 1 Click the Export...

Страница 28: ...soft Excel file by the following steps 1 Open Microsoft Excel first Then choose to open a Text file 2 Next go to the Text import setting and see the below screen Click Next to advance to the next scre...

Страница 29: ...data row 2 Move the cursor to point at the figure to be altered and click the left button of the mouse three times consecutively The figure will be highlighted and you can enter in a new figure You m...

Страница 30: ...st be presented to the carrier 3 damage to or deterioration of any accessory or decorative surface 4 damage resulting from failure to follow instructions contained in your owner s manual 5 damage resu...

Отзывы: