background image

FOLDOUT TABLE STAND 


The foldout table stand legs are located on the backside, at the lower corners, just 
below the battery cover. The hinges are towards the edges of the  atomic clock, and 
the ends (with no hinge) need to be folded out towards the edge. Once the foldout 
table stands are extended, place the atomic clock in an appropriate location. 


WALL MOUNTING


1)  Using a straight edge, horizontally space at 1-15/16 of an inch (50 mm) 

three screw positions on a wall.   

2)  Install three mounting screws (not included) into a wall —leaving 

approximately 3/16 of an inch (5mm) extended from the wall.


3)  Place the atomic clock onto the screws, using the hanging holes on the 

backside. Gently pull the atomic clock down to lock the screws into place.    


Note:


Always ensure that the atomic clock locks onto the screws before releasing. 


POSITIONING THE OUTDOOR TEMPERATURE TRANSMITTER 

The outdoor temperature transmitter can be mounted in two ways: 

• 

with the use of screws 

• 

using the adhesive tape. 


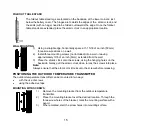
MOUNTING WITH SCREWS 


1) 

Remove the mounting bracket from the outdoor temperature 
transmitter. 

2) 

Place the mounting bracket over the desired location. Through the 
three screw holes of the bracket, mark the mounting surface with a 
pencil. 

3) 

Where marked, start the screw holes into mounting surface. 


15

Содержание WS-8256-AL

Страница 1: ...me with manual time setting Time display hour minute second Alarm setting with snooze function Complete calendar display Weekday display 3 languages to choose from English French and Spanish Time zone...

Страница 2: ...oth units Avoid using rechargable batteries TO INSTALL AND REPLACE BATTERIES IN THE ATOMIC CLOCK The atomic clock uses 3 x AA 1 5V batteries To install and replace the batteries please follow the step...

Страница 3: ...also updated with the received time Please refer to notes on Radio controlled time and Manual time setting 4 After the time signal has been received or the search mode has been manually stopped the in...

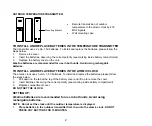
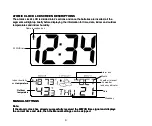
Страница 4: ...laying the information for time date indoor and outdoor temperatures and indoor humidity Indoor humidity nd temperature temperature a Outdoor temperature Outdoor temperature WWVB time Radio reception...

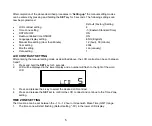
Страница 5: ...nth setting Jan January Date setting 1 LCD CONTRAST SETTING After entering the manual setting mode as described above the LCD contrast can be set between 0 and 7 1 Press and hold the SET key for 5 sec...

Страница 6: ...cific time 9 ALA Alaska time 10 HAW Hawaii time GMT will be displayed if set to GMT 0 DST SETTING daylight saving time 1 The word ON will start flashing in the lower LCD display 2 Press and release th...

Страница 7: ...radio controlled time setting and continue to the Language setting Note Turn off the radio controlled time feature only if you DO NOT want the clock to automatically update itself LANGUAGE SETTING Th...

Страница 8: ...the received time During reception attempts the WWVB tower icon will flash If reception has been unsuccessful then the WWVB tower icon will not appear but reception will still be attempted the followi...

Страница 9: ...le it is not possible to set the date 30 if the month of February is selected EXIT THE MANUAL SETTING MODES To return to the normal display mode from anywhere in manual setting mode simply press the A...

Страница 10: ...bear this in mind when positioning the transmitter Also the batteries may be reduced in power during periods of extreme cold temperatures 433MHz RECEPTION CHECK FOR OUTDOOR TEMPERATURE TRANSMITTER The...

Страница 11: ...pends on the surrounding environment and interference levels If no reception is possible despite the observation of these factors all system units have to be reset see Setting up CHANGING THE DISPLAY...

Страница 12: ...its signal from the NIST atomic clock in Boulder Colorado A team of atomic physicists continually measures every second of every day to an accuracy of ten billionths of a second a day These physicist...

Страница 13: ...g a necessity to disregard all weather forecasting for 12 24 hours after the unit has been set up reset or moved from one altitude to another i e from one floor of a building to another floor In areas...

Страница 14: ...nges in elevation will result with inaccurate temperatures readings for the next 12 to 24 hours These changes will require a 12 to 24 hour wait before obtaining reliable data To achieve a true tempera...

Страница 15: ...imately 3 16 of an inch 5mm extended from the wall 3 Place the atomic clock onto the screws using the hanging holes on the backside Gently pull the atomic clock down to lock the screws into place Note...

Страница 16: ...lution 1 It may help reception to face the front of the atomic clock in the general direction of Ft Collins Colorado 2 Wait overnight for signal 3 Be sure the atomic clock is at least 6 feet 2 meters...

Страница 17: ...hock as these may cause damage Avoid areas where the units can be exposed to sudden changes in temperature i e direct sunlight extreme cold and wet moist conditions as these will lead to rapid changes...

Страница 18: ...s product is only designed for use in the home or office This product is not to be used for medical purposes or for public information The specifications of this product may change without prior notic...

Страница 19: ...ipping charges incurred in getting your La Crosse Technology Ltd product to a La Crosse Technology Ltd authorized service center La Crosse Technology Ltd will pay reasonable return shipping charges to...

Страница 20: ...ail support lacrossetechnology com warranty work sales lacrossetechnology com information on other products web www lacrossetechnology com Questions Please see instruction video at www lacrossetechnol...

Отзывы: