background image


34

manufacturer, it may not be necessary for the majority of users 
to carry out – apart from the Relative Air Pressure (see further 
down) - any further basic settings. Changes however can easily 
be made if desired.   

 
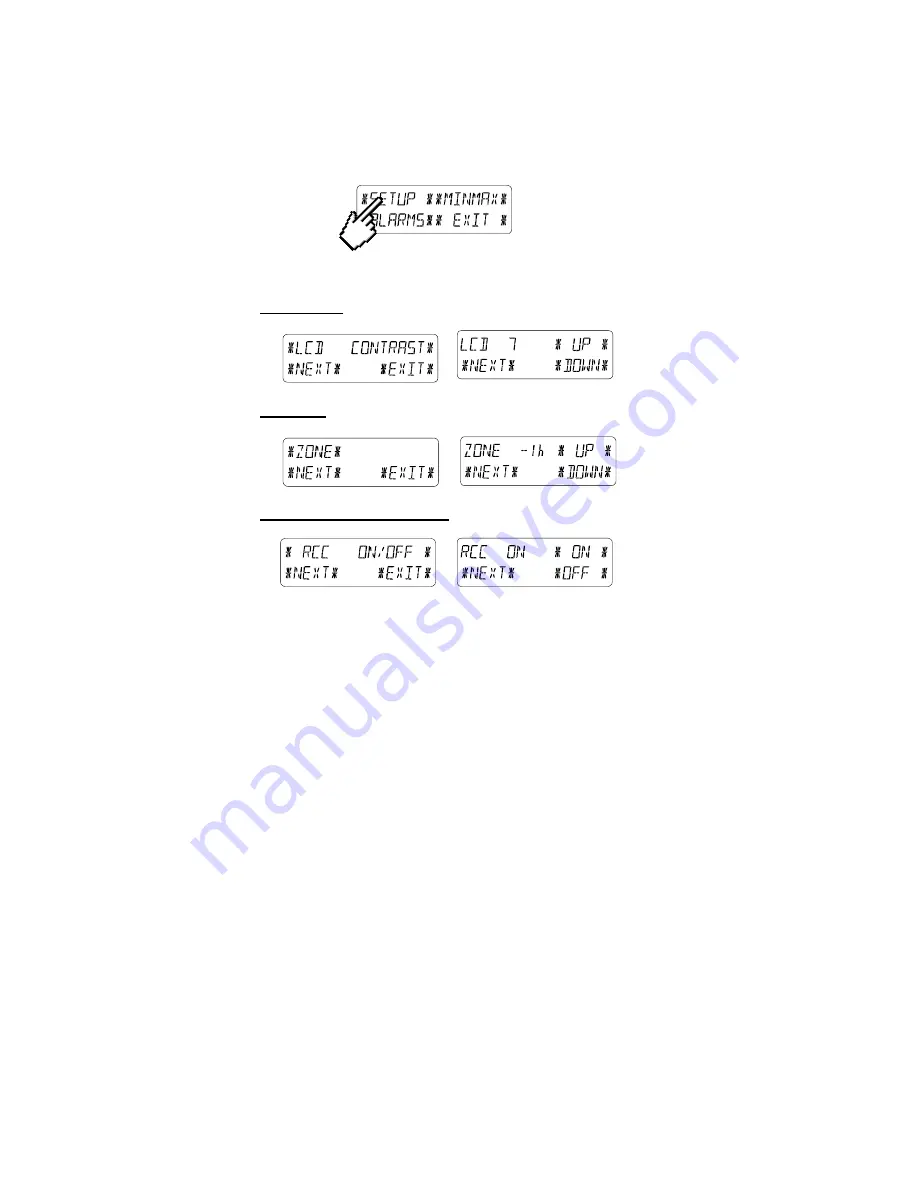
For basic settings the following menu is started by touching the Touch 
Screen in the center of the text display (last two lines on the LCD). 
Touching the 

٭

SETUP

٭

 display will enter the setup mode. 


The basic settings can now be performed in the following order:   
 

LCD Contrast


 Contrast can be set in 8 steps from 0 to 7 (Default 

4). 


Time Zone


 Time Zones can be set in the range from -12 to +12 

hours (Default 0 hours for Central Europe). 


DCF77 Radio Controlled Clock

 (RCC) 

 ON/OFF. In setting “OFF“ 

the clock is operating as a normal Quartz clock (Default RCC ON).   


Содержание WS-3502

Страница 1: ...25 TOUCH SCREEN WEATHER STATION WIND AND AIR PRESSURE WS 3502 Operation Manual ...

Страница 2: ...dency 8 Air Pressure History 9 Operating and Setting of various Functions 9 1 Air Pressure 10 Additional Information to Wind Function 10 1 Operating and Setting of Wind Direction Function 11 Operating and Setting of Backlight Buzzer and Alarm History Functions 11 1 EL Backlight 11 2 Buzzer 11 3 Alarm History 12 PC Connection 12 1 Data Storage 12 2 Data Recall 12 3 Connections and Software 13 Techn...

Страница 3: ... Weather Forecast Tendency Air Pressure and Air Pressure History Pressure Pressure History Wind Furthermore on the information text display located at the bottom of the LCD a number of additional data can be set up Note On the information text display The max and min of current air pressure wind speed and the maximum wind gust will be shown from time to time In case the set up menu is selected the...

Страница 4: ...formed by use of the switching areas ON or OFF UP or DOWN or by direct unit selection Advancing to any next menu step with NEXT leaving or terminating all respective modes with EXIT Every programming step activated by touching a switching area on the Touch Screen is being acknowledged by an acoustic signal with buzzer switched ON If during any process previously activated by use of the Touch Scree...

Страница 5: ... the Alarm On icon in the section means that the particular alarm has been enabled 3 Putting into Operation At first it is to decide whether battery supply or mains supply AC DC mains adapter included will be used to operate the system Both methods allow the connection of the Relay Transmitter and Base Station by cable or by 433 MHz radio signal Note When putting the Weather Station into operation...

Страница 6: ...mounting them at their final destinations 3 1 Wiring the System Independently of the final power supply mode the fixed cable of the Wind Sensor has first to be connected to the Relay Transmitter by plugging it into the marked receptacle Wireless Transmission Direct cable connection ...

Страница 7: ...Batteries First insert two Type C 1 5 V batteries into the battery compartment of the Relay Transmitter Immediately following this insert three Type AA 1 5V batteries into the battery compartment of the Touch Screen Weather Station Please help in the preservation of the environment and return used batteries to an authorized depot 3 2 2 AC DC Mains Adapter First insert two Type C 1 5 V batteries in...

Страница 8: ...owever remain in the unit for emergency supply in case of a power failure A change from cable operation to 433 MHz radio transmission or vice versa is possible in any case since the Weather Station will recognize this change and will automatically switch to the appropriate operating mode 3 3 System Start After inserting the batteries respectively connecting the AC DC adapter the LCD of the Weather...

Страница 9: ...cement After the Weather Station has been checked for correct operation with regard to the above points and found fit the mounting of the system components can take place It must be ensured however that all components work properly together at their chosen mounting or standing locations If e g there appear to be problems with the 433 MHz radio transmission they can mostly be overcome by slightly m...

Страница 10: ...Touch Screen in the center of the text display last two lines on the LCD Touching the SETUP display will enter the setup mode The basic settings can now be performed in the following order LCD Contrast Contrast can be set in 8 steps from 0 to 7 Default 4 Time Zone Time Zones can be set in the range from 12 to 12 hours Default 0 hours for Central Europe DCF77 Radio Controlled Clock RCC ON OFF In se...

Страница 11: ... Pressure Press in hPa or inHg Default hPa Relative Air Pressure Rel Pressure To be set to the locally valid reference air pressure with regard to the local height above sea level Default 1013 0 hPa Weather Tendency Tendency Setting to a definite switching threshold 2 hPa to 4 hPa for a change in display of weather icons Default 3 hPa ...

Страница 12: ...FF Relearn Mode Relearn Tx Allows newly recognize the outdoor transmitter e g after a battery change in the transmitter without the necessity of a comprehensive re setup of all system components Acknowledge with CONFIRM Default Settings Factory Reset Allows to clear all weather data in non volatile buffer memory EEPROM and to reset of all set and or stored values to the factory settings set prior ...

Страница 13: ...their respective display sections To recall named measuring and alarm values the menu shown below will have to be activated by touching the Touch Screen in the center of the text display section last two lines at the bottom of the LCD The display of the values is started by touching the displays MINMAX or ALARMS The continuance of the recalling process is essentially self explanatory With MINMAX t...

Страница 14: ...ible at any time to toggle between the MIN MAX and ALARMS value displays Any action can immediately be terminated by touching EXIT 6 Radio Controlled DCF77 Clock The Radio Controlled DCF77 Clock is normally controlled by the radio signal of the DCF77 time code transmitter and will thus set time and date automatically Under bad reception conditions however both can be set manually as follows Settin...

Страница 15: ...ice touching the DATE section the display will toggle between the following Date in DD MM YY format 24 hour time format or Date in MM DD YY format 12 hour time format Weekday in English abbreviation Date of Day Month 24 hour format or Weekday Month Date of Day 12 hour time format Seconds Set Wake up Alarm Time Setting of Wake up Alarm The action is started by touching the time display in the TIME ...

Страница 16: ... The text section last two lines on the LCD will show since when with time and date the weather condition corresponds to the currenttly displayed weather symbol Sunny Fair Cloudy with sunny intervals or Rainy Note Up and down arrows indicate the weather tendency Advanced storm warning is displayed by Rainy symbol with a flashing down arrow Every minute when a new pressure reading is obtained this ...

Страница 17: ...to 24 h to coarse 0 to 72 h and back by once touching the PRESSURE HISTORY section 9 Operating and Setting of the following Functions Air Pressure Pressure Relative and Absolute Wind Speed Wind Gust Important Note Since the operating procedures in all measurements are identical the various functions of the weather station will be explained once here by the following example of Air Pressure 9 1 Air...

Страница 18: ...rms by means of the HI Alarms In this example the setting up of Pressure high low alarm will be demonstrated Or similarly touching the WIND SECTION to set the High Low wind speed or wind gust alarm When the display is showing wind speed touching the wind section will advance to the menu for setting wind speed alarm On the other hand if the wind section is exhibiting wind gust touching the wind sec...

Страница 19: ...sible by touching the LO AL key in this example Adjusting the high alarm value with the key UP or DOWN Proceed with ON OFF Activate or deactivate the alarm with ON or OFF key Terminate with EXIT key Note Activation or deactivation of the alarm Display or deletion of the symbol only pertains to the respective presently displayed value ...

Страница 20: ...ay will toggle between the following Wind Speed Wind Direction Abbreviations of the compass card descriptions Wind Direction Degrees Wind Gust All setting and display facilities only pertain to the respective presently displayed value Outer pointer indicates the currently detected wind direction Text showing wind speed wind direction or wind gust Inner pointers indicate the previous wind direction...

Страница 21: ...splay the wind direction Then touch once to advance to the wind direction menu Then the below wind direction menu will be shown in text display Proceed with DIR AL key at the text display In the following menu up to 16 separate alarms can be activated depending on the basic set up clockwise around the compass card from N via NNE to NNW or from 0 via 22 5 to 337 5 in 22 5 increments Here the wind d...

Страница 22: ...ds every time any one of the LCD sections is being touched The switching condition Enabled Disabled is shown in the text section for about 30 seconds Note In case the Touch Screen Weather Station is battery operated the repeated use of the EL backlight will result in a considerable decrease of battery lifetime It is thus recommended to either operate the Weather Station with the included AC DC ada...

Страница 23: ...ive weather history the Base Station allows the internal storage of up to 1750 complete sets of weather data with time and date These data sets are being stored in non volatile ring buffer memory EEPROM and will not be lost even in case of an interruption of power supply e g change of batteries In case the memory capacity of the Weather Station is exhausted the oldest data sets stored will be over...

Страница 24: ...ease see the Help File under the Question mark button in menu bar of the Heavy Weather Program The temperature humidity and rain measurements are not applicable to the model WS 3502 Prior to manual setting or reception of DCF radio controlled time information there will be no recording of weather history data 13 Technical Data 13 1 Outdoor Data Transmission Range in Open Field 100 m max Wind Wind ...

Страница 25: ...LR6 Alkaline Batteries recommended Life Cycle without EL backlight approximately 1 year When batteries require replacement for the base station the low battery indicator will light up on the LCD or Mains Voltage AC DC Adapter INPUT 230VAC 50Hz use only the included Mains Adapter Recommended for PC Connection and frequent use of EL Backlight Relay Transmitter Batteries 2 x 1 5 V Batteries Type C IE...

Страница 26: ...ection All electronic instruments must from now on be recycled User shall take an active part in the reuse recycling and recovery of the electrical and electronic waste The unrestricted disposal of electronic waste may do harm on public health and the quality of environment As stated on the gift box and labeled on the product reading the User manual is highly recommended for the benefit of the use...

Страница 27: ...this manual may be reproduced without written authorization of the manufacturer R TTE Directive 1999 5 EC Summary of the Declaration of Conformity We hereby declare that this wireless transmission device does comply with the essential requirements of R TTE Directive 1999 5 EC ...

Отзывы: