background image

04

Connecting Your Alarm Clock

LA CROSSE VIEW

Connecting to Your Wi-Fi Network

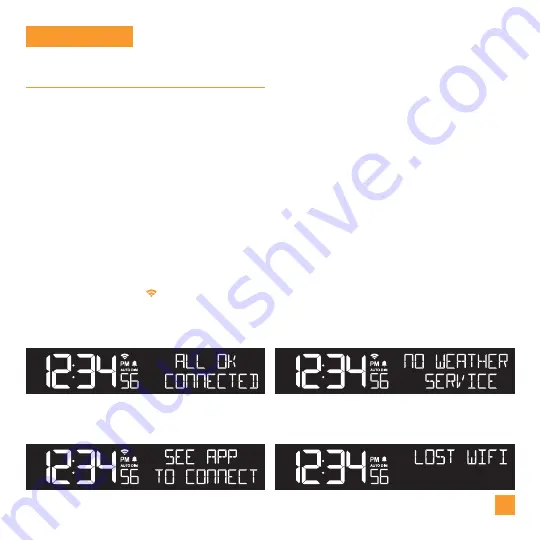
Checking Your Alarm Clock’s Wi-Fi Status

Press the

 SET 

button on the top of the Alarm Clock to view your Wi-Fi Status.

ALL OK CONNECTED: 

Your Alarm Clock is connected to 

your Wi-Fi and its data should be available on the Alarm 

Clock and in the app.

SEE APP TO CONNECT:


Check your La Crosse View 

app for notifications.

NO WEATHER SERVICE: 

Your Internet weather and time 

services are not connecting. These should resolve on 

their own, please be patient.

LOST WIFI: 

Check your router and network 

connections.

Now that you’ve created your La Crosse View account, it’s time to connect your Alarm Clock 

to your home router using the La Crosse View app.

The La Crosse View app is required to connect the Alarm Clock to your Wi-Fi network. Download, 

install, and log into your La Crosse View account first. 

New User Initial Setup:

 When first setting 

up your Alarm Clock, the app it will lead you 

through a series of instructions to help get 

your Alarm Clock added into your account and 

connected to your home Wi-Fi network.

Manually Add & Connect Display:


After the 

initial walk-through, Alarm Clocks can be 

added and connected via the Devices tab 

in the app’s main menu. Simply tap the 

Add 

Device

 or 

Plus

 (

+

) button at the bottom of the 

Devices page in the app. 

1.

Follow the initial app instructions or manually add the display into your account. 

2.

When connected, the       indicator on the display will become solid. 

3.

Содержание VA1

Страница 1: ...SET UP GUIDE Wi Fi PROJECTION ALARM CLOCK with Outdoor Temperature Humidity MODEL NUMBER VA1...

Страница 2: ...fications Warranty Recycling Disposal Cautions Statements Patents Support Information Factory Reset Stay in Touch 02 05 06 07 07 11 ALARM Setting Your Alarm Activating Deactivating Your Alarm Snooze D...

Страница 3: ...arm Clock Insert the 5V Power Adapter into an outlet and then plug it into the Power Jack on the back of the Alarm Clock Next remove the Insulation Tab from the Battery Compartment located on the bott...

Страница 4: ...an get ahold of you when something seems off Connecting your alarm clock is optional and the display will function as a standalone unit without the Wi Fi connection However we recommend connecting dur...

Страница 5: ...t s time to connect your Alarm Clock to your home router using the La Crosse View app The La Crosse View app is required to connect the Alarm Clock to your Wi Fi network Download install and log into...

Страница 6: ...nth Date Calendar Order Month Date or Date Month Fahrenheit Celsius Thank You 1 2 When the Alarm Clock is first powered on it will begin searching for your outdoor sensor which should connect shortly...

Страница 7: ...ture or add on sensor data Hold to add additional sensors 4 PROJ INFO Press to toggle through projection options Hold to alternate projection between available options 6 PLUS MINUS Use to adjust value...

Страница 8: ...enter the Auto Dim Settings Menu Program your Alarm Clock to automatically dim during preselected times Press the buttons to turn the Auto Dim feature on or off Press SNOOZE LIGHT to confirm Press th...

Страница 9: ...xit the Alarm Settings Menu Time Alarm Activating Deactivating the Alarm Setting the Alarm 1 2 Press the ALARM button to activate deactivate the alarm and to view your alarm time The icon will appear...

Страница 10: ...a from the sensor 6 INDOOR TEMPERATURE HUMIDITY Current Indoor Temperature and Humidity 3 OUTDOOR TEMPERATURE HUMIDITY Current Outdoor Temperature and Humidity Your Alarm Clock must be connected to Wi...

Страница 11: ...Fi and using internet services the clock will show forecast icons and chance of precipitations values powered by AccuWeather Moon Phases on Standalone Alarm Clock Your display must be connected to Wi...

Страница 12: ...ust be connected to Wi Fi to receive AccuWeather data Use the hanging hole on the back to mount the sensor Or insert one mounting screw through the front of your sensor Mount your sensor on a north fa...

Страница 13: ...eception Indicator will show solid on the screen when a sensor is connected Adding Extra Sensors to Your Alarm Clock 1 Hold the EXTRA button until you see the Sensor Reception Indicator start to anima...

Страница 14: ...f the image You can alternate between time and sensor projection options Please see page 12 for more information Tap the button to adjust the projection s brightness There are 3 levels plus an off opt...

Страница 15: ...S LTV TH2I Outdoor Temp Range 40 F to 140 F 40 C to 60 C Outdoor Humidity Range 10 to 99 RH Transmission Range 400 Feet 121 92 Meters Power Requirements 2 AA batteries not included Update Interval Eve...

Страница 16: ...radio or TV interference caused by unauthorized changes or modifications to this equipment Such changes or modifications could void the user authority to operate the equipment All rights reserved This...

Страница 17: ...uctions and consider removing the no collocation statement This device complies with Part 15 of the FCC Rules Operation is subject to the following two conditions 1 This device may not cause harmful i...

Страница 18: ...If you are experiencing issues press and hold the ALARM and NAP buttons down together until the display beeps You do not need to remove the button cell battery to restart the alarm clock Ask question...

Отзывы: