background image

Page | 9

Professional Remote Monitoring Station

Settings Menu

When operating as a standalone station, you can manually adjust your station’s settings

1. Hold the SET button for 3 seconds to enter settings menu.

2. Press and release the + or - buttons to adjust the flashing values. Hold to adjust quickly.

3. Press and release the SET button to confirm and move to the next item.

Note: 

Press and release the LIGHT button any time to exit settings

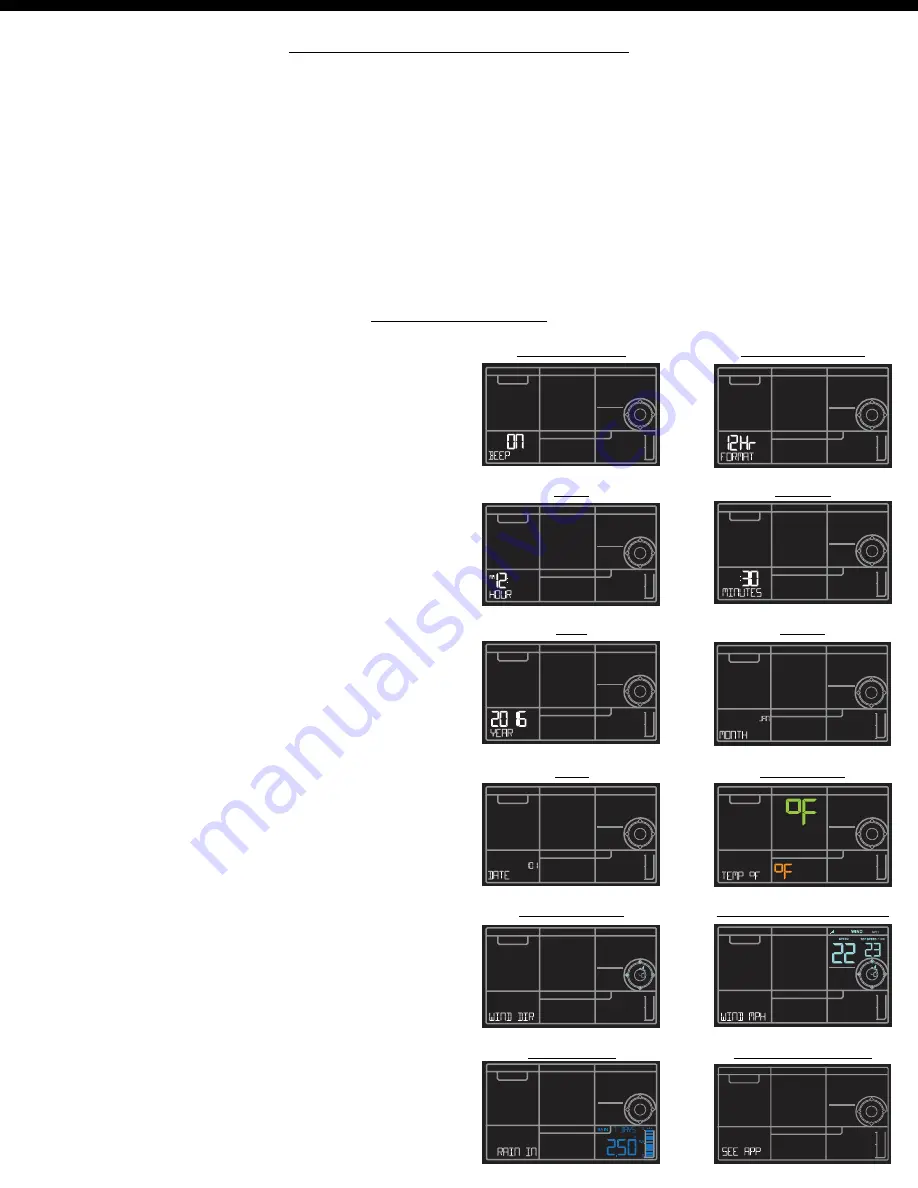
Settings order: 


•Beep ON/OFF

•12/24 Time

•Hour


•Minutes


•Year 


•Month

•Date

•Temperature Fahrenheit/Celsius

•Wind Direction (letters or degrees)

•Wind Speed (MPH | KMH)

•Rainfall unit (Inches | MM)

•SEE APP (connection prompt for app, 

  no actual function)

Option 2: 

Standalone Station

BEEP ON | OFF

12 | 24 Hour Time

Hour

Minutes

Year

Month

Date

Temp °F | °C

Wind Direction

Wind Speed MPH | KMH

Rain IN | MM

Connection Prompt

Содержание V40-PRO

Страница 1: ...fessional Weather Station and welcome to the La Crosse Technology family This product was designed with you in mind by our hometown team of weather enthusiasts based in La Crosse Wisconsin Instructional Manual Model V40 PRO DC 101917 PROFESSIONAL Remote Monitoring Weather Station ...

Страница 2: ...Speed History Reset Wind Speed History Rainfall Readings Reset Rainfall Readings HI LO Temperature Humidity Records Reset HI LO Temperature Humidity Alerts Set Alerts Disarm Alerts Active Alerts Temperature Humidity Trend Arrows Seasonal Changes in Foliage Sensor Search Sensor ID Delete your Sensor ID Factory Reset Detailed Sensor Set Up and Mounting Replace Wind Cups Replace Directional Vane Clea...

Страница 3: ... temperature humidity wind speed wind direction and rainfall information on the easy to read LCD display Continue with these instructions on page 9 You always have the option of connecting to the La Crosse View App at a later time if you choose STEP 3 MOUNTING BASICS At this time all of your sensor information should be displayed on your station Here are a few quick tips for mounting your sensors ...

Страница 4: ...ing an account and connecting your station to the Internet Once connected your time date and local forecast information will update instantly on your weather station s screen For online help visit http www lacrossetechnology com lacrosseviewsupport Wi Fi Network Requirements In order for your station to connect to your Wi Fi it will need to meet the following requirements Confirm that your mobile ...

Страница 5: ...nd Set Custom Mobile Alerts F R I E N D S F A M I LY SHARED ACCOUNTS No Need to Share Logins or Passwords Invite Friends Family to Download the App Monitor Your Home s Data B E S T I N C L A S S APP EXPERIENCE Use Your Own Photos and Receive Free Push Notifications on the New Easy to Navigate App ADD OTHER SENSORS TO YOUR LA CROSSE VIEW APP You can add additional Temp Humidity Wind Speed Rain or M...

Страница 6: ...ll as the additional eight icons here Windy Light Rain Severe T Storm Light Snow Wintry Mix Blizzard Fog Ice La Crosse View Enhancements NWS National Weather Service Daily HI LO temperature Note When not using the app the daily HI LO will come from your outdoor TH sensor NWS Chance of Precipitation Precipitation percentage will show in the forecast area NWS Additional Forecast Icons Standard Icons...

Страница 7: ...k Check your connection to the La Crosse View app Enter your Wi Fi password again Is there an update to install NO NWS This indicates an error on the NWS server NWS Expanded Forecast will not update or show The NWS will resolve this Very rare to have this error Note When you first connect to the La Crosse View app NO NWS may alternate with ALL OK for a few seconds until the station establishes con...

Страница 8: ...ional sensors you wish to add Note Additional sensors may be purchased and added to your La Crosse View app at any time Compatible additional sensors start with the letters LTV Always check your product page for available sensors www lacrossetechnology com V40 PRO DID YOU KNOW You can expand your system s coverage with additional sensors sold separately These add on sensors will use your weather s...

Страница 9: ...elease the SET button to confirm and move to the next item Note Press and release the LIGHT button any time to exit settings Settings order Beep ON OFF 12 24 Time Hour Minutes Year Month Date Temperature Fahrenheit Celsius Wind Direction letters or degrees Wind Speed MPH KMH Rainfall unit Inches MM SEE APP connection prompt for app no actual function Option 2 Standalone Station BEEP ON OFF 12 24 H...

Страница 10: ...hrenheit or Celsius Temperature Percentage Relative Humidity Relative Humidity Icon Temperature Icon AM PM Indicators HI LO Alert Icons Rain Graph Backlight Brightness 5 levels Your station has 5 levels of brightness for the backlight When operating with the power cord press and release the LIGHT button to adjust the backlight Intensity Levels 0 5 20 50 100 When operating on battery power only pre...

Страница 11: ...ture is higher than 80 F Heat Index will show as the Feels Like Temperature When outdoor temperature is lower than 50 F Wind Chill will show as the Feels Like Temperature When outdoor temperature is between 50 F and 80 F will show Current Outdoor Temperature as the Feels Like Temperature Wind Speed History Simply press and release the WIND button to cycle through the Wind History other readings wi...

Страница 12: ... minute samples Example If current time is 6 49 the 1 HOUR reading is the accumulated rain between 5 50 to 6 49 Day Rainfall from midnight to midnight Resets each day at 12am midnight 24 Hours Rainfall for the past 24 hours Updates at each full hour running total 7 Days Rainfall from the last 7 consecutive 24 hour rainfall readings Updates each day at midnight Not subject to your calendar but be s...

Страница 13: ...al display HI LO Temperature Humidity Records Press and release the TEMP button to view your HI and LO records with time and date of occurrence A new HI or LO record will replace the existing record Viewing order Outdoor HI Temp with Time Date Outdoor LO Temp with Time Date Outdoor HI Humidity with Time Date Outdoor LO Humidity with Time Date Indoor HI Temp with Time Date Indoor LO Temp with Time ...

Страница 14: ... arm the alert you wish to set then set the alarm value If you do not arm the alert you will skip that alert and move to the next Hold the ALERTS button for 3 seconds to enter alert set mode Outdoor Low Temperature alert OFF will show Alert ON 1 Press the buttons to arm the alert 2 Press the ALERTS button and the alert value will flash 3 Press the buttons to set the alert value Hold to set quickly...

Страница 15: ...e alert text goes from ON to OFF 4 Press the LIGHT button to exit Disarm Alerts Outdoor Humidity Alerts Wind Speed and Rain Alerts When armed alert value is reached station will beep 5 times each minute until out of alert range The flashing alert icon will indicate the type of alert Press any button to stop the alert from sounding The alert icon will continue flashing while value while value is in...

Страница 16: ...e past one hour period The tree foliage will change seasonally on your weather station The dates are programmed into your weather station for an automatic foliage change Seasonal Changes in Foliage March 20th June 20th Spring Autumn Summer Winter June 21st Sept 20th Sept 21st Dec 20th Dec 21st Mar 19th Sensor ID Sensor Search Each of your sensors has an individual ID number located by its bar code...

Страница 17: ...old the MINUS button for 5 seconds to delete your old sensor ID Dashes will show for the ID number 4 Your station will automatically begin searching for a new sensor 5 Install batteries in your new sensor and allow up to three minutes for your new sensor readings and ID to appear on your station Press and release the SENSOR button to view your sensor ID number Hold the MINUS button for 5 seconds t...

Страница 18: ... Mount with the solar panel facing south so the wind direction is correct See N S E W embossed on the top of the sensor 3 Use the bubble level on top of the sensor to ensure it is level for accurate rainfall readings 4 The maximum wireless transmission range to the station is over 400 feet 121 meters in open air not including walls or trees 5 Cups should be on the top of the sensor 6 Attach to mou...

Страница 19: ..._SensorMounting LED Light AA AA Battery Cover Hole for mounting TX F C Press TX to send a signal Press F C to select Fahrenheit or Celsius display on sensor V40 PRO station 1 Insert the power cord into a wall outlet then into your station Optional insert 3 AA batteries into your station to maintain time date in the event of a power outage Battery operation only will not update sensor or Wi Fi data...

Страница 20: ...rectional Vane 1 Loosen the screw on side of vane 2 Remove direction vane 3 Install new vane 4 Tighten screw Clean Rain Sensor 1 Remove rain funnel pull flat side firmly upward 2 Gently remove debris or insects inside the rain sensor 3 Clear debris from drain vents 4 Clear debris from the rain funnel 5 Reinstall the rain funnel Note Do not oil the rain sensor ...

Страница 21: ...i to work Note Weather Underground will show your station s information on the Weather Underground website In addition they have an App you can download to view your backyard weather on your mobile device without opening your browser Download the Weather Underground App and search for your weather station with your Personal Weather Station PWS ID number Weather Underground can take up to 24 hours ...

Страница 22: ...onnect your app through the Wi Fi network at your new location 1 Start the Weather Connect app and enter the password for the new Wi Fi network 2 Hold the PLUS and MINUS buttons on the station for 3 seconds to search for the network Station will flash SEE APP 3 Enter Weather Underground station ID and password Do not mix old and new batteries Do not mix Alkaline Standard Lithium or Rechargeable Ba...

Страница 23: ...nge 0 393 7 inches 0 9999 mm Up to 400 feet 121 meters in open air RF 915 MHz Wi Fi Transmission RF 2 4 GHz Power V40 PRO Station Optional Battery Backup LTV TH3 Thermo hygro Sensor LTV WR1 Multi Sensor 5 0 Volt 600mA power cord included Required AC6 HX06 0500600 AU Input 100 240V 0 3A 50 60Hz 3 AA batteries not included backup for time and date 2 AA batteries not included 3 AA batteries not inclu...

Страница 24: ...e may not cause harmful interference and 2 This device must accept any interference received including interference that may cause undesired operation Caution The manufacturer is not responsible for any radio or TV interference caused by unauthorized changes or modifications to this equipment Such changes or modifications could void the user authority to operate the equipment This equipment must b...

Отзывы: