


0UG61070427
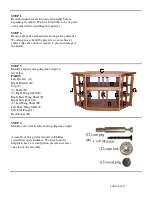
STEP 5
Attach 6 cam pegs to the outside face of
Left Divider (A) and Right Divider (B)
as shown at right.
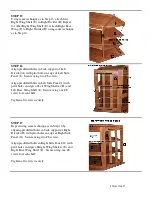
STEP 6
Lay Top (C) with cleats facing up on non-abrasive
surface (carpet or carton). Align predrilled holes in
Right Divider (B) with pilot holes in ends of middle
cleats on underside of Top (C). Ensure that the cam
pegs installed in Step 5 point away from the center
of the unit. Secure center side panel using two #8
screws. Do not tighten screws completely in order
to more easily install shelves in next few steps.
Note the relative positions of the FIVE pilot
holes in the rear edge of the Right Divider (B)
and the pilot holes in the cleat on the back edge of
the top.
STEP 7
Repeat Step 6 to attach other Left Divider (A) to
Top (C). Do not tighten screws completely in order
to more easily install shelves in next few steps.


