


0UG61070427
STEP 1
Read through these instructions thoroughly before
beginning assembly. We have found this to be of great
value when first assembling this product.
STEP 2
Remove all parts and hardware from packing material.
Wooden pieces should be placed on a non-abrasive
surface (like the carton or carpet) to prevent damage to
the finish.
STEP 3
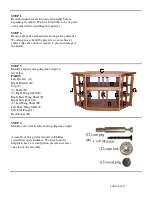
Identify all parts using diagram at right at
list below.
PARTS
Left Divider (A)
Right Divider (B)
Top (C)
(2) Shelf (D)
(2) Right Wing Shelf (E)
Right Base Wing Shelf (F)
Right Side Panel (G)
(2) Left Wing Shelf (H)
Left Base Wing Shelf (I)
Left Side Panel (J)
Back Panel (K)
STEP 4
Identify and count hardware using diagram at right.
Assembly of this product requires a Phillips
screwdriver and a hammer. We have found it
helpful to have a second person present in at least
one step of the assembly.
(28)


