background image

34

Using Memos

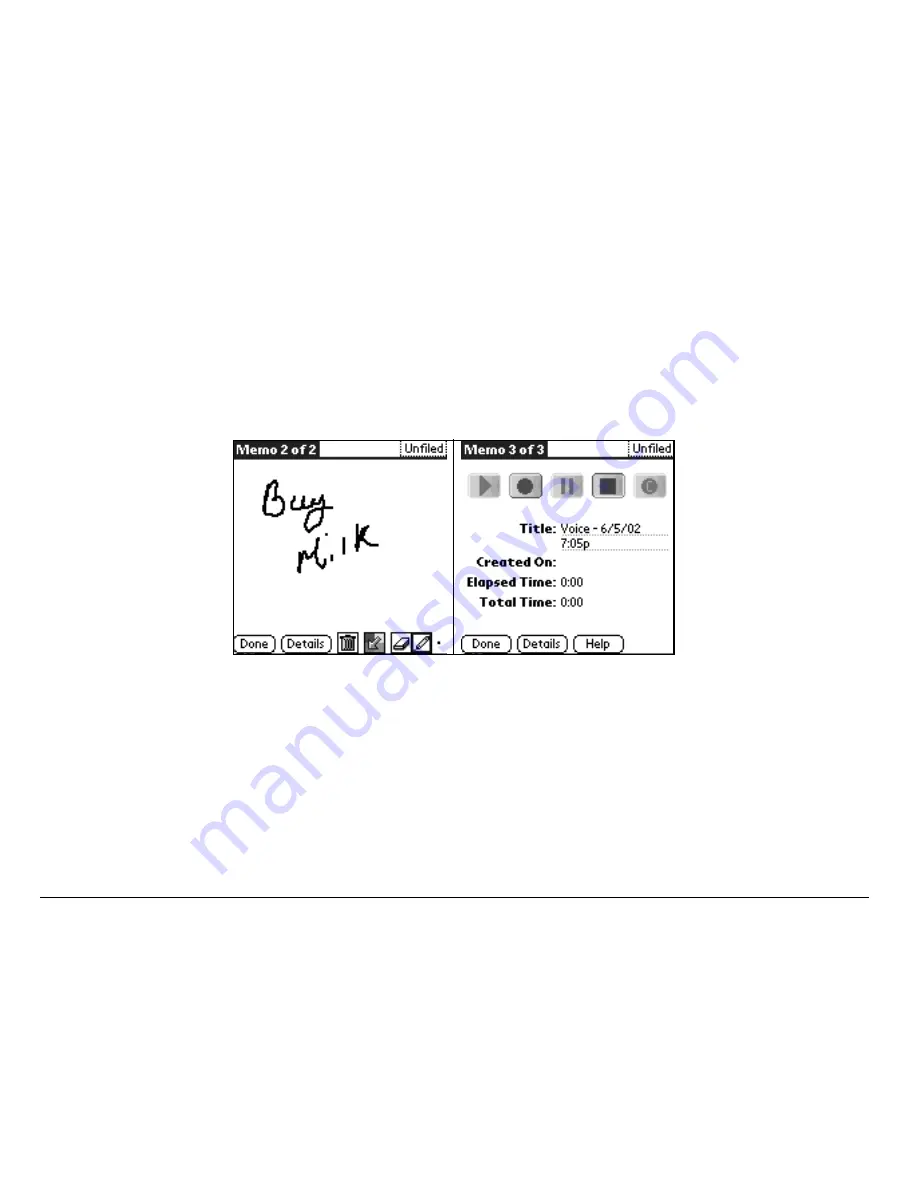
Doodle

. Use your stylus to write directly on your phone’s screen. Tap 

Done

.


Your doodle is saved with the date and time it was created.

Voice

. Tap on the Voice Memo icon. Use your stylus to tap on the 

individual 

Play

Record

Stop

Pause

, and 

Clear

 icons.

3.

Tap any existing memo to open it or tap 

New

 to create a new memo.

4.

Enter the memo text using Graffiti or the on-screen keyboard.

5.

When you have finished, tap 

Done

.

Содержание 7100 Series

Страница 1: ...82 K5328 1EN Rev 001 ...

Страница 2: ......

Страница 3: ...om K 10300 Campus Point Drive San Diego California 92121 U S A Visit us at www kyocera wireless com For accessories visit www kyocera wireless com store UOJhRPOUJNI oÉîK MMN User Guide for the 7135 smartphone by Kyocera ...

Страница 4: ...ne transmitting at its highest certified power level in all tested frequency bands Although the SAR is determined at the highest certified power level the actual SAR level of the phone while operating can be well below the maximum value This is because the phone is designed to operate at multiple power levels so as to use only the power required to reach the network In general the closer you are t...

Страница 5: ...es with Kyocera Wireless Corp phones Use of any unauthorized accessories may be dangerous and will invalidate the phone warranty if said accessories cause damage or a defect to the phone To comply with FCC radiation exposure requirements use of this device for body worn operational configurations is limited to accessories tested and approved by Kyocera Wireless Corp Other accessories used with thi...

Страница 6: ...ork controls the power level of the RF signal This power level can range from 0 006 watts to 0 6 watts There are situations in which wireless phones must be turned off for reasons of safety You can quickly turn off the Kyocera 7135 smartphone simply by holding down for a few seconds Exposure to RF energy In August 1996 the U S Federal Communications Commission FCC adopted RF exposure guidelines wi...

Страница 7: ...r the phone s RF energy may interfere with the pacemaker s operation The Health Industry Manufacturers Association and the wireless technology research community recommend that you follow these guidelines to minimize the potential for interference Always keep the phone at least six inches 15 centimeters away from your pacemaker when the phone is turned on Do not carry your phone near your heart Us...

Страница 8: ...p you obtain this information In health care facilitiesÔTurn your phone off in health care facilities when instructed Hospitals and health care facilities may be using equipment that is sensitive to external RF energy Avoiding potentially unsafe areas Posted facilitiesÔTurn your phone off in any facility when posted notices require you to do so AircraftÔFCC regulations prohibit using your phone on...

Страница 9: ...u are in any area with a potentially explosive atmosphere Obey all signs and instructions Sparks in such areas could cause an explosion or fire resulting in bodily injury or even death Areas with potentially explosive atmospheres are often but not always clearly marked They include Fueling areas such as gas stations Below deck on boats Transfer or storage facilities for fuel or chemicals Vehicles ...

Страница 10: ... free car kit car power adapter USB cable leather pouch leather case and more To purchase accessories visit www kyocera wireless com store You may also call 800 349 4188 U S A and Canada or 858 882 1410 Kyocera is a registered trademark of Kyocera Corporation QCP is a trademark of Kyocera Wireless Corp Graffiti and HotSync are registered trademarks and Palm and the Palm Computing platform logo are...

Страница 11: ...Other product and brand names may be trademarks or registered trademarks of their respective owners Copyright 2003 Kyocera Wireless Corp All rights reserved Printed in the United States of America Ringer Tones Copyright 2000 2003 Kyocera Wireless Corp Portions of this document are Copyright 1998 3Com Corporation or its subsidiaries Reprinted with permission 82 K5328 1 Rev 001 ...

Страница 12: ...x ...

Страница 13: ...battery in the cradle s rear pocket 7 Turning your phone on for the first time 9 Introducing the Kyocera 7135 smartphone 10 Getting to know the function keys 10 Turning the phone on and off 14 Features 14 Checking phone status 15 Checking LED status 16 Using the screen 16 Calibrating the screen If the screen is unresponsive follow these steps 17 Making and Receiving Calls 17 To dial a call on the ...

Страница 14: ...Making and receiving calls after dialing 911 21 Receiving and Sending Messages 22 Receiving a message 22 Sending a message 23 From the Phone Application screen 23 From the PDA Applications screen 23 Sending a preformatted text message 25 Using Main Menu Items 26 To check your own phone number 27 Entering Information 27 To use the on screen keyboard 27 To write with the stylus 28 Basic Graffiti cha...

Страница 15: ...ice mail 35 Using Speed Dial 36 To add numbers to your Speed Dial list 36 To make a call using Speed Dial 37 If you know the Speed Dial number 37 If you need to look up the Speed Dial number 38 Using PDA Applications 39 Using the Kyocera MP3 Player 40 Transferring audio files from your computer to your phone 41 Using your JukeBox 42 Managing your playlist 43 Edit Menu 44 ...

Страница 16: ...xpansion card 47 Renaming files and folders on the expansion card 48 Using PhotoSuite 49 Using EIS Web 50 Using Email Applications 52 Eudora Email 52 Palm Mail 53 Other Applications 53 Using the To Do List 54 Using Voice Features 55 To voice train the phone 55 To make a call using voice commands 55 To record and play back voice memos 56 To customize your smartphone for voice answer and voice wakeu...

Страница 17: ...st phone sounds 59 Setting Up Preferences 60 To set PDA preferences 61 Setting general preferences 61 Setting date time 62 Changing Formats 63 Customizing 64 To set phone preferences 64 Adjusting call volume 64 Adjusting flip settings 65 Adjusting settings for incoming calls 66 Setting phone alerts 67 Setting the GPS locator 68 To set 68 Setting Up Network Connections 69 To set up Network Preferen...

Страница 18: ...Phone 74 To perform a soft reset 74 To perform a hard reset 75 Synchronizing Your phone With a Computer 76 To install the Desktop software 77 To perform your first synchronization 77 Phone Care 79 Phone 79 Antenna 81 Battery 81 Caution 82 Tips for improving battery performance 83 Replacing the battery 84 Where to find help 86 Index 87 ...

Страница 19: ... on a quick tour of the phone s major features Reference Guide For detailed information insert the CD ROM in your computer and open the Reference Guide or visit Kyocera Wireless Corp at www kyocerasmartphone com CD ROM On the CD ROM you ll find the Kyocera 7135 desktop to install it see the Reference Guide on the CD ROM You ll also find third party software and user guides for sending email browsi...

Страница 20: ...have been enhanced to integrate with the telephone s features Icons Most icons and buttons are identical to those on your Palm handheld Only a few icons have changed The Calculator icon has been replaced with the Dialer icon Tap this icon to open the phone application You ll find the Calculator on the PDA applications screen Also the Messages and Web browser buttons have changed Palm Desktop You d...

Страница 21: ...ead the Reference Guide on the enclosed CD ROM for several recommended methods Warning Do not simply synchronize your new phone to copy the data Some important settings on the phone will be changed if you do so Additionally since every Palm handheld device must have a unique name serious synchronization problems may occur if you synchronize two Palm devices with the same user name ...

Страница 22: ...wer back of the phone Lift off the battery compartment cover 2 Slide the battery into the compartment with the Kyocera label facing up toward you and the arrow pointing toward the bottom of the phone The end of the battery with three copper colored depressions goes toward the bottom of the phone 3 Apply gentle pressure until the battery snaps into place Then replace the battery cover by inserting ...

Страница 23: ...ert the small round plug of the power cable a into the base of the sync cradle Plug the other end of the power cable into a wall outlet 2 To connect the data cable to your computer first turn off the computer 3 Plug the data cable from the phone b into a serial communications COM port or universal serial bus USB port on your computer The cable requires a dedicated port it cannot share a port with ...

Страница 24: ...e phone in the cradle and flip open so the screen is visible 6 Tap to access the phone screen The battery icon in the upper right corner of the phone screen tells you whether the phone is Fully charged All black bars are displayed Partially charged Fewer black bars are displayed indicating partial charge Charging The battery icon is animated and scrolls indicating the battery is charging ...

Страница 25: ... The battery will not overcharge so you can leave the phone connected as long as you like To charge a battery in the cradle s rear pocket Your smartphone s sync cradle has a rear pocket that lets you charge a second battery This way you have a fresh battery ready when you don t have time to recharge your smartphone IMPORTANT Charge the battery completely before first use If the battery is totally ...

Страница 26: ...er source whenever the battery is removed since extended time without power can lead to data loss A charge indicator light shows the status of a battery charging in the rear pocket This light is on the cradle s right side behind the HotSync button No light no battery in pocket pocket empty Red light battery charging Red light blinking battery not charging Check for error in placement of battery in...

Страница 27: ...n appears on the screen 2 Follow the Setup procedures to calibrate the screen and Graffiti writing area If the Setup screens do not appear see Calibrating the screen on page 17 The first 2 of 4 screens are shown here 3 After calibrating the screens tap Done to exit Setup 4 Tap to view the phone application screen or tap to see the PDA application screen ...

Страница 28: ...Hold it like a pen to write on the screen Infrared Port Point at other devices for beaming data External LCD Caller ID View caller information without opening the phone Antenna Extend during calls Headset Jack Pug the headset cable in here Volume Up and Down Press these buttons to increase or decrease phone volume 1 2 3 4 5 6 ...

Страница 29: ...urn backlight on and off Power port Plug the power cable in here to recharge battery Data port MP3 port Plug the data cable in here to load data and MP3s Expansion slot Insert a MMC or SD card here to expand available memory on your smartphone LED light emitting diode Green Home area Amber Roaming Red No signal 7 8 9 10 11 ...

Страница 30: ...lications on your smartphone for selected text Date book key opens the date book to schedule appointments and view entries by hour day or month Address book key opens the address book where contacts names phone numbers email addresses and other information is stored Messages key opens your Messages In box to view text messages and access voice mail Web key opens the EIS Web application to browse t...

Страница 31: ...a call Clear key erases the last character entered while using the keypad or an application Speakerphone key turns the speakerphone on and off End Power key turns on and turns off the phone ends a call or returns to the home screen Shift key changes the text mode in text entry Space key enters a space during text entry Backlight button turns the phone screen and PDA on and off Press and hold the b...

Страница 32: ...if the phone is on and the phone application is selected If the PDA screen is displayed and you aren t sure whether the phone is on press If the message Phone is OFF appears and you would like to turn the phone on press and hold for a few seconds When you are not using the phone or PDA applications the screen goes blank after a few minutes to save power To activate the screen press any key press t...

Страница 33: ... The more lines you see the stronger the signal When this icon appears you can make and receive calls If the signal strength is very low you may not be able to complete a call Geographic Positioning System is enabled to share your location with emergency services as well as your service provider Geographic Positioning System shares your location with emergency services only The phone is not receiv...

Страница 34: ...ns amber during a call Red No signal available The phone is searching for a signal Using the screen The screen is touch sensitive when you are using the PDA Use the stylus to open applications and make selections when you are using the PDA When you are using the phone application the screen is not touch sensitive You must use the navigator key to make selections from menus and lists This icon show...

Страница 35: ...nstructions on the screen When calibration is complete tap to go to another application Warning See Chapter 1 Introducing the Kyocera 7135 smartphone in the Reference Guide on the CD ROM MAKING AND RECEIVING CALLS To dial a call on the keypad 1 Extend the antenna Check the signal strength icon 2 Press the keys to enter the phone number Then press If you make a mistake press to remove the last digi...

Страница 36: ...e first letter of the name you are searching for For example the 2 key is equivalent to A B or C If you press the 2 key once the letter A appears in the Find window If you press the 2 key twice the letter B appears Press keys rapidly Wait a moment The cursor moves one position to the right 3 Press the key for the second letter of the name you are searching for Enter as many letters as you wish 4 Y...

Страница 37: ... to select the phone number contact you wish to call and press To make a call using speed dial After you have assigned a speed dial location to a contact press and hold the number on your keypad until you see the contact s name appear on your screen For information on setting up Speed Dial see Using Speed Dial on page page 36 in this user guide To use the headset during a call 1 Plug the headset i...

Страница 38: ...n your phone use your stylus to tap the Prefs PDA In the upper right corner select Flip Settings Use your stylus to check the box next to Answer call To call emergency numbers You can place calls to 911 even if your phone is locked or your account is restricted Countries outside the USA may have an emergency number different than 911 If so substitute that number for 911 ...

Страница 39: ...ur phone so they can call you back if necessary To make or receive regular calls after dialing 911 you must exit this mode When you have completed the 911 call press to select Exit Then press again to confirm your choice The phone returns to standby mode the home screen shown here and you are ready to make and receive calls Note For more detailed information consult the Reference Guide on the encl...

Страница 40: ...u 1 Tap Go To to view the message 2 After viewing your message tap Done to exit your message Save to save the message in your Saved folder or Erase to erase the message The Action menu offers several choices including Reply The Outgoing Message screen is displayed with the address of the sender inserted in the To field Enter your message text and tap Send ...

Страница 41: ...k Blocks incoming messages from the sender Sending a message From the Phone Application screen Use the navigator key to scroll down to highlight Messages Then press Continue with step 3 on next page From the PDA Applications screen 1 Using the stylus scroll down and tap Messages 2 At the Messages screen tap New 3 Using the stylus tap the Tap to enter recipient box Enter the phone number or email a...

Страница 42: ... tap next to Action to view your address book or save an address After you have entered the recipient s phone number or email address use your stylus to tap OK 4 Use the Graffiti writing area to rapidly enter text and symbols See Entering Information on page 27 for information on forming letters and numbers using your stylus and using the keyboards 5 After you have prepared your message tap Send ...

Страница 43: ...ely and saves it in your Text Out Box Save Saves the message to your Saved folder Cancel Returns to the Out Box Options Allows you to customize your outgoing message Callback Number Adds a callback number to the message Request Receipt Indicates when the message has been received Priority Marks the message Normal or Urgent Schedule Date Schedules date of delivery of the message Schedule Time Sched...

Страница 44: ... Recent Calls See your recent incoming outgoing and missed calls Phone Number Check your phone number Phone Preferences Customize your phone s preferences Messages Check your voice mail and text messages Address Book View your Address Book add a new contact view Speed Dial list or view Voice Dial list Exit Phone Return to the PDA Applications screen Mute or Unmute Mute the sound so the caller cann...

Страница 45: ...d select Phone Number Your number appears on the screen 2 To return to the Main Menu press Note Your Kyocera 7135 will automatically return to the Main Menu within 15 seconds ENTERING INFORMATION To use the on screen keyboard Use the Graffiti writing area to quickly enter text for messages memos and other applications To enter information using Graffiti you must be in one of the PDA applications W...

Страница 46: ... left side of the Graffiti writing area for letters and the right side for numbers 2 Draw the shape as it appears in the table starting at the dot Don t draw the dot itself 3 Lift the stylus at the end of the stroke The letter appears at the insertion point Begin the stroke for the next character Tap here for the numbers keyboard Tap here for the letters keyboard ...

Страница 47: ...r phone automatically saves your work when you change from one application to another so you don t need to worry about losing information To enter Draw To enter Draw A B C D E F G H I J K L M N O P Q R S T U V W X Y Z 0 1 2 3 4 5 6 7 8 9 Space Next Line Back Space To enter Draw ...

Страница 48: ...n tap the person s name not the phone number and make your modifications 6 To add a new entry tap New 7 Use your stylus to enter as much or as little information as you like for your contact To enter information in a new line tap on the line Place an entry in a category such as Business or Personal or make an entry private by tapping Details Use your stylus to make selections Attach a note to a co...

Страница 49: ...coming outgoing and missed calls 1 Tap to view the PDA Applications screen 2 Tap to open Call History 3 To place a call tap the phone icon to the right of the number you want to call 4 To end your call press The icons show the call type Incoming Outgoing Missed Data for example a call to a Web site ...

Страница 50: ...one hour tap the time of the event to open the Set Time dialog 5 If your event is exactly one hour long skip to step 7 6 Tap the correct hour and minute in the time columns on the right side of the dialog to set the Start Time 7 Tap the End Time box Tap the hour and minute in the time columns 8 Tap OK when you have finished 9 To see different views of your schedule tap the icons in the lower left ...

Страница 51: ...rs the number of memos you can store depends on how much free memory you have 1 From the Applications screen tap to open Memos 2 Select the type of memo you would like to create from the three options located on the bottom right corner of the screen Text Use the stylus to write your message in the Graffiti writing area When you have finished tap Done Text Doodle Voice ...

Страница 52: ...th the date and time it was created Voice Tap on the Voice Memo icon Use your stylus to tap on the individual Play Record Stop Pause and Clear icons 3 Tap any existing memo to open it or tap New to create a new memo 4 Enter the memo text using Graffiti or the on screen keyboard 5 When you have finished tap Done ...

Страница 53: ... OK to acknowledge the message Select Snooze to see or hear the message later Select Go To to view the message or dial voice mail To check messages and voice mail 1 To dial your voice mail press and hold the key 2 To check new text or filed messages use the navigator key to select Messages from the phone screen or press the messages button See Getting to know the function keys on page 10 3 Press 4...

Страница 54: ...ked to the Address Book when you change a phone number in the Address Book it is automatically updated in the Speed Dial list To add numbers to your Speed Dial list 1 Tap to view the PDA applications screen 2 Use the navigator key or tap the scroll bar to move through applications On the PDA screen tap to open Speed Dial 3 Tap on an empty speed dial location then tap Add Note Speed Dial 1 has been...

Страница 55: ...ess Book proceed with step 4 4 Tap Lookup 5 Tap the entry you want to add to the Speed Dial list Then tap Add If the entry has more than one phone number select the one you want to use The entry is added to the next available Speed Dial number To make a call using Speed Dial If you know the Speed Dial number Press the Speed Dial number on the keypad and press Note Press the Speed Dial number on th...

Страница 56: ... number 1 From the phone application screen press the navigator key up or down to highlight Address Book Press 2 Press the navigator key up or down to select View Speed Dial ListK 3 Press 4 Tap the selected speed dial number and press 5 To end your call press ...

Страница 57: ...e screen to scroll down or press the navigator key down to see more applications 8 To change from one application to another tap and select the new application 9 To open the Date Book Address Book Messages or Web press the appropriate key below the Graffiti screen See Getting to know the function keys on page 10 Note The applications on your PDA are placed in categories In the upper right corner o...

Страница 58: ...re digital card or a multimedia card card sold separately To listen to your MP3 player through the Kyocera headset sold separately you simply plug the headset into the phone s headset jack See Introducing the Kyocera 7135 smartphone on page 10 The Kyocera MP3 Player contains three main functions JukeBox PlayList Downloader Note Basic instructions are provided here For detailed information on these...

Страница 59: ...ws Application 5 Press the Connect button Note To verify that you are connected look at the bottom left corner of the Kyocera Downloader application on your computer s desktop 6 Download the MP3 audio file that you wish to transfer to your Kyocera 7135 smartphone by dragging and dropping from the upper Explorer style region to the lower pane Copy and Paste may also be used 7 Once you have added al...

Страница 60: ...layer Song Title Shows the current song s title Elapsed Remaining Shows how much time has elapsed for the current song Tap on the number field to show the remaining time of the current song Song Progress Bar Shows the progress of the current song Volume Sets the volume Balance Sets the headphone balance Random If checked songs in the PlayList will play in random order Loop If checked the player wi...

Страница 61: ...he Play button to play the current song While the song is playing the button changes to a pause button Tap the Pause button to stop the song or mute the volume Stop Stops the player Next Song Press Next Song to advance to the next song in the PlayList Managing your playlist The PlayList screen lists all of the MP3 songs on your media card You can activate or deactivate songs and view additional so...

Страница 62: ...yList If not checked the song is skipped when the playList is played Song Title Shows the title of the song Playing Indicator The playing indicator will flash on the right side of the currently playing song Song Info Displays song information for the selected song Delete Permanently deletes a song from your media card Player Control Buttons See Using your JukeBox on page 42 To adjust volume balanc...

Страница 63: ...R FileManager will allow you to manage the files on your expansion card the same way that you manage your files on your computer View the lists of databases on your phone Copy or move files from your phone to the expansion card Copy or move files from the expansion card to your phone Delete files and folders from the expansion card Create new folders for the expansion card Rename files and folders...

Страница 64: ...n slot 2 Use your stylus to tap the FileManager icon In the upper right corner of the screen tap to select Internal if Card is displayed 3 Select the database you would like to copy by tapping it with your stylus To deselect an item tap it once more 4 Tap COPY 5 FileManager prompts you to verify that you intend to copy the selected items Tap COPY again to proceed Note If you tap MOVE instead of CO...

Страница 65: ...ap it once more 4 Tap COPY 5 FileManager prompts you to verify that you intend to copy the selected items Tap COPY again to proceed Note If you tap MOVE instead of COPY FileManager will delete the file from the original location Use MOVE with caution Creating new folders on the expansion card 1 Insert an expansion card into your phone s expansion slot 2 Use your stylus to tap the FileManager icon ...

Страница 66: ...se your stylus to tap the FileManager icon In the upper right corner tap to select Card if Internal is displayed 3 Navigate to the folder or file you would like to rename 4 Tap the FileManager menu bar at the top of the screen and select Rename FileManager will prompt you to enter a new name for the new folder Enter a name and tap OK For detailed information on using FileManager consult the Refere...

Страница 67: ...ansferring them to the your Kyocera 7135 smartphone The PhotoSuite Mobile Album allows you to view your photos and videos either individually as thumbnails or as a slide show on your Kyocera 7135 smartphone Supported photo file formats include BMP PNG GIF TIF and JPG in 3 character extensions i e TIFF and JPEG extensions are not recognized Supported video file formats include AVI MOV QT ASF and WM...

Страница 68: ... the EIS Browser 1 Press on the keypad to open EIS Web 2 Tap Visit Web EIS Web connects you to the Internet Menus are accessed by tapping on the home screen The four main menus are Quick Links Takes you to a list of Palm friendly websites related to travel sports finance shopping entertainment news and internet searching ...

Страница 69: ...f available Bookmarks Keep a list of your favorite Web addresses You can also access menus by tapping the blue EIS Web tab in the upper left corner of the browser homepage or by tapping the menu icon in the lower left corner of the screen The three menus are Navigate Go to a specific Web address Visit Website return to the homepage go forward or backward refresh the screen and connect or disconnec...

Страница 70: ...ures You can forward redirect or reply to messages You can set up mailboxes and folders You can sort messages set up alerts and send automatic replies All your favorite addresses can be stored in your personal address book More Eudora features and functions are described later in this guide Note Eudora Email and Palm Mail your smartphone s standard email applications do not support email attachmen...

Страница 71: ... Eudora com Palm Mail Palm Mail allows you to create emails You can prepare messages with customized fonts and signatures to be sent later Note Palm Mail is a software that allows you to create emails You cannot send emails using Palm Mail Other Applications Other email applications are available See the CD ROM that came in your phone package to download other email applications and user guides ...

Страница 72: ...m The text can be longer than one line 4 Tap Details to set a priority put the item in a category assign a due date or mark the item as private You can also attach a note to it 5 Tap Show to set your preferences for displaying the To Do List For example you can sort items by priority due date or category 6 Tap Done when you have finished Note See Chapter 15 To Do List in the Reference Guide on the...

Страница 73: ...r tap and select it 3 Tap New A list of all the names in your Address Book appears 4 Select a person and tap Add If there is more than one phone number select the one you want to use and tap Add 5 When you hear Speak a name speak the name Repeat the name when you are instructed to do so To make a call using voice commands 1 Press 2 When you hear Speak a name and a beep speak the name of the person...

Страница 74: ...ttom left corner of the screen tap the voice icon See Using Memos on page 33 3 Press When you hear Please record at the tone and a beep record your memo 4 Tap to stop recording the memo 5 To replay a memo select the memo from the Memo list by tapping it with your stylus 6 Select the memo you want to replay 7 Use your stylus to select any of the options on the screen Play Pause Record Resume or App...

Страница 75: ...reen tap with your stylus to open Prefs Phone 2 In the upper right corner of the screen use your stylus to tap 3 Use your stylus to select Voice Dialing 4 With your stylus tap the checkboxes next to Voice Answer and Voice Wakeup ADJUSTING SOUNDS To adjust the speaker volume Press the volume up and volume down buttons on the side of the Kyocera 7135 To select a ringer sound and adjust ringer volume...

Страница 76: ...t a sound you hear a sample of it 6 To select different ringer sounds for different categories of calls do the following a Put a check mark in the Ring by Category check box b Tap under Category Select a category of calls c Tap the under Ringer Select the sound for that category of calls d Repeat steps b c for each category you want to set up 7 When you have finished tap Done To silence the ringer...

Страница 77: ...programmed reminders or alerts for your smartphone Game Sound controls the volume of beeps and other sound effects when you are playing a game on your phone To adjust phone sounds 1 With your stylus tap to open Prefs Phone 2 Tap in the upper right area of the screen and select Call Volume 3 Tap next to Auto Volume Earpiece Hands Free Car Kit Headset and Speakerphone to adjust volume settings for t...

Страница 78: ...elect conditions under which you would like your phone to alert you by using your stylus to tap the checkboxes SETTING UP PREFERENCES Using the preferences screens you can turn on many features such as Auto Answer One Touch Dialing and infrared beaming You can also make adjustments to sound power usage and other settings For information on adjusting sound settings see Adjusting sounds on page 57 i...

Страница 79: ...Tap each next to System Sound Alarm Sound and Game Sound to select a volume level for these features Note System Sound controls the volume of beeps you hear when tapping icons and performing general functions on your PDA Alarm Sounds are sounds that you hear if you have programmed reminders or alerts for your smartphone Game Sound controls the volume of beeps and other sound effects when you are p...

Страница 80: ... the upper right corner of the screen and tap Date Time with your stylus 2 The date and time on your phone are automatically set Tap the box next to Manual Time Set to adjust these settings yourself Note Daylight Savings time is automatically updated when Manual Time Set is unchecked If Manual Time Set is checked your phone provides information on calculating the correct time ...

Страница 81: ... adjust the way time is displayed tap next to Time and make your selection To adjust the way the date is displayed tap next to Date and make your selection To change the day you would like the week to start on tap next to Week starts and make your selection To adjust the way numbers are displayed tap next to Numbers and make your selection ...

Страница 82: ...dress Phone Messages and Web to assign an application to each button Use your stylus to make your selection To set phone preferences Adjusting call volume 1 Tap to view the PDA screen 2 Tap to open Prefs Phone Tap pick list in the upper right corner and select Call Volume Tap the beside Auto Volume to automatically adjust earpiece volume and microphone sensitivity during a call depending on ambien...

Страница 83: ...lip settings 1 Tap to view the PDA screen 2 Tap to open Prefs Phone Tap the in the upper right corner and select Flip Settings with your stylus Tap the box next to Answer call answer incoming calls by opening the flip Tap the box next to Show phone display to show the phone s status when opening the flip Tap next to Play sound to select and play unique sounds when opening and closing the flip of y...

Страница 84: ...nly or Vibrate then Ring Tap by Ringer Volume to select from the options listed Your phone will demonstrate the selected volume Tap next to Ringer Type to select from a variety of ringer tones When you select a Ringer Type your phone will demonstrate that ringer Tap the box next to Ring by Category to set different rings for your contacts Tap the box next to Roam Ringer to activate a unique ringer...

Страница 85: ...ide Silence All to select between Normal Sounds Vibrate Only or Lights Only 5 Tap to check the box next to each condition after Alert When and your phone will emit a single beep each time a selected condition occurs Note When Vibrate Only or Lights Only is selected incoming calls and alerts will cause the phone to vibrate or light up instead of sounding Your MP3 player also will not play ...

Страница 86: ...ional services Note This feature works only when you are in digital mode To set 1 From the PDA screen tap the Prefs Phone icon 2 Tap in the upper right corner of the screen and tap Phone Service 3 Tap to select 911 Only or Location On 911 Only default is set up to share your position information only with emergency services when you dial 911 Location On is set up to share your position information...

Страница 87: ...ection setting is preselected for optimal speed and ease of use however if you want an alternate connection you can choose from one of the other preprogrammed choices To change your network connection settings follow these procedures 1 Install your desired data application from the CD ROM 2 Tap to view the PDA Applications screen 3 Tap to open Prefs PDA on your PDA Applications screen 4 Use your s...

Страница 88: ...cations USING FAX MODEM You can use the built in wireless modem in your Kyocera 7135 smartphone just like a standard external modem to your desktop computer or laptop You can also use it to send or receive faxes from the computer Notice however that you cannot make or receive voice calls or use any other applications while the modem is in Data Fax mode Incoming phone calls will be redirected to vo...

Страница 89: ...ttings to these values You can change these settings if necessary Refer to your computer user guide if necessary 5 Tap Done To use Fax Modem 1 Connect the phone to the cable If the cable is attached to the port you use for data synchronization turn off HotSync on your computer If you are using a data cable on a different port than the one you use for synchronization it is not necessary to turn off...

Страница 90: ... option These settings allow you to control phone functions while the phone is in Fax Modem mode These settings do not affect outgoing data fax operations 5 From the computer make the connection you want to initiate 6 To end the data or fax call tap End or tap and select a different application Voice Fax until off Fax next call Data until off Data next call ...

Страница 91: ...receive feature must be turned on See step 6 on page 61 To beam information 1 Locate the entry you want to beam 2 Tap to open the menus From the Record menu tap Beam 3 Align your smartphone s infrared port with that of the receiving device as shown in diagram For best results the devices should be approximately 5 30 centimeters 2 12 inches apart and the path between them must be clear of obstacles...

Страница 92: ... entries are saved In a hard reset all records and entries are erased If you must do a hard reset you can restore any data that you previously synchronized using a HotSync operation To perform a soft reset 1 Turn the Kyocera 7135 smartphone over Open the battery door on the back of the phone 2 Press the reset button with the stylus 3 Replace the battery door Turn the phone back over and verify tha...

Страница 93: ...rn the Kyocera 7135 smartphone over Open the battery door on the back of the phone 2 Press and hold down the backlight button on the keypad of the phone Keep holding down the backlight button as you use the stylus to press the reset pin on the right side of the battery Wait a moment and release only the reset pin 3 When the Palm logo appears release the backlight key The following message appears ...

Страница 94: ...remove the Saved_Preferences prc file from the Palm Backup folder You do not need to remove this file before synchronizing if you choose to give your new phone a user name that is different from your original Palm or if you are not a previous Palm user If you have a serial connection If you already use a Palm device and have installed the Palm Desktop software on your computer it is not necessary ...

Страница 95: ...art menu and choose Run Type the letter of your CD ROM drive followed by a colon a backslash and the word launch For example E launch 3 Click Install Palm Desktop Follow the instructions on the screen To perform your first synchronization Important If you are a Palm user see Transferring information between Palm devices in Chapter 4 of the Reference Guide before you synchronize your phone 1 On you...

Страница 96: ...on or off during synchronization 5 Tap the sync button on the phone screen During your first synchronization a message asks for your user name 6 On the computer enter a user name Click OK Note Every Palm device must have a unique name Problems may occur if you synchronize more than one device with the same name You may synchronize your new phone to an existing user name from a previous Palm compat...

Страница 97: ...cessories cause damage or a defect to the phone See The phone s electronic serial number ESN This number is in the battery compartment underneath the battery You must remove the battery to see it on page 86 Keep the phone dry If the phone gets wet turn the power off immediately Let it dry before you use it again In general treat the Kyocera 7135 smartphone as you would a pocket calculator or other...

Страница 98: ...lass may break Protect the Kyocera 7135 smartphone from temperature extremes Do not leave it on the dashboard of a car on a hot day and keep it away from heaters and other heat sources Store it out of direct sunlight Do not store or use the phone in any location that is extremely dusty damp or wet Use a soft dry cloth to clean the screen Avoid using suntan lotion around the phone Chemicals in sunt...

Страница 99: ...s at least 20 centimeters 8 inches away from other people and is pointed away from them Battery Your Kyocera 7135 smartphone has a rechargeable lithium ion battery To charge the battery place your phone in the cradle charging begins unless the battery is already fully charged You can also plug the power cable into the round port on the phone s base to charge directly The battery will not overcharg...

Страница 100: ... you have not used a battery for more than a month recharge it before using it Do not charge any battery if the temperature is below 32ºF 0ºC or above 122ºF 50ºC Do not store any battery in hot areas for long periods of time Use these guidelines under 1 month 4º to 140ºF 20º to 60ºC over 1 month 4ºF to 113ºF 20º to 45ºC Never dispose of any battery in or near a fire It could explode ...

Страница 101: ...e Minimize use of the backlight Note that during phone calls the backlight automatically dims 50 to conserve power You can turn the backlight off completely by pressing anytime during a call Minimize use of the loudspeaker Remove headset when not in use If you don t plan to make or receive calls you can use the Palm applications without turning on the phone Completely charge the battery before pro...

Страница 102: ...ds Phone is OFF appear on the screen Only remove the battery to replace it with another battery Don t leave the battery out of the phone For example if your battery becomes drained while you are traveling and you don t have a second battery or a cable to recharge it it is better to leave the drained battery in the phone than to remove it If the battery drains completely the phone no longer operate...

Страница 103: ... perform a soft reset on the phone Then synchronize the phone to your computer to restore the data If the battery is fully charged and the phone is turned off your clock settings and data will be stored for about two months With the phone off when you remove the battery and reinsert it the Kyocera 7135 smartphone does a soft reset No information is deleted in a soft reset all records and entries a...

Страница 104: ...age To view or download the most current versions of these guides visit us at www kyocera wireless com Kyocera technical support If you have additional questions contact the Kyocera Wireless Corp Customer Care Center Web site www kyocerasmartphone com Before requesting support please try to reproduce and isolate the problem Have the following information available The name of your service provider...

Страница 105: ... answering calls 20 antenna 81 Applications Launcher 39 applications opening 39 Auto Volume 59 B battery 81 charge icon 6 16 charge indicator on cradle 7 charging in rear pocket 7 extending battery life 81 83 improving performance 83 installing and charging 4 low battery signal 16 removing 85 replacing 84 beaming 73 sending data 73 turning on beam receive 61 Block 23 brightness 62 setting 62 ...

Страница 106: ...20 viewing recent calls 26 care and safety 79 CDMA digital mode 15 charging the battery 5 contact find using the keypad 18 contrast 62 setting 62 Copying data 46 cradle 7 Creating new folders 47 D Date 63 Date Book 32 desktop software install 77 dialing keypad 17 Speed Dial 37 Voice Dial 55 dialing 911 21 digital mode 15 Doodle 34 Downloader 40 driving safety vi E Earpiece 59 Email 52 ...

Страница 107: ...ng 63 G Game 61 Graffiti 28 29 basic characters 29 H Hands Free Car Kit 59 hard reset 75 Headset 59 hearing aid using phone with vi help 86 home area indicator 16 HotSync first time 77 installing Desktop software 76 I install battery 4 installing Palm Desktop 77 J JukeBox 40 K keys 14 Kyocera 7135 Desktop 77 Kyocera 7135 desktop install it 1 L LED 16 LED status 16 ...

Страница 108: ...sending 23 messages 35 checking 26 envelope icon 15 modes 15 MP3 Player 40 mute phone during call 26 N network connections 69 network preferences 69 no signal indicator 15 16 number own phone number 27 O on call icon 15 on screen keyboard 27 28 own phone number 27 P pages see messages Palm Desktop 77 PDA applications 39 PDA sounds 59 phone checking own number 27 flip settings 65 preferences 64 Pho...

Страница 109: ...s 60 Press 30 Priority 25 R radio frequency energy iv Receiving and Sending Messages 22 receiving calls 20 recent calls 19 26 recharge the battery 7 removing battery 84 Renaming files and folders 48 Request Receipt 25 resetting 74 resetting phone 74 85 RF energy exposure iv unsafe areas vi ringer ring by category 58 selecting 57 58 setting to vibrate 66 volume 58 ringer type 58 vibrate 66 ringer v...

Страница 110: ...h 15 Silence All 60 soft reset 74 85 sound adjusting ringer 57 58 ring by category 58 selecting ringer 57 speaker volume 57 speaker adjusting volume 57 Speakerphone 59 Speed Dial adding numbers 36 looking up numbers 38 making calls 37 using 19 stylus 28 sync cradle 7 synchronizing 76 synchronizing phone to computer 76 System Sound 61 T talk time battery charge icon 16 Text 33 Text Message preforma...

Страница 111: ...s connection 2 universal serial bus USB 5 unmute phone during call 26 unsafe areas vi V vibrate setting for ringer 66 Voice 34 voice answer 57 voice commands 55 Voice Dial 55 Voice Features 55 voice mail indicator 15 Voice Memo 34 voice wakeup 57 volume adjusting speaker 57 setting ringer 57 58 W Web 39 50 ...

Страница 112: ...94 Index ...

Отзывы: