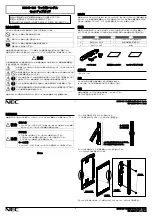
Interior
Interior
Exterior
Exterior
The mounting plate
should be pre-installed
on the interior. If
removed, re-install.
La placa de montaje debe
ser pre-instalada en el
interior. Si se removio,
reinstale la placa.
Install the deadbolt.
Instale el cerrojo.
A
B
Installation Guide
Guía de instalación
64485-002 Rev 02
819 / 973 Dmy
1-800-327-5625
www.kwikset.com
Parts in the box
Piezas en la caja
Required tools
Herramientas necesarias
If drilling a new door, use the
supplied template and the complete
door drilling instructions available
at kwikset.com/doorprep
Si va a perforar una puerta nueva,
utilice la plantilla suministrada y
las instrucciones completas para
la perforación de la puerta estan
disponibles en kwikset.com/doorprep
Fold the supplied template along the fold
line and place on the exterior side of your
door so that the holes in the template are
aligned with the holes in your door.
Doble la plantilla suministrada a lo largo
de la línea de pliegue y coloquela sobre
el borde exterior de su puerta de manera
que los orificios en la plantilla queden
alineados con los orificios de su puerta.
Through door
A través de la puerta
2-3/8" (60 mm)
or • o
2-3/4" (70 mm)
1-3/4" — 2-1/4"*
44 mm — 57 mm*
5-1/2"
140 mm
2-1/8"
54 mm
2-1/8"
54 mm
Exterior
Exterior
Exterior
Exterior
Exterior
Exterior
7/16"
11.11 mm
*Call Kwikset to order
a service kit for 2-1/4"
(57 mm) thick doors.
*Llame a Kwikset para
pedir un kit de servicio
para puertas gruesas
con un espesor de
entre 57 mm (2-1/4”).
Deadbolt
Cerrojo
Handleset
Conjunto
de manija
Lever Option 1: Visible Screws
Opción 1: Palanca con tornillos visibles
Lever Option 2: Hidden Screws
Opción 2: Palanca con tornillos escondidos
A
B
D
G1
G2
J1
J2
C
E1
E2
F
H1
K1
H2
K2
H3
H4
B
B
C
(x2)
A
If you already have the bottom hole drilled
in your door, confirm that its location falls
between the highest and lowest holes at
the bottom of the template. If it does not fall
within this range, drill a new hole in step 3.
If the bottom hole is not drilled, use the
template to mark the location of the new hole
on your door. Make sure it is aligned with the
other holes in the door. Drill a new hole in step
3 at the 9-1/8" (232 mm) mark on the template.
Si el orificio inferior está perforado de
antemano en su puerta, confirmar que está
alineado con uno de los orificios inferiores
de la plantilla. Si no cae dentro de este rango
perforar un nuevo orificio en el paso 3.
Si el orificio inferior no se perfora, utilice la
plantilla para marcar la ubicación del orificio
nuevo en la puerta. Asegúrese de que el
orificio está alineado con los otros orificios en
la puerta. Perfore un nuevo orificio en el paso 3
en la marca de 232 mm (9-1/8") en la plantilla.
Note: Installation is the same, regardless of model shown.
Nota: La instalación es la misma sin importar el modelo que se ilustre.
1 / 2
A
B
Prepare door and check dimensions
Prepare la puerta y revise las dimensiones
1
Drill new bottom hole (if needed)
Perfore un nuevo orificio inferior (si es necesario)
3
Confirm bottom hole location
Confirme la ubicación del orificio inferior
2
Install deadbolt
Instale el cerrojo
4