24 | kvm-tec
SCREEN „ Update“
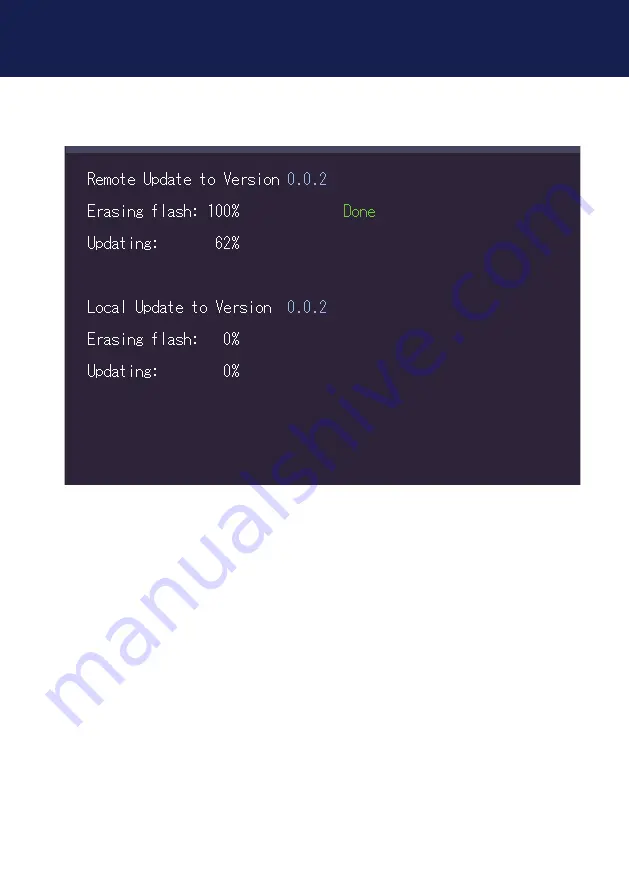
The UPDATE process is now started and takes place in two steps:
1.
Erasing flash: erases the memory
2.
Updating: the new version is installed
3. MaIn MEnU & SETTInGS
Страница 1: ...CPU LOCAL 6811R CON REMOTE Check out our Installation Channel USER MANUAL kvm tec engineered 4K System 4K Extender DP 1 2 6930 media4Kconnect DP1 2 Extender Set 6950 redundant 6970 uncompresed media4...
Страница 2: ...d Indicators 12 2 Extender Installation 13 2 1 Unpacking and checking the content 13 2 2 Mounting kit 14 2 2 1 Mounting optional 14 2 3 Installing the Extender 15 2 4 Quickinstallation Start up 16 2 5...
Страница 3: ...ta your PC uses 27 3 4 2 Select Keyboard Layout 28 3 4 3 Keyboard Shortcuts 29 3 4 4 Mouse Settings 30 3 4 5 Managing Local Settings 31 4 Features 32 4 1 Menu Features 32 4 1 1 Point to Point 33 4 1 2...
Страница 4: ...5 2 Disposal 34 6 Support First Aid 35 7 Cable Requirements 37 7 1 Requirements for Fiber Cable 37 8 Requirements Network Switch 38 8 1 Recommended Swithces 39 9 Warranty 40 9 1 Extended Warranty 40...
Страница 5: ...tant information regarding safety use and disposal for every user of the media4Kconnect DP1 2 Extender Please familiarise yourself with the information within prior to using your product Use the produ...
Страница 6: ...nstructions as described in this manual All use other than that described in this manual is seen as unintended use Modifications in the course of technological progress are reserved In these user inst...
Страница 7: ...knowledge unless they are supervised by a person who is responsible for their safety or provides them with instructions on how to use the product Danger Not for use in potentially explosive environmen...
Страница 8: ...ouch the adapter with wet hands Use the product within the specified performance limits Do not place the product near heaters Do not drop or hit the product Unplug all connections before cleaning the...
Страница 9: ...pply 12 VDC 2A Power requirement 12W withoutUSB devices Operating temperature 0 C to 45 C 32 bis 113 F Storage semperature 25 C bis 80 C 13 to 176 F Relativ humidity max 80 not condensing Casing mater...
Страница 10: ...Status LED Status LED for Network secondary 4 Status LED Status LED for Netzwerk main 5 kvm link Connection for fibercable main 6 kvm link Connection for fibercable secondary 7 dp out DisplayPort 1 2...
Страница 11: ...Status LED for network secondary 13 Status LED Status LED for Network main 14 kvm link Connection for fibercables main 15 kvm link Connection for fibercebles secondary 16 dp in DisplayPort 1 2 Input...
Страница 12: ...ors Normal Operation Rem Only Colour Blinking Physical Link Active Connection Video Extended USB Initialisation UBS Data Received Identify Command Autoupdate Mode Red Yes No No Update Failed Red Slow...
Страница 13: ...rm the carrier immediately Before delivery the product is checked for its function and its operating safety Make sure that the packaging contains the following content 1x media4Kconnect DP1 2 local Ex...
Страница 14: ...xtender Installation 2 2 Mounting kit 2 2 1 Mounting optional Rack Mounting Kit RMK F The rack mounting kit RMK F is for assembling kvm tec media4Kconnect extenders It consists of 19 rack tray and an...
Страница 15: ...p to access point to point or over a Switching System with a host computer In the case of the latter an additional 10 G Network Switch and a Windows PC od tablet with the Switching Manager must be ins...
Страница 16: ...o PC 4 DVI in from PC 1 power supply for 12V 2A on the back side Please note that the recommended length of the display port cable should be max 1 8m 5 9 ft otherwise interference free 4K transmis sio...
Страница 17: ...t the USB cable to a USB socket of your PC and connect the other end of the USB cable to the Local Unit Connect the keyboard and mouse to the Remote Unit 3 Connect the Local and the Remote Unit with a...
Страница 18: ...us LED blinks some seconds red and changes to green after a successful connection The monitor will displays your computer s desktop or any open applications 2 5 REPlacInG ThE SfP MoDUlE The UVX1 F is...
Страница 19: ...kvm tec 19 2 ExTEnDER InSTallaTIon 2 6 REMoVInG a fIbER cablE To remove a fiber cable Press the latch down and slowly pull the cable out 2...
Страница 20: ...overview of the submenus are displayed 3 To access a submenu press the corresponding key or navigate with the arrow keys up and down to the corresponding line and then press Enter key SCREEN OSD menu...
Страница 21: ...e connection the resolution of the video channel and the USB status The current Firmware version is displayed in the upper left corner The link status indicates whether a connection is possible Video...
Страница 22: ...Menu Display of firmware version By pressing the U key or by selecting the arrow keys you reach the update menu in which the firmware of the Extender will be displayed and can be updated SCREEN Update...
Страница 23: ...her information please refer to the update chapter 2 Connect the USB stick to the CON REMOTE unit wait a few seconds until the USB stick is connected to the CON unit 3 Open the update menu with the U...
Страница 24: ...24 kvm tec SCREEN Update The UPDATE process is now started and takes place in two steps 1 Erasing flash erases the memory 2 Updating the new version is installed 3 MAIN MENU SETTINGS...
Страница 25: ...e accessed via the extender via the already activated upgrade USB memory The USB memory upgrade can be switched off and on by pressing M Switching up to 2000 endpoints The already activated Switching...
Страница 26: ...26 kvm tec 3 4 settingS By pressing the G key or selecting the arrow keys you will have access to the Settings menu where you can access all Extender settings SCREEN Settings 3 MAIN MENU SETTINGS...
Страница 27: ...DC option menu 3 Press 1 to display the DDC information of the monitor connected to the remote CON 4 The Extender is connected The DDC information is automatically saved 5 Press 2 for a fix resolution...
Страница 28: ...ou can switch between the keyboard layouts with which you can navigate the on screen display menu OSD Press the K button The Keyboard Local menu opens Press E to select English QWERTY Press D to selec...
Страница 29: ...ange one of the shortcuts you have to press the letter specified for the shortcut Now you can press any key or key combination Please note that only a key combination with the keys 1 or F1 is possible...
Страница 30: ...ng the G buttonor by selecting the arrow buttons you enter the Mouse Settings menu With the M button you will open the Mouse Settings where you can adjust the speed of the mouse with the arrow keys SC...
Страница 31: ...Settings By pressing the G key or by selecting the arrow keys you can access the Menu Local Settings Press the L key to open the Local Settings Here you will find the Remote Wakeup setting SCREEN Loca...
Страница 32: ...sing the F key or selecting the arrow keys you will access the FEATURES menu where you can select all the functions and the features P Point to point Mode on off S Matrix Switching Mode U USB save fea...
Страница 33: ...witching Manager software see Switching Manager manual All functions of the switching system can be controlled via the Switching Manager software can be operated With this link you can download the Sw...
Страница 34: ...rate collection systems for waste electrical and electronic equipment By disposing of the product in the proper manner you help to avoid possible hazards for the environment and public health that cou...
Страница 35: ...al or the remote Unit is causing the problem by swaping first the local and than the remote Unit to ano ther Unit Contact kvm tec support Check if all cables are plugged in correctly Check if the PC i...
Страница 36: ...r keyboard LED is lighting in green Screen occurs but the keyboard is not working Plug out in USB of keyboard and wait until driver is installed after few seconds Check all USB connections on both sid...
Страница 37: ...ould meet the following requirements The maximum length should be 300 m 984ft The media4Kconnect is equipped with a multimode SFP module which allows a transmission distance of up to 300 m 984ft Dedic...
Страница 38: ...reasons it cannot be integrated into an existing company network The network switch must meet the following specifications 10 Gigabit Switch with a port to port transfer rate of 10 Gigabit second The...
Страница 39: ...k Switch 24x RJ45 1000 Base T 2x SFP 1G 2x SFP 10G in Kombination mit MX 6171 NS48RJ 2SFP Network Switch 48x RJ45 10G 2x SFP 10G fIbER SWITchE 6161 NS48SFP 4QSFP Network Switch 48x SFP 10G 4x QSFP 8 1...
Страница 40: ...ternal effort improper maintenance Violation of the operating instructions lightning damage Please contact us first before returning the product 9 1 extended warranty 2 years standard warranty Art Nr...
Страница 41: ...253 81 912 Fax 0043 0 2253 81 912 99 Email support kvm tec com Web www kvm tec com Find our newest updates and FAQs on our homepage http www kvm tec com support 10 adDress Phone email kvm tec Inc USA...
Страница 42: ...42 kvm tec 11 notes...