


16 | kvm-tec
kvm-tec | 17
2. installation of the extender
2. installation of the extender
MVX2
digital kvm-extender
power/status
power/status
MVX2
digital kvm-extender
power/status
power/status
5. Audio to PC
6. Audio
from PC
4. DVI in
from PC
4. DVI out
to Monitor
4. DVI in
from PC
1. po
wer
plug 12V 3A
2. USB from
keyboard and mouse
6. Audio from
microphone
5. Audio to
speaker
3. Network cable CA
T5e/6/7/ up to 150m/492ft
2. USB zu PC
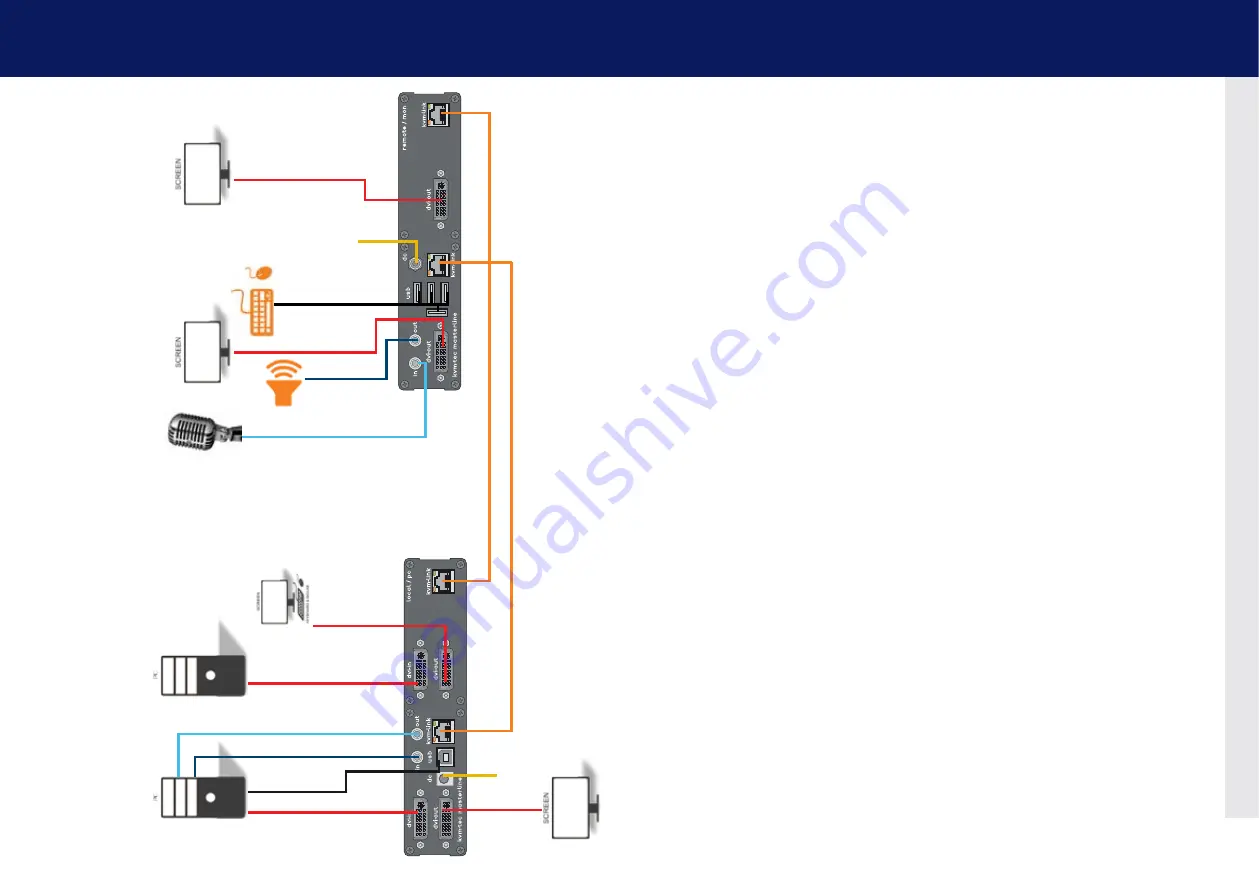
Quick Installation MVX2 MASTERlINE
local / cPU – remote/ con
1. Connect the CON / Remote and the CPU / Local Unit with the included 12V
2A power supply.
2. Now connect the USB cable to a USB port on your PC and connect the
other end of the USB cable to the CPU / Local Unit. Connect keyboard and
mouse to the CON / Remote Unit.
3. Connect the CPU / Local and the CON / Remote Unit with two network
cables.
4. Now connect the DVI cable to the DVI socket of the PC and the other end
to the DVI socket of the CPU / Local Unit (DVI-in). Then connect the moni-
tor to the CON / Remote Unit with a DVI cable.
5. Then connect PC audio out with the audio cable to Local Audio in. Then
connect audio / out via the audio cable
6. Almost done! Now connect the audio cable Local Audio / out to the PC
Audio in and Remote Audio / out with the audio cable to the microphone.
HAVE FUN - your kvm-tec Extender is now in use for many years
(MTBF approx 10 years)
1. po
wer
plug 12V 3A
3. Network cable CA
T5e/6/7/ up to 150m/492ft
4. DVI out
to Monitor
4. DVI out
to Monitor
4. DVI out
to Monitor
Содержание Masterline MVX2
Страница 40: ...78 kvm tec 10 Notes...