


4
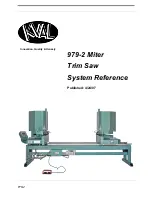
979-2
Lock Out Procedure
This policy is required by OSHA regulation 1910.147 and Cal OSHA’S SB198 ruling of July 1991.
Use the following lockout procedure to secure the
979-2
while it is powered down. During a lockout,
you disconnect all power and shut off the air supply. Be sure to use the tagout guidelines noted below.
To lock out the
979-2
1.
Assess the equipment to fully understand all energy sources (multiple electrical supplies, air supply
and pressure, spring tension, weight shifts, etc.).
2.
Inform all affected personnel of the eminent shutdown, and the duration of the shutdown.
3.
Obtain locks, keys, and tags from your employer’s lockout center.
4.
Disconnect power
NOTE:
Always lock out electrical disconnects on both electrical cabinets
a.
Turn the disconnect switches on the main electrical panel to the OFF position. Then pull out
the red tab and place a padlock through the hole. Place your tag on the padlock, as per the tagout
guidelines below. (see example below)
b.
Turn the disconnect switch on the larger high-frequency panel to the OFF position. Then pull
out the red tab and place a padlock through the hole. Place your tag on the padlock, as per the
tagout guidelines below
Other Hazard Control
Action
If you believe any part or operation of this machine is in violation of any health or
safety regulation, it is your responsibility to immediately protect your employees
against any such hazard and bring the matter to our attention for review and correction,
if deemed advisable.
Additional detailed safety guidelines are included in the operating instructions of this
manual. KVAL will be pleased to review with you any questions you may have regard-
ing the safe operation of this machine.
When multiple people are
working on the machine, each
person needs to have a lock on
the handle in the extra holes
provided.
Содержание 979-2
Страница 1: ...979 2 Innovation Quality Honesty 979 2 Miter Trim Saw System Reference Published 4 24 07 ...
Страница 2: ...979 2 ...
Страница 4: ...b 979 2 ...
Страница 8: ...f 979 2 ...
Страница 10: ...Introduction 2 979 2 ...
Страница 20: ...12 979 2 ...
Страница 21: ...979 2 13 CHAPTER 2 Operation The following chapters explain normal operation of the 979 2 ...
Страница 22: ...Operation 14 979 2 ...
Страница 24: ...16 979 2 ...
Страница 26: ...18 979 2 ...
Страница 36: ...28 979 2 ...
Страница 52: ...Maintenance 44 979 2 Grease Points Main Frame Bottom View Bottom View ...
Страница 53: ...Lubrication Requirements 979 2 45 Fixed Head ...
Страница 54: ...Maintenance 46 979 2 Movable Head Bottom View ...
Страница 56: ...48 979 2 ...
Страница 57: ...Cut Depth Set up 979 2 49 ...
Страница 58: ...50 979 2 ...
Страница 59: ...Cut Depth Set up 979 2 51 ...
Страница 60: ...52 979 2 ...
Страница 64: ...56 979 2 ...
Страница 65: ...979 2 57 CHAPTER 5 Troubleshooting ...
Страница 87: ...Touch Screen Troubleshooting 979 2 79 Technical Support Contact information ...
Страница 92: ...84 979 2 ...
Страница 98: ...90 979 2 ...
Страница 100: ...92 979 2 ...
Страница 102: ...94 979 2 ...


