background image

6. Fehlerdiagnose 

und -behebung

Error Diagnosis

and Remedy

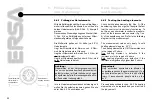
6.4.1  Prüfung der Heizelemente

Wird die Entlötspitze nicht heiß, obwohl die Regel-

einheit  offensichtlich  funktioniert,  so  sollten  die 

beiden Heizelemente (Abb. 5/Pos. 3) überprüft  

werden.

Dazu messen Sie am abgezogenen Stecker (Abb. 

1/  Pos.  2)  des  Entlötkolbens  mit  einem  Wider-

standsmeßgerät nach folgendem Schema:

Die  Meßwerte  gelten  nur  für  kalte  (ca.  20°C) 

Heizelemente.

Liegt  der  Widerstand  im  Bereich  von    2  Ohm, 

sind die Heizelemente in Ordnung.

Liegt der Widerstand im Bereich von  4 Ohm, ist 

ein Heizelement defekt.

Liegt der Widerstand deutlich über 6 Ohm, sind 

beide Heizelemente defekt. 

6.4.1  Testing the heating elements

Check both heating elements (fig. 5/no. 3) if the 

desoldering tip does not get hot despite the fact 

that the control unit is obviously functioning. To 

do this, use an ohmmeter to conduct a measure-

ment on the disconnected connector (fig. 1/no. 

2) of the desoldering iron. Refer to the following 

diagram for this measurement:

The  measurement  values  only  apply  to  cold 

heating elements (approx. 20 °C).

The heating elements are OK if the resistance is 

in the region of 2 ohms.

One  heating  element  is  defective  if  the 

resistance is in the region of 4 ohms.

Both  heating  elements  are  defective  if  the 

resistance is significantly higher than 6 ohms. 

Thermoelement- 

fühler / thermo 

couple sensor

Heizelement/

heating element

Ist  ein  Heizelementeaustausch  notwendig  und 

wollen Sie ihn selbst vornehmen, gehen Sie wie 

unter Kap. 6.4.3 beschrieben vor.

Proceed as described in chap. 6.4.3 if a heating 

element has to be replaced and you want to do 

the job yourself.

Achtung:

Reparaturen  an  der  Versorgungseinheit  dür-

fen nur von autorisiertem Fachpersonal durch-

geführt werden. Im Gerät befinden sich span-

nungsführende Teile. Bei unsachgemäßen Ein-

griffen besteht Lebensgefahr!

Important:

Only  authorised  specialists  are  allowed  to 

undertake repairs on the power supply unit. The 

unit contains live parts. There is a risk of fatal 

injury  if  inexperienced  people  work  on  the 

unit.

20

Содержание X-Tool

Страница 1: ...ERSA X Tool Betriebsanleitung Operatinginstructions Die leistungsfähige Entlötstation The powerful desoldering station ...

Страница 2: ...bung 6 Fehlerdiagnose und Fehlerbehebung 7 Wartung und Instandhaltung 8 Ersatzteile und Bestelldaten 9 Garantie 1 Introduction 2 Technical Data 3 Safety information 4 Commissioning 5 Functional description 6 Error diagnosis and Remedy 7 Maintenance 8 Spare parts and ordering information 9 Warranty Contents 1 2 ...

Страница 3: ...rol unit 5 Finger button 6 X Tool desoldering iron 7 Residual solder container 3 8 Viscose sponge 9 Holder 10 Power switch 11 Vacuum hose 12 Prefilter 1 Compressor Unit CU 100A 2 Rundsteckerd Entlötkolbens 3 Netzleitung mit Stecker 4 Regeleinheit DIG 2000 oder MIC 60 iA 5 Fingertaster 6 Entlötkolben X Tool 7 Restlotbehälter X Tool Pictures 10 10 11 12 1 2 4 3 7 5 6 Abb 1 a Fig 1 a Abb 1 b Fig 1 b 8...

Страница 4: ...rol unit 5 Finger button 6 X Tool desoldering iron 7 Residual solder container 4 8 Viscose sponge 9 Holder 10 Power switch 11 Vacuum hose 12 Prefilter 1 Venturi Unit VU 100A 2 Rundsteckerd Entlötkolbens 3 Netzleitung mit Stecker 4 Regeleinheit DIG 2000 oder MIC 60 iA 5 Fingertaster 6 Entlötkolben X Tool 7 Restlotbehälter X Tool Pictures 9 10 11 12 2 4 3 7 5 6 Abb 1 c Fig 1 c Abb 1 d Fig 1 d 8 10 1 ...

Страница 5: ...ingplug 2 Particlefilter 3 Residualsoldercontainer 5 1 Dichtstopfen hinten 2 Partikelfilter 3 Restlotbehälter X Tool Pictures 1 2 3 4 5 4 Lotsammelfilter 5 Dichtstopfen vorne 4 Solder collection filter 5 Front sealing plug Abb 2 Fig 2 ...

Страница 6: ...rz black Thermoelement rot Red thermocouple schwarz black blau blue Ausschnitt X Tool ohne Griffschale 2 und ohne Lottauffangbehälter Cut away of X Tool with out handle shell 2 and without solder collection container Ansicht Y View Y Heizkörper heating element X Tool Pictures Abb 3 Fig 3 ...

Страница 7: ...dungen 4 Ventilstößel 5 Leiterplättchen 6 Heizelemente 7 Nut 7 1 Valve 2 Locking knob 3 Tab connectors 4 Valve tappet 5 Chip 6 Heating elements 7 Slot 1 Arretierknopf 2 Gehäuseschraube 3 Griffhälfte 4 Entlötkopf 5 Entlötspitze 1 2 2 3 2 4 5 1 2 3 4 5 6 6 5 3 7 Abb 4 b Fig 4 b Abb 4 a Fig 4 a X Tool Abbildungen X Tool Pictures ...

Страница 8: ...e Vakuum sobald Sie den Fingertaster betätigen Alle Komponenten sind mit antistatischer Ober fläche aufgebaut Congratulations on purchasing this high tech ERSA desoldering station We recommend that you use this combination unit for desoldering wired up components comprising single sided double sided or multiple layer printed circuit boards The outstanding features of this unit are its high desolder...

Страница 9: ...inweise Sollten die aufgezählten Komponenten beschä digt oder nicht vollständig sein so setzen Sie sich bitte mit Ihrem Lieferanten in Verbindung 1 1 Scope of supply Please check that the contents of the package are complete The CU 100 A packaging unit comprises Compressor Unit CU 100 A Mains lead Prefilter Holder with viscose sponge X Tool desoldering iron Cleaning needle Spare residual solder con...

Страница 10: ...cht 550 g Endvakuum max 900 mbar Luftverbrauch 11 5 Normliter bei 100 Einschaltdauer Ausführung antistatisch Compressor Unit CU 100 A Voltage Power 230 V 50 Hz 45 W 115 V 60 Hz 50 W Please refer to the information on the rating plate Noise level approx 55 db A Weight approx 1 25 kg Ultimate vacuum approx 800 mbar Throughflow approx 4 5 l min Design antistatic Compressor Unit VU 100 A Voltage Power ...

Страница 11: ...CrNi Thermoelement Startvakuum bis zu 800 mbar Weg Griff Entlötspitze ca 70 mm Ausführung antistatisch X tool desoldering device Voltage 24 V Heat up rating 260 W Heat up time tip dependent Weight incl cable and tip approx 240 g Heating elements 2 60 W each at 350 C Temperature measurement Ni CrNi thermocouple Starting vacuum up to 800 mbar Distance from handle to soldering tip approx 70 mm Design...

Страница 12: ...Sicherheitshinweise Safety information Bitte beachten Sie vor der Inbetriebnahme unbedingt die beiliegenden Sicherheitshin weise Before commissioning be sure to note the enclosed safety information 3 12 ...

Страница 13: ...run gen liegen dann die Gewindestifte bündig einschrauben Viskoseschwamm mit destilliertem Wasser gut anfeuchten Important Only use clean and oil free compressed air The maintenance unit with filters and pressure reducer must be connected in series of the unit Holder A 44 Hook the holder plate from below and put it with a slight slowing movement so that the insert nuts are over the fastening holes ...

Страница 14: ...leichzeitig auf wird die Ist Temperatur der Lötspitze angezeigt Sie können nun mit der Löt station arbeiten 4 4 X Tool desoldering iron Check that the solder collection filter fig 2 no 4 and the particle filter fig 2 no 2 are fitted in the residual solder container fig 2 no 3 Make sure that the residual solder container fig 2 no 3 is inserted in the desoldering iron Check that the desoldering tip fig 4 no...

Страница 15: ...0 C liegen siehe Kap 5 1 4 5 Switching on Plug in the mains plug fig 1 no 3 in the CU 100 A Compressor Unit respectively VU 100 A Venturi Unit and into the corresponding control unit Switch on the power switch fig 1 no 11 of the vacuum unit and the control unit glow lamp in the power switch lights up Setthedesiredworkingtemperatureonthe controlunit Seetheappropriateoperating instructions DIG2000A or...

Страница 16: ...ring shaped gap of approx 0 1 to 0 2 mm between the connection being desoldered and the extraction duct Thus the used solder can be sucked up 5 16 5 1 Auswahl der richtigen Entlöttemperatur Wählen Sie stets die niedrigstmögliche Entlöt temperatur für IhreAufgabe Zu hohe Temperatu ren schädigen die Leiterplatte und die Bauteile Richtwerte für Solltemperatur Nicht durchkontaktierte Leiter ca 270 C p...

Страница 17: ... an der Spitze anstehende Vakuum aus Dadurch wird das Lot schlagartig durch die Lötspitze hindurch in den Restlotbehälter beför dert 5 3 Changing the desoldering tip The desoldering tip fig 4 no 5 can be changed using the tip holder fitted onto the support stand To do this position the desolder ing tip with its radial slot in one of the holes in the tip holder Use one hand to hold the tip holder in ...

Страница 18: ...igkeit 6 3 2 VU 100 A schaltet überhaupt nicht Vakuum steht an Eingangsdruck nicht ausreichend Überprüfung des Luftdruckes und gegebenen falls nachregeln 6 1 Inadequate desoldering power see chap 7 1 Filters 6 2 CU 100 A pump starts up frequently The vacuum system is not air tight Check the sealing plugs connections and hoses 6 3 CU 100 A pump does not start up Is the station switched on and is th...

Страница 19: ... Sie Spannungsversorgung und Siche rung der Regeleinheit siehe Technische Daten Sicherung und Ersatzsicherung sind in der rück seitigen Netzanschlußbuchse untergebracht 6 3 3 VU 100 A does not switch at all No vacuum No power supply Check fuse below the power plug at the unit s rear side Replace it if neces sary 6 3 4 VU 100 A switches on but does not switch off automatically Air escapes audibly b...

Страница 20: ... the desoldering iron Refer to the following diagram for this measurement The measurement values only apply to cold heating elements approx 20 C The heating elements are OK if the resistance is in the region of 2 ohms One heating element is defective if the resistance is in the region of 4 ohms Both heating elements are defective if the resistance is significantly higher than 6 ohms Thermoelement f...

Страница 21: ...älter Abb 1 Pos 8 siehe auch Kap 7 1 1 Entspannen Sie das Ventil indem Sie den Arretierknopf Abb 4 Pos 1 drücken 6 4 2 Testing the thermocouple sensor An indication of a defect in the thermocouple is that only a low temperature e g room tem perature is shown on the actual value display of the control unit when the desoldering tip is hot An indication of a breakage in the thermocouple is that a hig...

Страница 22: ...Sollten Sie ein Problem nicht lösen können so schicken Sie das Gerät bitte frei komplett und in der Originalverpackung an ihren zuständigen Händler oder den Hersteller Use a size 6 Torx driver to open the housing 2 screws on the front panel 2 screws on the top part of the housing fig 4 no 2 Remove the handle halves fig 4 no 3 in which the locking knob fig 4 no 1 is mounted Measure the heating element...

Страница 23: ...the X Tool handle presses the residual solder container fig 2 out far enough for you to remove it easily 7 1 Filter Ein notwendiger Wechsel der Filter kündigt sich durch abnehmende Entlötleistung an Das heißt der Durchfluß wird geringer und reicht unter Umständen nicht mehr aus um das komplette Restlot abzusaugen Bei nachlassendem Durchfluß reinigen Sie bitte mit dem beiliegenden Spitzenreiniger den ...

Страница 24: ...ührung stand noch heiß sein Lassen Sie den Restlotbehäl ter erst abkühlen bevor Sie ihn öffnen To put the residual solder container back in place it back into the opening push it forwards with your thumb and then press the locking knob fig 4 no 1 This reconnects the valve tappet fig 4 no 4 with the residual solder container 7 1 2Changingthesoldercollection filter The solder collection filter fig 2 no 4...

Страница 25: ...lter fest auf den Anschluß andrücken und den Vakuumschlauch Abb 1 Pos 12 auf den Filter aufstecken 7 1 3 Changing the particle filter The particle filter fig 2 no 2 is used for pro tecting the downstream valve fig 4 no 1 as well as the hoses and the pump against solder vapours The particle filter should be changed as well about every second or third change of the solder collection filter To change the p...

Страница 26: ...educe its ability to create an air tight seal Make certain that the effectiveness of the ventilation holes is not impaired by a build up of dust 7 1 Important care jobs Hinweis Verwenden Sie ausschließlich Original ERSA Verbrauchs und Ersatzteile um sichere Funk tion und Gewährleistung zu erhalten Sorgen Sie dafür dass die Entlötspitze stets verzinnt ist Wischen Sie die Entlötspitze falls erforder...

Страница 27: ...of dust Use the small brass brush in the accessory kit to clean the tip holder hole in the heat reservoir from time to time Achten Sie darauf dass Lüftungsöffnungen nicht durch Staubablagerungen ihre Wirkung verlieren Reinigen Sie mit dem im Zubehör befind lichen Messingbürstchen gelegentlich die Spitzenaufnahmebohrung im Wärme speicher ...

Страница 28: ...ation withoutcontrolunit VU100Aventuriunit CompressorunitforCU100A antistatic X Tooldesolderingironwithde solderingtip722ED12 antistatic HeatinginsertforX Tool withthermocouple HeatinginsertforX Tool withoutthermocouple Reservoirvalve complete Desoldering head fig 4 no 4 Residualsoldercontainer compl Soldercollectionfilter 10pcs Particlefilter 10pcs Frontsealingplug Backsealingplug Desold tip ID 1 2 ...

Страница 29: ...U100A Description Vacuumgauge Cleaningbrush Holderantistatic Viscosesponge Option Tipchangingtool VenturiUnitVU100A withoutcontrolunit VenturistationVU103A forVU100A Bestell Nr VM01 3N412 A 44 0003 3ZT000164 VU 100 A VU 103 A Order No VM01 3N412 A 44 0003 3ZT000164 VU 100 A VU 103 A X Tool ERSADUR desoldering tips X Tool ERSADUR Entlötspitzen 722 EN 0818 722 EN 0823 722 EN 1020 722 EN 1023 722 EN ...

Страница 30: ...ugsweise nicht ohne die schriftliche Genehmigung der ERSA GmbH reproduziert übertra gen oder in eine andere Sprache übersetzt werden ERSA has produced these Operating Instructions with the utmost care Nevertheless we cannot provide any guarantee regarding the content completeness or qua lity of the information in these Instructions The content is regularly updated and adapted to current conditions...

Отзывы: