Küppersbusch KD7580.0GE Скачать руководство пользователя страница 18


34


Maintenance, Cleaning and Care 

 
It  is  absolutely  essential  to  have  your  cooker  hood  regularly  serviced  in  order  to 
ensure  that  it  operates  efficiently  for  a  long  time.  When  the  metal  grease  filter  is 
clogged with particles of grease and dirt it will not work properly. 
The  charcoal  filter  (only  used  for  the  circulation  mode)  cannot  be  rinsed  or 
regenerated  and  must  therefore  be  replaced  at  regular  intervals.  You  can  order 
replacement  charcoal  filters  from  your  specialist  dealer  or  from  our  spare-parts 
service. 
 

Important!

 Pull the mains plug out of the socket or switch of the relevant safety fuse 

in the fuse box for the building when carrying out any maintenance or cleaning work.


The cooker hood may not be cleaned with a steam cleaner. 
 

Housing 

 
Only clean the surfaces and control elements with a sponge cloth and water as they 
are very sensitive to scratches and cuts. 

When you have removed the metal grease filter, clean the accessible metal surfaces 
in the interior of the cooker hood. When doing so make sure that you only use a little 
liquid  when  working  on  the  interior  of  the  cooker  hood  or  when  cleaning  it.


Do  not  use  any  acidic  cleaning  agents,  agents  which  contain  solvents  or  abrasive 
agents such as scouring powder or liquid scouring cleaner.  

You can also remove and clean the insides of the two doors of model KD9970.0GE. 
Use a soft cloth for cleaning. These doors are not suitable for rinsing in a dishwasher. 
To  remove  the  doors,  first  of all  remove  the two  fastening  screws  (Fig.  7)  and  then 
remove the inside of the door (Fig. 7.1). 
 
Fig. 7   


Fig. 7.1 


Содержание KD7580.0GE

Страница 1: ...BEDIENUNGS UND MONTAGEANWEISUNG GB INSTRUCTIONS FOR ASSEMBLY AND USE GR ΟΓΗΓΙΔ ΥΔΙΡΙ ΜΟΤ ΚΑΙ ΤΝΑΡΜΟΛΟΓΗ Η KD7580 0GE KD9970 0GE KD9960 0GE KD9580 0GE ...

Страница 2: ......

Страница 3: ......

Страница 4: ...tructions and tips Dimensioned drawings Assembly instructions Operation Switching your appliance on off Power controls Automatic delayed stop Switching the lamp on off Dimmer function Filter saturation display Remote control Maintenance Cleaning and Care Casing Grease filter Charcoal filter 29 32 32 32 32 32 33 33 34 35 36 20 21 22 24 24 25 26 ...

Страница 5: ...er and if available fax number 9 When can customer service call 10 An exact appliance designation model no and fabric no refer to the nameplate and or the receipt Model designation E number F N 11 Date of purchase 12 An exact description of the problem or the kind of service you require Please also have your receipt available This will help us to avoid wasting time as well as cutting down on expen...

Страница 6: ...pen fireplace e g tile stoves coal ovens fireplaces etc must always be provided with a sufficient supply of fresh air This is best ensured with a wall box for inlet air and exhaust air or with a flip switch for the window Contact your local chimney sweep for information before making your plans He will have to give his approval for the hood and the inlet air and exhaust air pipes before you put yo...

Страница 7: ...fat that has been deposited in the filter Constant supervision is essential when deep frying or cooking with oil or fat under the hood because of the risk of fire No other work may be carried out with an open flame A fire may result and damage the metal grease filter or other parts of the hood This does not include the proper use of a gas cooker Safety instructions for maintenance cleaning and car...

Страница 8: ... You can order the extra part required for the recirculation mode from us also see the section on maintenance cleaning and care Electrical connection Before connecting the hood to the mains check that the voltage stated on the type plate corresponds to the local power supply The type plate is located inside the hood You will see it next to the motor once you have removed the grease filter The hood...

Страница 9: ...th pipes Exhaust air boxes and pipes with a diameter of 100 or 120 mm are not suitable Do not use a plastic flex exhaust air tube since this may make the operating noise unpleasantly loud When drilling holes for dowels make sure that lines running in the walls electricity gas and water are not damaged This cooker hood has been designed for mounting on a wall Please follow the drawings and instruct...

Страница 10: ...26 KD9580 0GE KD7580 0GE dimensioned drawing KD9580 0GE KD7580 0GE dimensioned drawing of installation dimensions back view ...

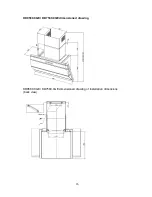
Страница 11: ...27 KD9970 0GE dimensioned drawing KD9970 0GE dimensioned drawing of installation dimensions back view ...

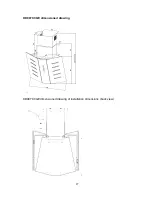
Страница 12: ...28 KD9960 0GE dimensioned drawing KD9970 0GE dimensioned drawing of installation dimensions back view ...

Страница 13: ...a minimum clearance of 55 70 cm for gas hobs See Fig 2 1 for the exact dimensions of the wall mounting bracket Fig 2 Fig 2 1 Now fasten the two mounting bars shown in Fig 3 onto the holes that have been provided on the top of the body motor block of the cooker hood on the right and left next to the air exit of the fan motor and then hang the hood into the two clips on the wall mounting bracket Fig...

Страница 14: ...unting bracket and then align and fasten it Fig 4 1 To align the height of the hood when it has already been suspended you will need to unscrew and screw the two screws that go into the holes on the top clip of the mounting bars evenly Fig 4 2 If the cooker hood has not been horizontally mounted the two screws will need to be screwed in and out separately until the hood is in the optimal horizonta...

Страница 15: ...culation mode you will first of all need to follow the instructions given in Fig 5 2 before you mount the chimneys also according to Fig 5 and Fig 5 1 Please note Extraction mode Telescopic part of the chimney with recirculation air openings facing down Recirculation mode Telescopic part of the chimney with recirculation air openings facing up Pull the telescopic chimney B upwards and fasten it to...

Страница 16: ...delayed stop This cooker hood is equipped with an automatic delayed stop function which automatically switches the hood motor off after 15 minutes The automatic delayed stop function should always be activated as soon as cooking has been completed in order to remove the steam and odours that remain after cooking Touching the timer symbol lightly will switch on the automatic delayed stop function T...

Страница 17: ...rom the display IR remote control An IR remote control Fig 6 is included with delivery It can be used to operate and regulate all the functions of the cooker hood from a distance of several metres To do so point the remote control towards the cooker hood and press the function of your choice on the remote control Fig 6 On off switch Increase reduce power setting or the dimmer setting Switch on the...

Страница 18: ...ng work The cooker hood may not be cleaned with a steam cleaner Housing Only clean the surfaces and control elements with a sponge cloth and water as they are very sensitive to scratches and cuts When you have removed the metal grease filter clean the accessible metal surfaces in the interior of the cooker hood When doing so make sure that you only use a little liquid when working on the interior ...

Страница 19: ... 8 Fig 8 1 Some of the models have a metal grease filter that is covered with a removable stainless steel grid The metal grease filter will have to removed before you put it into the dishwasher To remove the stainless steel grid press the bar rail handle down until the two movable clips have been pulled right down Fig 8 2 and then press the metal filter out of the stainless steel grid Fig 8 3 Now ...

Страница 20: ...e order according to Fig 8 ff Charcoal filter To remove the charcoal filter Fig 9 pull the two front fastening clips in the filter frame to the front After you have removed the new charcoal filter from its packaging the filter should be shaken to distribute the granules evenly Make sure that the fastening clips on the filter point to the front when you insert the new charcoal filter First put the ...

Страница 21: ......

Отзывы: