background image

Kübler

4 Installation

English

Operation Manual R60105.0009 - 01

EN | 21

4.1.2.2 Step by Step Installation

The steps necessary for mounting the measuring wheel sys-
tem are represented as a succession of pictures on the first
pages of this operation manual, see chapter Step-by-Step In-
stallation[

}

 2].

The illustrations used for this purpose are examples intended
to describe the operating principle.

The measuring wheel system is supplied as described in the
data sheet, i. e. in a determined orientation of the encoder
and of the corresponding connection technology. If this ori-
entation is not suitable for the needs of the application, the
following can be adapted when mounting the device, see
chapter Changing the Fastening Possibilities [

}

 22];

• The orientation of the connection technology (30° steps).
• Using measuring wheels with other diameters.
• Using measuring wheels with other surfaces.

Installation in the application:

a) Place the measuring wheel on the surface of the material

to be measured and the bracket on the installation surface
(1[

}

 2]).

b) Fasten the base plate on the assembly surface with two

M6 screws (2[

}

 2]).

c) During this installation, the carriage and the measuring

wheel are moved upwards by 5 mm [0.2“] (3[

}

 2]).

NOTICE

Influence of the measuring wheel size

When the surface of the material to be measured and the in-
stallation surface of the system are located at the same
height, the recommended measuring wheel circumference is
200 mm [7.87“].

This results in a maximum spring travel of the measuring
wheel of ±5 mm [±0.2“].

If a measuring wheel with another circumference is used, the
height of the surface of the material to be measured and the
height of the installation surface must be chosen so that the
working range of the measuring wheel system, i. e. the max-
imum spring travel, is not exceeded.

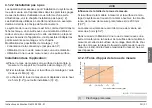
4.1.2.3 Measuring Wheel Pressure Force

Pressure force in N

Spring travel in mm [inch]

IMG-ID: 27021598006829835

(1)

Recommended preload

Содержание MWE40

Страница 1: ...Betriebsanleitung Operation Manual Instructions d utilisation R60105 0009 01 MWE40 MWE41 Deutsch English Fran ais...

Страница 2: ...2 R60105 0009 01 1 M6 5 6 Nm 3 69 4 43 lb in 2 5 mm 0 2 3 4...

Страница 3: ...R60105 0009 01 3 30 B 1 0 Nm 8 85 lb in SW2 5 C 1 0 Nm 8 85 lb in SW2 D...

Страница 4: ...essradsystems 7 3 2 Bestimmungsgem e Verwendung 7 3 3 Vorhersehbare Fehlanwendung 7 3 4 Typenschild 7 3 5 Technische Daten 8 3 5 1 Messradsystem 8 3 5 2 Zulassungen 8 4 Installation 9 4 1 Mechanische...

Страница 5: ...kument genannten Marken und Produktmar ken sind Warenzeichen oder eingetragene Warenzeichen der jeweiligen Titelhalter Irrt mer und nderungen vorbehalten Angegebene Produk teigenschaften und technisch...

Страница 6: ...Informationen zur Bedienung des Produktes so wie Tipps und Empfehlungen f r einen effizienten und st rungsfreien Betrieb 2 2 Vorbemerkung Die folgenden grunds tzlichen Sicherheitshinweise dienen dazu...

Страница 7: ...zuverl ssi ge Geschwindigkeits Positions und Distanzmessung in An wendungen mit linearen Bewegungen Diese werden ber das Messrad mit angebautem Drehgeber rotativ erfasst und in Messdaten umgewandelt...

Страница 8: ...echenden Angebots Kundenzeichnung des Produktes HINWEIS Konfiguration beachten Die Leistungsmerkmale und die mechanische Ausf hrung des Produktes sind abh ngig von der gew hlten Konfigurati on gem Bes...

Страница 9: ...Sturz Schicken Sie besch digte Ger te mit einem ausgef llten Formblatt f r R cksendungen RMA an den Hersteller zu r ck 4 1 1 Allgemeine Hinweise f r die Montage HINWEIS Werkzeuge Verwenden Sie f r di...

Страница 10: ...tspricht die se Ausrichtung nicht den Anforderungen innerhalb der Appli kation kann Folgendes bei der Montage adaptiert werden siehe Kapitel nderung der Befestigungsm glichkeiten 11 Die Ausrichtung de...

Страница 11: ...montieren achten Sie dabei auf den Kabelabgang des Drehgebers B 3 b Ziehen Sie an der gew nschten Position die drei M3 Schrauben fest C 3 Montage Messrad a Setzen Sie das Messrad auf die Drehgeberwell...

Страница 12: ...Kontakt 14 Vor den Arbeiten Schalten Sie die Energieversorgung ab und sichern Sie die se gegen Wiedereinschalten Trennen Sie anschlie end die Energieversorgungsleitungen physisch Entfernen Sie Betrieb...

Страница 13: ...14 HINWEIS Umweltsch den bei falscher Entsorgung Elektroschrott Elektronikkomponenten sowie Schmierstoffe und andere Hilfsstoffe unterliegen der Sonderm llbehand lung Problemstoffe d rfen nur von zuge...

Страница 14: ...39 0 26 42 33 45 K bler sterreich 43 3322 43723 12 K bler Polen 48 6 18 49 99 02 K bler T rkei 90 216 999 9791 K bler China 86 10 8471 0818 K bler Indien 91 8600 147 280 K bler USA 1 855 583 2537 Rep...

Страница 15: ...uring wheel system 18 3 2 Use According to the Intended Purpose 18 3 3 Foreseeable Misuse 18 3 4 Type plate 18 3 5 Technical Data 19 3 5 1 Measuring wheel system 19 3 5 2 Approvals 19 4 Installation 2...

Страница 16: ...olders Subject to errors and changes The stated product features and technical data shall not constitute any guarantee declara tion 2 General Information Please read this document carefully before wor...

Страница 17: ...instructions 2 3 Target Group The device may only be planned mounted commissioned and serviced by persons having the following qualifications and fulfilling the following conditions Technical trainin...

Страница 18: ...gn the system is also suitable for tightest installation spaces it can be installed quickly and easily horizontally vertically or overhead 3 2 Use According to the Intended Purpose The measuring wheel...

Страница 19: ...Mechanical characteristics spring bracket Operating temperature 20 C 70 C 4 F 158 F Shock resistance according to EN 60068 2 27 1 000 m s2 6 ms Vibration resistance accord ing to EN 60068 2 6 55 2000...

Страница 20: ...crews and screwed connections Unless otherwise specified a friction coefficient of 0 14 is re quired for all screwed connections Unless otherwise spe cified a strength class of 8 8 metric or grade 5 i...

Страница 21: ...surfaces Installation in the application a Place the measuring wheel on the surface of the material to be measured and the bracket on the installation surface 1 2 b Fasten the base plate on the assemb...

Страница 22: ...application using e g Coated screws Threadlocker Schorr washers We recommend an additional protection against manipulation by marking the fastening screws with locking varnish or sim ilar 5 Commission...

Страница 23: ...lation 20 can be complied with All assembly steps described in chapter Installation 20 can be performed 7 Disposal Always dispose of unusable or irreparable devices in an en vironmentally sound manner...

Страница 24: ...bler Italy 39 0 26 42 33 45 K bler Austria 43 3322 43723 12 K bler Poland 48 6 18 49 99 02 K bler Turkey 90 216 999 9791 K bler China 86 10 8471 0818 K bler India 91 8600 147 280 K bler USA 1 855 583...

Страница 25: ...roue de mesure 28 3 2 Utilisation conforme 28 3 3 Utilisation erron e pr visible 28 3 4 Plaque signal tique 28 3 5 Caract ristiques techniques 29 3 5 1 Syst me de roue de mesure 29 3 5 2 Homologations...

Страница 26: ...fs Sous r serve d erreurs ou de modifications Les caract ris tiques produit et les donn es techniques indiqu es ne consti tuent pas une d claration de garantie 2 Informations g n rales Lisez attentive...

Страница 27: ...ments et consignes de s curit 2 3 Groupe cible L appareil ne peut tre utilis dans un projet mont mis en service et entretenu que par des personnes disposant des qualifications et r pondant aux conditi...

Страница 28: ...des donn es de mesure Gr ce sa conception compacte ce syst me convient gale ment aux espaces d installation les plus restreints et peut tre install rapidement et facilement l horizontale la verticale...

Страница 29: ...Caract ristiques m caniques de l querre ressort Temp rature de travail 20 C 70 C 4 F 158 F R sistance aux chocs sui vant EN 60068 2 27 1000 m s2 6 ms R sistance aux vibrations suivant EN 60068 2 6 55...

Страница 30: ...Vis et liaisons viss es Sauf indication contraire un coefficient de friction de 0 14 est requis pour toutes les liaisons viss es Sauf indication contraire une classe de r sistance de 8 8 m trique ou d...

Страница 31: ...sure avec une autre surface Installation dans l application a Placer la roue de mesure sur la surface de la mati re mesurer et le support sur la surface de montage 1 2 b Fixer la plaque de base sur la...

Страница 32: ...utiliser par exemple en fonction de l application Des vis rev tues Du freinfilet Des rondelles Schorr Un marquage suppl mentaire des vis de fixation au moyen de vernis de blocage ou similaire est rec...

Страница 33: ...es les consignes de s curit du chapitre Installation 30 peuvent tre respect es Si toutes les tapes du montage d crites au chapitre Installation 30 peuvent tre r alis es 7 Elimination Toujours liminer...

Страница 34: ...9 53 45 45 K bler Italie 39 0 26 42 33 45 K bler Autriche 43 3322 43723 12 K bler Pologne 48 6 18 49 99 02 K bler Turquie 90 216 999 9791 K bler Chine 86 10 8471 0818 K bler Inde 91 8600 147 280 K ble...

Страница 35: ...Notizen Notes...

Страница 36: ...K bler Group Fritz K bler GmbH Schubertstr 47 D 78054 Villingen Schwenningen Germany Phone 49 7720 3903 0 Fax 49 7720 21564 info kuebler com www kuebler com...

Отзывы: