background image

 ITALIANO

MONTAGGIO. 5

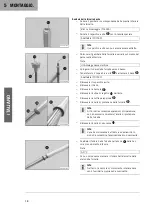
15

501107-01

Montare il disco di sostegno

co

.

Montare il supporto della boccola di scorrimento

cn

.

501123-01

Gambale della forcella sinistro

Montare il supporto boccola di scorrimento

bo

sull'asta

1

(in dotazione).

Info

Non montare il supporto della boccola di scorri-
mento attraverso la filettatura dell'asta!

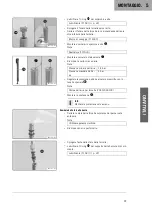
Montare la boccola

ds

.

501124-01

Serrare l'asta in una morsa.

Blocco di serraggio (T14016S)

Montare e serrare il pistone

dr

.

Nota

Chiave svita tappo (T1218)

501127-01

Riassemblaggio dei gambali della forcella

Gambale della forcella sinistro

Serrare lo stelo della forcella sul mozzo del perno ruota
anteriore.
Nota

Utilizzare ganasce morbide.

Lubrificare il pistone nell'area

F

e lo stelo della forcella.

Spingere l'asta nello stelo della forcella.

Lubrificare l'O-ring

ek

del supporto della boccola di scorri-

mento.

Lubrificante (T158) (

p. 22)

501128-01

Montare il supporto della boccola di scorrimento

bo

e ser-

rarlo con l'utensile speciale.
Nota

Adattatore (T727S)

Montare la boccola di scorrimento superiore

bn

.

Info

Non utilizzare attrezzi, separare il giunto manual-
mente con delicatezza.

Содержание 45412955044S

Страница 1: ...FITTING INSTRUCTIONS LOW CHASSIS KIT 45412955044S ...

Страница 2: ......

Страница 3: ...konstruktiven Weiterentwicklung ergeben sind jedoch nie ganz auszuschließen Alle enthaltenen Angaben sind unverbindlich Die KTM AG behält sich insbesondere das Recht vor technische Angaben Preise Farben Formen Materialien Dienst und Serviceleistungen Konstruktionen Ausstattungen und Ähnliches ohne vorherige Ankündigung und ohne Angabe von Gründen zu ändern bzw ersatzlos zu streichen sie an lokale ...

Страница 4: ...it dem erforderlichen Spezialwerkzeug optimal betreut Kennzeichnet einen Seitenverweis Mehr Informationen sind auf der angegebenen Seite nach zulesen Kennzeichnet eine Angabe mit weiterführenden Informationen oder Tipps Kennzeichnet das Ergebnis aus einem Prüfschritt Kennzeichnet eine Spannungsmessung Kennzeichnet eine Strommessung Kennzeichnet das Ende einer Tätigkeit inklusive eventueller Nachar...

Страница 5: ...ht bestimmungsgemäßem Einsatz können Gefahren für Personen Material und die Umwelt entstehen Jegliche Verwendung des Fahrzeuges die über den bestimmungsgemäßen Gebrauch und die Einsatzdefinition hinausgeht stellt Fehlgebrauch dar Fehlgebrauch umfasst darüber hinaus die Verwendung von Betriebs und Hilfsstoffen die die geforderten Spezifi kationen für den jeweiligen Einsatz nicht erfüllen 2 3 Sicher...

Страница 6: ... beseitigen lassen Am Fahrzeug angebrachte Hinweis Warnhinweisaufkleber beachten 2 6 Schutzkleidung Warnung Verletzungsgefahr Fehlende oder mangelhafte Schutzkleidung stellt ein erhöhtes Sicherheitsrisiko dar Tragen Sie bei allen Fahrten geeignete Schutzkleidung wie Helm Stiefel Handschuhe sowie Hose und Jacke mit Protektoren Verwenden Sie immer Schutzkleidung die in einwandfreiem Zustand ist und ...

Страница 7: ...Landes Da Motorräder nicht der EU Richtlinie für die Entsorgung von Altfahrzeugen unterliegen gibt es keine gesetzliche Regelung zur Entsorgung eines Altmotorrads Ihr autorisierter Händler hilft Ihnen gerne 2 9 Montageanleitung Lesen Sie unbedingt diese Montageanleitung genau und vollständig bevor Sie die erste Ausfahrt unternehmen Die Montageanleitung enthält viele Informationen und Tipps die Ihn...

Страница 8: ...site http www ktm com Das aktuelle Husqvarna Motorcycles Zubehör für Ihr Fahrzeug finden Sie auf der Husqvarna Motorcycles Website Internationale Husqvarna Motorcycles Website www husqvarna motorcycles com 3 3 Abbildungen Die in der Anleitung dargestellten Abbildungen enthalten zum Teil Sonderausstattungen Zur besseren Darstellung und Erklärung können einige Teile ausgebaut oder nicht abgebildet s...

Страница 9: ...DEUTSCH LIEFERUMFANG 4 7 4 1 Lieferumfang 501091 01 2x Kolbenstange 1 1x Einstellrohr 2 1x Führungsbuchse 3 1x Federauflage 4 ...

Страница 10: ... Schraubdeckel 5 mit Spezialwerkzeug lösen Stecknuss T07030 Info Der Schraubdeckel kann noch nicht abgenommen werden 501093 01 Gabelbein ausspannen Gabelöl entleeren 501094 01 Gabelbein an der Gabelfaust einspannen Vorgabe Schonbacken verwenden Gabelaußenrohr nach unten schieben Schutzkappe 6 entfernen Druck langsam aus der Luftcartridge ablassen Ventileinsatz 7 entfernen 501095 01 Schraubdeckel 5...

Страница 11: ...angesetzt werden kann 501097 01 Gabelaußenrohr im Bereich A der unteren Gleitbuchse erwärmen Vorgabe 50 C Gabelaußenrohr ruckartig vom Gabelinnenrohr ziehen Info Die untere Gleitbuchse muss dabei aus ihrem Lagersitz gezogen werden 501098 01 Obere Gleitbuchse bn entfernen Info Kein Werkzeug verwenden Stoß von Hand leicht auseinander ziehen Gabelinnenrohr am oberen Ende erwärmen Vorgabe 50 C Gleitbu...

Страница 12: ...tecknuss T07030 Schraubdeckel entfernen Mutter entfernen Buchse br entfernen Einstellrohr bs aus der Kolbenstange entfernen 501104 01 Staubmanschette bt entfernen Gabelschutzring ck entfernen Info Demontage des Gabelschutzrings ist für die weitere Reparatur nicht unbedingt notwendig Sicherungsring cl entfernen Info Der Sicherungsring hat ein angeschliffenes Ende an der ein Schraubendreher angesetz...

Страница 13: ...chsenträger cn mit Spezialwerkzeug lösen Stecknuss T727S 501106 01 Kolbenstange entfernen 501107 01 Kolbenstange zerlegen rechtes Gabelbein Gleitbuchsenträger cn entfernen Stützscheibe co entfernen 501108 01 Kolbenstange in einen Schraubstock einspannen Klemmblock T14016S Kolbenring cp entfernen 501109 01 Mutter cq mit Rückschlagventil Gehäuse entfernen Rückschlagventil Kugel cr entfernen ...

Страница 14: ... C Federhalter cs entfernen Stiftschlüssel T103 501111 01 Feder ct entfernen Zugstufen Shim dk entfernen 501112 01 Kolben dl entfernen 501113 01 Druckstufen Shim dm entfernen Feder dn entfernen 501114 01 Feder do nach unten drücken Bauteil dp erwärmen und entfernen Vorgabe 50 C ...

Страница 15: ...ernen Stiftschlüssel T1218 501119 01 Buchse ds entfernen Gleitbuchsenträger bo entfernen Info Gleitbuchsenträger nicht über das Gewinde der Kol benstange entfernen 501116 01 Kolbenstange zusammenbauen rechtes Gabelbein Kolbenstange 1 Lieferumfang in einen Schraubstock einspannen Klemmblock T14016S Feder do aufschieben Verstellnadel dq mit Feder montieren 501117 01 Bauteil dp montieren und festzieh...

Страница 16: ...ht E Kolben von unten 501111 01 Zugstufen Shim dk montieren Feder ct montieren 501121 01 Federhalter cs montieren und festziehen Vorgabe Stiftschlüssel T103 Kolbenring cp montieren 501144 01 Rückschlagventil Kugel cr positionieren Mutter cq mit Rückschlagventil Gehäuse dt montieren und festziehen Vorgabe Info Das Rückschlagventil Gehäuse muss nach unten offen sein ...

Страница 17: ... Kolben dr montieren und festziehen Vorgabe Stiftschlüssel T1218 501127 01 Gabelbeine zusammenbauen Linkes Gabelbein Gabelinnenrohr an der Gabelfaust einspannen Vorgabe Schonbacken verwenden Kolben im Bereich F und Gabelinnenrohr schmieren Kolbenstange in das Gabelinnenrohr schieben O Ring ek des Gleitbuchsenträgers schmieren Schmierstoff T158 p 22 501128 01 Gleitbuchsenträger bo montieren und mit...

Страница 18: ...erk zeugs halten Montagewerkzeug T724S Dichtring und Stützring in das Gabelaußenrohr auf Anschlag einpressen 501131 01 Sicherungsring bm montieren Der Sicherungsring rastet deutlich hörbar ein Staubmanschette bk montieren Gabelschutzring bl montieren 501132 01 Gabelaußenrohr nach unten schieben Buchse 9 aufschieben Mutter 8 auf Anschlag montieren Schraubdeckel 5 montieren und festziehen Vorgabe St...

Страница 19: ...en und festziehen Cartridge mit Luft füllen Vorgabe Minimaler Luftdruck 1 4 bar Maximaler Luftdruck 4 bar Luftdruck mit Spezialwerkzeug ep nach Vorgabe einstel len Vorgabe Gabelluftpumpe 79412966100 Schutzkappe 6 montieren Info Schutzkappe nur mit der Hand montieren 501136 01 Rechtes Gabelbein Gabelinnenrohr an der Gabelfaust einspannen Vorgabe Schonbacken verwenden Gabelöl einfüllen 501137 01 Kol...

Страница 20: ...se in das Gabelaußenrohr auf Anschlag einpres sen 501140 01 Stützring es positionieren Dichtring et mit dem kürzeren Absatz des Spezialwerk zeugs halten Montagewerkzeug T724S Dichtring und Stützring in das Gabelaußenrohr auf Anschlag einpressen 501141 01 Sicherungsring cl montieren Der Sicherungsring rastet deutlich hörbar ein Staubmanschette bt montieren Gabelschutzring ck montieren 501142 01 Gab...

Страница 21: ...ienungsanleitung Vorderrad einbauen s Bedienungsanleitung Motorrad vom Hubständer nehmen s Bedienungsanleitung 5 2 Montage Federbein Vorarbeit Motorrad mit Hubständer aufheben s Bedienungsanleitung Federbein ausbauen s Bedienungsanleitung Feder ausbauen s Reparaturanleitung 501145 01 Stoßdämpfer zerlegen Den Istzustand der Zug fl und Druckstufendämp fung fm notieren Einstellelemente der Zug und Dr...

Страница 22: ...ungsring fr montieren Info Innenfläche nicht zerkratzen Kolbenstange herausziehen damit der Dichtringträger an der Führungsbuchse anliegt Verschlusskappe fp montieren Stoßdämpfer mit Stickstoff füllen s Reparaturanleitung 501150 01 Schutzkappe fn des Reservoirs montieren 501152 01 Feder einbauen Einstellring fs mit Konterring ft montieren und ganz nach unten schrauben 501151 01 Gesamte Federlänge ...

Страница 23: ...der Fahrwerkseinstellung können das Fahrverhalten wesentlich verschlech tern und Bauteile überlasten Nehmen Sie Einstellungen nur innerhalb des empfohlenen Bereiches vor Fahren Sie nach Änderungen zuerst langsam um das Fahrverhalten abzuschätzen Feder durch Drehen des Einstellrings fs auf das beim Ausbau ermittelte Maß spannen Hakenschlüssel T304 Konterring ft festziehen Nacharbeit Federbein einba...

Страница 24: ...DEUTSCH 6 HILFSSTOFFE 22 Schmierstoff T158 Empfohlener Lieferant Lubcon Turmogrease PP 300 ...

Страница 25: ...ZEICHNIS 7 23 Art Nr Artikelnummer bzw beziehungsweise ca zirka etc et cetera evtl eventuell ggf gegebenenfalls mind mindestens Nr Nummer u a unter anderem u Ä und Ähnliches usw und so weiter vgl vergleiche z B zum Beispiel ...

Страница 26: ...7 ABKÜRZUNGSVERZEICHNIS 24 ...

Страница 27: ...ces due to further developments in design cannot be ruled out completely All specifications contained herein are non binding KTM AG specifically reserves the right to modify or delete technical specifications prices colors forms materials services designs equipment etc without prior notice and without specifying reasons to adapt these to local conditions as well as to stop production of a particul...

Страница 28: ...rained experts using the special tools required Indicates a page reference more information is provided on the specified page Indicates information with more details or tips Indicates the result of a testing step Indicates a voltage measurement Indicates a current measurement Indicates the end of an activity including potential reworking 1 2 Formats used The typographical formats used in this docu...

Страница 29: ...hicle must only be used as intended Dangers can arise for people property and the environment through use not as intended Any use of the vehicle beyond the intended and defined use constitutes misuse Misuse also includes the use of operating and auxiliary fluids which do not meet the required specification for the respective use 2 3 Safety advice A number of safety instructions need to be followed...

Страница 30: ...on and warning labels on the vehicle 2 6 Protective clothing Warning Risk of injury Missing or poor protective clothing presents an increased safety risk Wear appropriate protective clothing such as helmet boots gloves as well as trousers and a jacket with protectors on all rides Always wear protective clothing that is in good condition and meets the legal regulations In the interest of your own s...

Страница 31: ... of life motorcycle Your authorized dealer will be glad to assist you 2 9 Fitting instructions It is important that you read these fitting instructions carefully and completely before making your first trip The fitting instructions contain useful information and many tips on how to operate handle and service your motor cycle Only then will you find out how to customize the vehicle ideally for your...

Страница 32: ...current Husqvarna Motorcycles accessories for your vehicle can be found on the Husqvarna Motorcycles web site International Husqvarna Motorcycles website www husqvarna motorcycles com 3 3 Figures The figures contained in the manual may depict special equipment In the interest of clarity some components may be shown disassembled or may not be shown at all It is not always necessary to disassemble t...

Страница 33: ...ENGLISH SCOPE OF SUPPLY 4 7 4 1 Scope of supply 501091 01 2x Piston rod 1 1x Adjusting tube 2 1x Pilot bushing 3 1x Spring seat 4 ...

Страница 34: ... triple clamp Clamping stand T1403S Release screw cover 5 with the special tool Socket T07030 Info The screw cover cannot be removed yet 501093 01 Unclamp the fork leg Drain the fork oil 501094 01 Clamp the fork leg on the fork fist Guideline Use soft jaws Push the outside fork tube downwards Remove protection cap 6 Slowly release the pressure from the air cartridge Remove valve core 7 501095 01 H...

Страница 35: ...up the outside fork tube in area A of the lower sli ding bushing Guideline 50 C 122 F Pull the outside fork tube off the inside fork tube with a jerk Info The lower sliding bushing must be pulled out of its bearing seat 501098 01 Remove upper sliding bushing bn Info Without using a tool pull the stack slightly apart by hand Warm up the inside fork tube at the upper end Guideline 50 C 122 F Loosen ...

Страница 36: ...07030 Remove the screw cap Remove the nut Remove bushing br Remove adjusting tube bs from the piston rod 501104 01 Remove dust boot bt Remove fork protector ring ck Info The fork protector ring does not necessarily need to be removed for repair work Remove lock ring cl Info The lock ring has a specially finished end against which the screwdriver can be placed 501097 01 Warm up the outside fork tub...

Страница 37: ... C 122 F Loosen sliding bushing support cn using the special tool Socket T727S 501106 01 Remove the piston rod 501107 01 Disassembling the piston rod Right fork leg Remove sliding bushing support cn Remove supporting plate co 501108 01 Clamp the piston rod in a vise Clamping stand T14016S Remove piston ring cp 501109 01 Remove nut cq with check valve housing Remove check valve ball cr ...

Страница 38: ...line 50 C 122 F Remove spring holder cs Pin wrench T103 501111 01 Remove spring ct Remove rebound shim dk 501112 01 Remove piston dl 501113 01 Remove compression shim dm Remove spring dn 501114 01 Press spring do downward Heat component dp and remove Guideline 50 C 122 F ...

Страница 39: ...piston dr Pin wrench T1218 501119 01 Remove bushing ds Remove sliding bushing support bo Info Do not remove the sliding bushing support over the piston rod thread 501116 01 Assembling the piston rod Right fork leg Clamp piston rod 1 included in a vise Clamping stand T14016S Slide on spring do Mount adjustment needle dq with the spring 501117 01 Mount and tighten component dp Guideline Component pi...

Страница 40: ...iston from above View E of piston from below 501111 01 Mount rebound shim dk Mount spring ct 501121 01 Mount and tighten spring holder cs Guideline Pin wrench T103 Mount piston ring cp 501144 01 Position the check valve ball cr Mount and tighten nut cq with check valve housing dt Guideline Info The check valve housing must be open at the bot tom ...

Страница 41: ... and tighten piston dr Guideline Pin wrench T1218 501127 01 Assembling the fork legs Left fork leg Clamp the inside fork tube on the axle clamp Guideline Use soft jaws Lubricate piston in area F and the inside fork tube Slide the piston rod into the inside fork tube Lubricate O ring ek of the sliding bushing support Lubricant T158 p 22 501128 01 Mount sliding bushing support bo and tighten using t...

Страница 42: ... seal ring en with the shorter section of the special tool Mounting tool T724S Press the seal ring and support ring all the way into the outside fork tube 501131 01 Mount lock ring bm The lock ring engages audibly Mount dust boot bk Mount fork protector ring bl 501132 01 Push the outside fork tube downwards Slide on bushing 9 Mount nut 8 all the way Mount and tighten screw cap 5 Guideline Socket T...

Страница 43: ...ll the cartridge with air Guideline Minimum air pressure 1 4 bar 20 psi Maximum air pressure 4 bar 58 psi Adjust air pressure with special tool ep as per specificati ons Guideline Fork airpump 79412966100 Mount protection cap 6 Info Only mount the protection cap by hand 501136 01 Right fork leg Clamp the inside fork tube on the axle clamp Guideline Use soft jaws Fill with fork oil 501137 01 Slide ...

Страница 44: ... on the outside fork tube Press the sliding bushing all the way into the outside fork tube 501140 01 Position support ring es Hold seal ring et with the shorter section of the special tool Mounting tool T724S Press the seal ring and support ring all the way into the outside fork tube 501141 01 Mount lock ring cl The lock ring engages audibly Mount dust boot bt Mount fork protector ring ck 501142 0...

Страница 45: ...the front wheel see Owner s Manual Remove the motorcycle from the lift stand see Owner s Manual 5 2 Assembling the shock absorber Preliminary work Raise the motorcycle with a lift stand see Owner s Manual Remove the shock absorber see Owner s Manual Remove the spring see repair manual 501145 01 Disassembling the damper Make a note of the present state of rebound fl and com pression damping fm Open...

Страница 46: ...o Do not scratch the inside surface Pull out the piston rod until the seal ring retainer is flush with the pilot bushing Mount locking cap fp Fill the damper with nitrogen see repair manual 501150 01 Mount protection cap fn of the reservoir 501152 01 Installing the spring Mount adjusting ring fs with retaining ring ft and screw all the way down 501151 01 Measure the total spring length while the s...

Страница 47: ...spension setting may cause a serious deterioration in the handling characteristic and overload components Only make adjustments within the recommen ded range Ride slowly to start with after making adjust ments to get the feel of the new handling cha racteristic Adjust the spring to the value determined when it was removed by turning adjusting ring fs Hook wrench T304 Tighten retaining ring ft Fina...

Страница 48: ...ENGLISH 6 AUXILIARY SUBSTANCES 22 Lubricant T158 Recommended supplier Lubcon Turmogrease PP 300 ...

Страница 49: ...ENGLISH LIST OF ABBREVIATIONS 7 23 Art no Article number at least at least ca circa cf compare e g for example etc et cetera i a inter alia no number poss possibly ...

Страница 50: ...7 LIST OF ABBREVIATIONS 24 ...

Страница 51: ...pi costruttivi Tutti i dati contenuti non sono vincolanti KTM AG si riserva in particolare il diritto di modificare o eliminare senza sostituirli dati tecnici prezzi colori forme materiali prestazioni di servizio e assistenza configurazioni allestimenti e simili senza preavviso e senza indicarne i motivi di adattarli alla situazione locale nonché di cessare la produzione di un determinato modello ...

Страница 52: ...peciali Contrassegna un riferimento a una determinata pagina alla pagina indicata sono riportate mag giori informazioni sull argomento Contrassegna informazioni più dettagliate o suggerimenti Contrassegna il risultato di una verifica Contrassegno per la misurazione della tensione Contrassegno per la misurazione della corrente Contrassegna il termine di un intervento eventuali operazioni successive...

Страница 53: ...ente secondo l uso conforme Da un uso non conforme possono derivare pericoli per persone materiali e l ambiente Qualsiasi utilizzo del veicolo diverso da quello conforme e da quanto specificato nella definizione del campo d im piego è considerato non conforme Rientrano in un uso non conforme anche l impiego di materiali d esercizio e ausiliari le cui specifiche non corris pondono a quelle richiest...

Страница 54: ...esivi applicati sul veicolo che riportano le indicazioni e le avvertenze 2 6 Abbigliamento protettivo Avvertenza Pericolo di lesioni L assenza di un abbigliamento protettivo o l utilizzo di capi difettosi possono compor tare un maggior rischio per la sicurezza Indossare sempre un abbigliamento protettivo idoneo casco stivali guanti e giacca e pantaloni con protezioni Indossare sempre abbigliamento...

Страница 55: ... di vei coli vecchi non vi sono leggi specifiche a riguardo Il vostro concessionario autorizzato sarà lieto di aiutarvi 2 9 Istruzioni di montaggio Prima di affrontare la prima uscita con la moto leggere sempre attentamente e per intero le presenti istruzioni di montaggio Le istruzioni di montaggio contengono molte informazioni e consigli che faciliteranno la guida le manovre e la manutenzione del...

Страница 56: ...o web KTM Sito web KTM internazionale http www ktm com Gli accessori Husqvarna Motorcycles attualmente disponibili per il vostro veicolo sono riportati sul sito web Husqvarna Motorcycles Sito web internazionale Husqvarna Motorcycles www husqvarna motorcycles com 3 3 Figure Le figure riportate in questo manuale potrebbero raffigurare un equipaggiamento speciale Ai fini di una maggiore chiarezza alc...

Страница 57: ...ITALIANO VOLUME DELLA FORNITURA 4 7 4 1 Volume della fornitura 501091 01 2x Asta 1 1x Astina di registro 2 1x Bussola di guida 3 1x Supporto molla 4 ...

Страница 58: ...itare il coperchio a vite 5 con l utensile speciale Adattatore T07030 Info Il coperchio a vite non può ancora essere estratto 501093 01 Sbloccare il gambale della forcella Scaricare l olio per forcelle 501094 01 Serrare il gambale della forcella sul mozzo del perno ruota anteriore Nota Utilizzare ganasce morbide Spingere il fodero della forcella verso il basso Rimuovere la protezione 6 Scaricare l...

Страница 59: ...odero della forcella nella zona A della boc cola di scorrimento inferiore Nota 50 C Con un colpo secco staccare il fodero della forcella dallo stelo della forcella Info Nel farlo la boccola di scorrimento inferiore deve venir fuori dalla propria sede cuscinetto 501098 01 Rimuovere la boccola di scorrimento superiore bn Info Non utilizzare attrezzi separare il giunto manual mente con delicatezza Sc...

Страница 60: ...vere il coperchio a vite Rimuovere il dado Rimuovere la boccola br Rimuovere l astina di registro bs dall asta 501104 01 Rimuovere la cuffia parapolvere bt Rimuovere l anello di protezione della forcella ck Info Ai fini delle successive operazioni di riparazione non è necessario smontare l anello di protezione della forcella Rimuovere l anello di sicurezza cl Info L anello di sicurezza è affilato ...

Страница 61: ...to della boccola di scorrimento cn con l utensile speciale Adattatore T727S 501106 01 Rimuovere l asta 501107 01 Smontaggio dell asta Gambale della forcella destro Rimuovere il supporto della boccola di scorrimento cn Rimuovere il disco di sostegno co 501108 01 Serrare l asta in una morsa Blocco di serraggio T14016S Rimuovere il segmento pistone cp 501109 01 Rimuovere il dado cq con il corpo della...

Страница 62: ...la cs Chiave svita tappo T103 501111 01 Rimuovere la molla ct Rimuovere lo spessore d estensione dk 501112 01 Rimuovere il pistone dl 501113 01 Rimuovere lo spessore di compressione dm Rimuovere la molla dn 501114 01 Spingere la molla do verso il basso Scaldare e rimuovere il componente dp Nota 50 C ...

Страница 63: ...o T1218 501119 01 Rimuovere la boccola ds Rimuovere il supporto della boccola di scorrimento bo Info Non rimuovere il supporto della boccola di scorri mento attraverso la filettatura dell asta 501116 01 Riassemblaggio dell asta Gambale della forcella destro Serrare l asta 1 in dotazione in una morsa Blocco di serraggio T14016S Inserire la molla do Montare l albero di regolazione dq con la molla 50...

Страница 64: ...l basso 501111 01 Montare lo spessore d estensione dk Montare la molla ct 501121 01 Montare e serrare il supporto molla cs Nota Chiave svita tappo T103 Montare il segmento pistone cp 501144 01 Posizionare la sfera della valvola antiritorno cr Inserire e serrare il dado cq con il corpo della valvola anti ritorno dt Nota Info Il corpo della valvola antiritorno deve essere aperto verso il basso ...

Страница 65: ...ta Chiave svita tappo T1218 501127 01 Riassemblaggio dei gambali della forcella Gambale della forcella sinistro Serrare lo stelo della forcella sul mozzo del perno ruota anteriore Nota Utilizzare ganasce morbide Lubrificare il pistone nell area F e lo stelo della forcella Spingere l asta nello stelo della forcella Lubrificare l O ring ek del supporto della boccola di scorri mento Lubrificante T158...

Страница 66: ...o dell utensile speciale Utensile di montaggio T724S Premere l anello di tenuta e l anello di appoggio fino a bat tuta nel fodero della forcella 501131 01 Montare l anello di sicurezza bm L anello di sicurezza si innesta in modo udibile Montare la cuffia parapolvere bk Montare l anello di protezione della forcella bl 501132 01 Spingere il fodero della forcella verso il basso Inserire la boccola 9 ...

Страница 67: ...tuccia con aria Nota Pressione minima dell aria 1 4 bar Pressione massima dell a ria 4 bar Regolare la pressione dell aria al valore prescritto con l u tensile speciale ep Nota Pompa dell aria per forcella 79412966100 Montare la protezione 6 Info Montare la protezione solo a mano 501136 01 Gambale della forcella destro Serrare lo stelo della forcella sul mozzo del perno ruota anteriore Nota Utiliz...

Страница 68: ...i scorrimento fino a battuta nel fodero della forcella 501140 01 Posizionare l anello di appoggio es Tenere fermo l anello di tenuta et utilizzando lo spalla mento più corto dell utensile speciale Utensile di montaggio T724S Premere l anello di tenuta e l anello di appoggio fino a bat tuta nel fodero della forcella 501141 01 Montare l anello di sicurezza cl L anello di sicurezza si innesta in modo...

Страница 69: ...a anteriore vedi manuale d uso Rimuovere la motocicletta dal cavalletto alzamoto vedi manu ale d uso 5 2 Montaggio ammortizzatore Operazione preliminare Sollevare la motocicletta con il cavalletto alzamoto vedi manuale d uso Smontare l ammortizzatore vedi manuale d uso Smontare la molla v manuale di riparazione 501145 01 Smontaggio dell ammortizzatore Prendere nota dello stato dello smorzamento in...

Страница 70: ...erla sotto la scanalatura anulare La scanalatura è rivolta verso l alto Montare l anello di sicurezza fr Info Prestare attenzione a non graffiare la superficie interna Estrarre l asta in modo che il supporto dell anello di tenuta sia a contatto con la bussola di guida Montare il cono finale fp Riempire l ammortizzatore con azoto v manuale di ripara zione 501150 01 Montare la protezione fn del serb...

Страница 71: ...ortamento di marcia Variazioni estreme all assetto del telaio possono peggiorare notevolmente il comportamento di marcia e sovraccaricare i componenti Eseguire le regolazioni esclusivamente all in terno del range consigliato Se sono state apportate delle variazioni all ini zio viaggiare lentamente in modo da valutare il comportamento di marcia Per tendere la molla al valore rilevato al momento del...

Страница 72: ...ITALIANO 6 MATERIALI AUSILIARI 22 Lubrificante T158 Fornitore consigliato Lubcon Turmogrease PP 300 ...

Страница 73: ...ITALIANO ELENCO DELLE ABBREVIAZIONI 7 23 Ad es Ad esempio ca Circa cfr Confronta Cod Codice ecc Eccetera event Eventualmente min almeno N Numero risp Rispettivamente se nec Se necessario ...

Страница 74: ...7 ELENCO DELLE ABBREVIAZIONI 24 ...

Страница 75: ...lues Toutes les informations du présent document sont fournies sans aucun engagement Sous réserve de modifica tion de suppression sans substitution ou d adaptation aux exigences locales des informations techniques des tarifs des couleurs des formes des matériaux des prestations de services et de maintenance des constructions et des équipements ou autres ainsi que d un arrêt de fabrication définiti...

Страница 76: ...on spécifique et disposant de l outillage spécial nécessaire Indique un renvoi à une page des informations supplémentaires sont disponibles à la page indiquée Indique un complément d information ou des conseils Indique le résultat d une étape de contrôle Caractérise une mesure de tension Caractérise une mesure de courant Indique le fin d une activité dont d éventuels travaux ultérieurs 1 2 Convent...

Страница 77: ...oute utilisation non conforme met en danger les personnes le matériel et l environnement Tout utilisation non conforme de la moto ou qui dépasse l utilisation prévue constitue une mauvaise utilisation La mauvaise utilisation comprend également l utilisation de liquides et d additifs ne remplissant pas les spécifi cations exigées pour l utilisation prévue 2 3 Consignes de sécurité Afin de garantir ...

Страница 78: ...onduire adéquat est requis pour la conduite sur voies publiques Les pannes susceptibles de nuire à la sécurité doivent être réparées sans délai par un atelier agréé Respecter les consignes et les avertissements des autocollants apposés sur le véhicule 2 6 Vêtements de protection Avertissement Risque de blessures Ne pas porter de vêtements de protection ou porter des vêtements de protection abîmés ...

Страница 79: ...a mise au rebut des vieux composants veiller à appliquer la législation et les directives correspondantes en vigueur dans le pays d utilisation En matière de mise à la casse des véhicules anciens les motos ne tombent pas sous le coup de la directive de l UE Il n y a donc aucune réglementation relative à la mise à la casse d une moto Votre distributeur agréé est à votre entière disposition 2 9 Manu...

Страница 80: ...es sur le site Internet de KTM Site Internet KTM international http www ktm com Les accessoires Husqvarna Motorcycles actuellement disponibles pour le véhicule sont présentés sur le site web de Husqvarna Motorcycles Site web international de Husqvarna Motorcycles www husqvarna motorcycles com 3 3 Illustrations Les figures représentées dans ce manuel illustrent parfois des équipements spéciaux Pour...

Страница 81: ...FRANÇAIS CONTENU DE LA LIVRAISON 4 7 4 1 Contenu de la livraison 501091 01 2x Tige de piston 1 1x Tube de réglage 2 1x Bague de guidage 3 1x Logement du ressort 4 ...

Страница 82: ...rcle fileté 5 à l aide de l outil spécial Douille T07030 Info Le couvercle fileté ne peut pas encore être déposé 501093 01 Desserrer le bras de fourche Vidanger l huile de fourche 501094 01 Serrer le bras de fourche au niveau de la fixation de l es sieu de roue avant Indications prescrites Utiliser des mâchoires de protection Pousser le tube extérieur de fourche vers le bas Retirer le capuchon 6 V...

Страница 83: ... la zone A de la douille de glissement inférieure Indications prescrites 50 C 122 F Tirer sur le tube extérieur de la fourche pour le retirer du tube intérieur Info La douille de glissement inférieure doit être extraite de son logement lors de cette opération 501098 01 Retirer la douille de glissement supérieure bn Info Ne pas utiliser d outil déboîter l ensemble à la main Chauffer le tube intérie...

Страница 84: ...nlever le couvercle fileté Retirer l écrou Retirer la bague br Sortir le tube de réglage bs de la tige de piston 501104 01 Déposer le cache poussière bt Retirer la bague de protection de la fourche ck Info Le démontage de la bague de protection de la four che n est pas nécessaire pour le restant des opérati ons de réparation Retirer le circlip cl Info Le circlip est doté d une extrémité biseautée ...

Страница 85: ...la cage de douille de glissement cn à l aide de l outil spécial Douille T727S 501106 01 Déposer la tige de piston 501107 01 Démonter la tige de piston Bras de fourche de droite Retirer la cage de la douille de glissement cn Retirer la rondelle d appui co 501108 01 Serrer la tige de piston dans un étau Outil spécial T14016S Retirer le segment cp 501109 01 Enlever l écrou cq avec le corps du clapet ...

Страница 86: ...upport de ressort cs Outil à ergot T103 501111 01 Retirer le ressort ct Retirer la rondelle de détente dk 501112 01 Enlever le piston dl 501113 01 Retirer la rondelle de compression dm Retirer le ressort dn 501114 01 Pousser le ressort do vers le bas Chauffer le composant dp et le retirer Indications prescrites 50 C 122 F ...

Страница 87: ... 01 Retirer la bague ds Retirer la cage de la douille de glissement bo Info Ne pas retirer la cage de la douille de glissement sur le filetage de la tige de piston 501116 01 Assembler la tige de piston Bras de fourche de droite Serrer la tige de piston 1 comprise dans la livraison dans un étau Outil spécial T14016S Insérer le ressort do Mettre en place l aiguille de réglage dq et le ressort 501117...

Страница 88: ...ous 501111 01 Mettre en place la rondelle de détente dk Mettre en place le ressort ct 501121 01 Mettre le support de ressort cs en place et serrer Indications prescrites Outil à ergot T103 Monter le segment cp 501144 01 Mettre en place la bille du clapet antiretour cr Mettre l écrou cq en place avec le corps du clapet antire tour dt et serrer Indications prescrites Info Le corps du clapet antireto...

Страница 89: ... et le serrer Indications prescrites Outil à ergot T1218 501127 01 Assembler les bras de fourche Bras de fourche de gauche Serrer le tube intérieur de fourche sur la fixation de l es sieu de roue avant Indications prescrites Utiliser des mâchoires de protection Graisser le piston dans la zone F ainsi que le tube intérieur de fourche Insérer la tige de piston dans le tube intérieur de fourche Grais...

Страница 90: ...gue d appui em Maintenir la bague d étanchéité en avec le talon court de l outil spécial Outil de montage T724S Introduire la bague d étanchéité et la bague d appui dans le tube extérieur de fourche jusqu en butée 501131 01 Mettre le circlip bm en place Le circlip doit s enclencher de façon perceptible Mettre en place le cache poussière bk Monter la bague de protection de la fourche bl 501132 01 P...

Страница 91: ...ions prescrites Douille T07030 501135 01 Mettre l obus de soupape 7 en place et le serrer Remplir d air la cartouche Indications prescrites Pression de gonflage mini male 1 4 bar 20 psi Pression de gonflage maxi male 4 bar 58 psi Régler la pression à l aide de l outil spécial ep conformé ment aux consignes Indications prescrites Pompe de gonflage de fourche 79412966100 Mettre le capuchon 6 en plac...

Страница 92: ... de glissement inférieure Indications prescrites 50 C 122 F Maintenir la douille de glissement inférieure er avec le talon long de l outil spécial Outil de montage T724S Emmancher le tube extérieur de fourche Introduire la douille de glissement dans le tube extérieur de fourche jusqu en butée 501140 01 Mettre en place la bague d appui es Maintenir la bague d étanchéité et avec le talon court de l ...

Страница 93: ...our che inférieur Outil spécial T1403S Mettre en place le couvercle fileté bp et le serrer Indications prescrites Douille spéciale T14084 Travaux de retouche Monter les bras de fourche voir le manuel d utilisation Monter la roue avant voir le manuel d utilisation Retirer le motocycle du socle réglable voir le manuel d utilisa tion 5 2 Montage de l amortisseur Travaux préalables Soulever le motocyc...

Страница 94: ...rise dans la livrai son et la décaler sous la gorge de segment La gorge est orientée vers le haut Mettre le circlip fr en place Info Veiller à ne pas érafler la surface intérieure Extraire la tige de piston afin que le support de joints soit accolé à la bague de guidage Mettre en place le bouchon obturateur fp Remplir l amortisseur d azote voir manuel de réparation 501150 01 Monter le capuchon fn ...

Страница 95: ...partie cycle peut influer fortement sur le comportement routier Des modifications importantes au niveau du rég lage de la partie cycle peuvent altérer considéra blement le comportement routier Ne pas modifier les réglages au delà de la plage préconisée Après avoir effectué des modifications rouler d abord doucement pour évaluer le comporte ment routier Tendre le ressort en tournant la bague de rég...

Страница 96: ...FRANÇAIS 6 PRODUITS AUXILIAIRES 22 Lubrifiant T158 Fournisseur recommandé Lubcon Turmogrease PP 300 ...

Страница 97: ...FRANÇAIS LISTE DES ABRÉVIATIONS 7 23 au min au moins cf voir env environ etc et cetera evtl éventuellement N Numéro p ex par exemple Réf Référence ...

Страница 98: ...7 LISTE DES ABRÉVIATIONS 24 ...

Страница 99: ...l derecho a introducir sin previo anuncio y sin dar a conocer los motivos cambios en los datos técnicos los precios los colores las formas el diseño el equipamiento y el material de los vehículos así como en las prestaciones de ser vicio también se reserva el derecho a adaptar sus vehículos a las condiciones locales en determinados merca dos y a finalizar la producción de un modelo determinado sin...

Страница 100: ... específica y disponen de las herramientas especiales necesarias para rea lizar el mantenimiento ideal de su motocicleta Identifica una referencia cruzada más información en la página indicada Identifica una indicación con información o consejos adicionales Indica el resultado de un punto de comprobación Indica una medición de la tensión Indica una medición de la corriente Identifica el fin de una...

Страница 101: ...a adecuada Si se hace un uso no adecuado se pueden provocar daños personales materiales y al medio ambiente Cualquier uso del vehículo que no responda al uso adecuado ni a la definición de empleo supone un uso inde bido El uso indebido también incluye el empleo de agentes de servicio y medios auxiliares que no cumplan las especi ficaciones exigidas para el empleo en cuestión 2 3 Indicaciones de se...

Страница 102: ...conducción correspondiente Las anomalías que afecten a la seguridad deben repararse inmediatamente en un taller especializado autorizado Respetar los adhesivos de aviso advertencia del vehículo 2 6 Ropa de protección Advertencia Peligro de lesiones No utilizar ropa de protección o utilizar menos de la necesaria supone un grave riesgo para la seguridad Utilice en todos los desplazamientos ropa de p...

Страница 103: ...ectivas del país correspondiente Debido a que las motocicletas no están sujetas a la directiva europea sobre la eliminación de vehículos usados no hay ninguna reglamentación legal que regule la eliminación de la motocicleta usada Su concesionario auto rizado estará encantado de ayudarle 2 9 Manual de montaje Es imprescindible leer completa y atentamente este manual de montaje antes de conducir por...

Страница 104: ...gina web de Husqvarna Motorcycles encontrará los accesorios de Husqvarna Motorcycles más actuales para su vehículo Sitio web internacional de Husqvarna Motorcycles www husqvarna motorcycles com 3 3 Imágenes Algunas de las imágenes que se utilizan en el manual incluyen equipamientos especiales A fin de mejorar la representación visual y facilitar la comprensión de las imágenes es posible que alguna...

Страница 105: ...ESPAÑOL VOLUMEN DE SUMINISTRO 4 7 4 1 Volumen de suministro 501091 01 2x Vástago del émbolo 1 1x Tubo de ajuste 2 1x Casquillo guía 3 1x Soporte del muelle 4 ...

Страница 106: ... T1403S Soltar el tapón roscado 5 utilizando la herramienta espe cial Llave de vaso T07030 Información Todavía no se puede extraer el tapón roscado 501093 01 Destensar la botella de la horquilla Vaciar el aceite para la horquilla 501094 01 Sujetar la botella de la horquilla en el puño de la horquilla Prescripción Utilizar mordazas de protección Desplazar el tubo exterior de la horquilla hacia abaj...

Страница 107: ...ar el tubo exterior de la horquilla en la zona A del casquillo deslizante inferior Prescripción 50 C 122 F Extraer el tubo exterior de la horquilla del tubo interior de un tirón Información El casquillo deslizante inferior debe salir de su asi ento 501098 01 Extraer el casquillo deslizante superior bn Información No utilizar herramientas separarlos dando un golpe con la mano Calentar el extremo su...

Страница 108: ...o T07030 Retirar el tapón roscado Retirar la tuerca Retirar el casquillo br Retirar el tubo de ajuste bs del vástago del émbolo 501104 01 Extraer el manguito guardapolvo bt Extraer el anillo de protección de la horquilla ck Información El desmontaje del anillo de protección de la hor quilla no es absolutamente necesario para el resto de la reparación Retirar el anillo de retención cl Información E...

Страница 109: ...lizando la herramienta especial Llave de vaso T727S 501106 01 Extraer el vástago del émbolo 501107 01 Desmontar el vástago del émbolo Botella derecha de la horquilla Retirar el soporte del casquillo deslizante cn Retirar la arandela de apoyo co 501108 01 Sujetar el vástago del émbolo en un tornillo de banco Bloque de sujeción T14016S Retirar el segmento del pistón cp 501109 01 Retirar la tuerca cq...

Страница 110: ...ave de espigón T103 501111 01 Retirar el muelle ct Quitar la plaquita de ajuste del nivel de extensión dk 501112 01 Retirar el pistón dl 501113 01 Quitar la plaquita de ajuste del nivel de compresión dm Retirar el muelle dn 501114 01 Presionar el muelle do hacia abajo Calentar y retirar el componente dp Prescripción 50 C 122 F ...

Страница 111: ...8 501119 01 Retirar el casquillo ds Retirar el soporte del casquillo deslizante bo Información No retirar el soporte del casquillo deslizante por la rosca del vástago del émbolo 501116 01 Ensamblar el vástago del émbolo Botella derecha de la horquilla Sujetar el vástago del émbolo 1 volumen de suministro en un tornillo de banco Bloque de sujeción T14016S Colocar el muelle do Montar la aguja de aju...

Страница 112: ...01111 01 Montar la plaquita de ajuste del nivel de extensión dk Montar el muelle ct 501121 01 Montar y apretar el portamuelles cs Prescripción Llave de espigón T103 Montar el segmento del pistón cp 501144 01 Posicionar la bola de la válvula de retención cr Montar y apretar la tuerca cq con la carcasa de la válvula de retención dt Prescripción Información La carcasa de la válvula de retención debe ...

Страница 113: ...4 01 Sujetar el vástago del émbolo en un tornillo de banco Bloque de sujeción T14016S Montar y apretar el pistón dr Prescripción Llave de espigón T1218 501127 01 Ensamblar las botellas de la horquilla Botella izquierda de la horquilla Sujetar el tubo interior de la horquilla en el puño de la hor quilla Prescripción Utilizar mordazas de protección Lubricar el pistón por la zona F y el tubo interior...

Страница 114: ...el casquillo deslizante en el tubo exterior de la horquilla hasta el tope 501130 01 Colocar el anillo de apoyo em Sujetar el anillo de hermetizado en con el tacón corto de la herramienta especial Herramienta de montaje T724S Embutir el anillo de hermetizado y el anillo de apoyo en el tubo exterior de la horquilla hasta el tope 501131 01 Montar el anillo de retención bm El anillo de retención se en...

Страница 115: ...apón roscado 5 Prescripción Llave de vaso T07030 501135 01 Montar y apretar el elemento de la válvula 7 Llenar el cartucho con aire Prescripción Presión de aire mínima 1 4 bar 20 psi Presión de aire máxima 4 bar 58 psi Ajustar la presión de aire con la herramienta especial ep de acuerdo con las especificaciones Prescripción Bomba de aire para la horquilla 79412966100 Montar la cubierta de protecci...

Страница 116: ...lizante inferior Prescripción 50 C 122 F Sujetar el casquillo deslizante inferior er con el tacón largo de la herramienta especial Herramienta de montaje T724S Deslizar el tubo exterior de la horquilla Embutir el casquillo deslizante en el tubo exterior de la horquilla hasta el tope 501140 01 Colocar el anillo de apoyo es Sujetar el anillo de hermetizado et con el tacón corto de la herramienta esp...

Страница 117: ...loque de sujeción T1403S Montar y apretar el tapón roscado bp Prescripción Llave de vaso especial T14084 Trabajos posteriores Montar las botellas de la horquilla véase el manual de instruc ciones Montar la rueda delantera véase el manual de instrucciones Retirar la motocicleta del caballete elevador véase el manual de instrucciones 5 2 Montaje del amortiguador Trabajos previos Levantar la motocicl...

Страница 118: ...perficie interior 501148 01 Ensamblar el amortiguador Montar el casquillo guía 3 volumen de suministro y deslizarlo bajo la ranura del anillo La hendidura mira hacia arriba Montar el anillo de retención fr Información No rayar la superficie interior Extraer el vástago del émbolo para que el soporte del anillo de hermetizado quede apoyado en el casquillo guía Montar la tapa de cierre fp Llenar el a...

Страница 119: ...aje pueden alterar considerablemente el comportamiento durante la conducción Los cambios extremos en el ajuste del tren de rodaje pueden empeorar considerablemente el comportamiento durante la conducción y sobre cargar algunos componentes Realizar ajustes únicamente dentro de los már genes recomendados Conducir a baja velocidad tras haber realizado ajustes para comprobar el comportamiento durante ...

Страница 120: ...ESPAÑOL 6 AGENTES AUXILIARES 22 Lubricante T158 Proveedor recomendado Lubcon Turmogrease PP 300 ...

Страница 121: ...ESPAÑOL ÍNDICE DE ABREVIATURAS 7 23 aprox aproximadamente ART N º Número de artículo etc etcétera mín mínimo Nº Número p ej por ejemplo v véase ...

Страница 122: ... 3213957en 3213957 01 2020 KTM AG Stallhofnerstraße 3 5230 Mattighofen www ktmgroup com ...

Отзывы: