background image

Product Views 


Antenna Connector 

The  connector  for  antenna  is  a  standard  reverse  SMA  jack.  Simply  connect  it  to  a  2.0dBi  dipole 

antenna  (Standard  Rubber  Duck) and it is 50 Ohms  impedance and can support  2.4GHz  frequency

 
Ethernet Port  

The connector for network is the usual RJ45.    Simply connect it to your network switch or Hub. When 

the  connection  is made, the green  color LED of Ethernet  port will  light  on. When  data traffic (Rx/Tx) 

occurs  on the  network,  yellow  color  LED will  blink during  data transferring. 


Serial Port of RS-232/RS-422/RS-485 

Connect the serial data cable between the WPC-832 converter and the Serial interface device. Follow 

the  web page parameter setup  procedures to configure  the  converter.   


USB  host   

for OpenWrt only 

RS-232/422/485 


Antenna 

Ethernet RJ45 

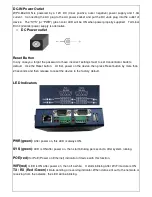
DC-IN Power Outlet 

(DC Jack)


DC-IN Power Outlet 

(Terminal Block)   

Reset Button 

Содержание WPC-832-Con

Страница 1: ...WPC 832 Con 2 Ports Modbus TCP to Modbus RTU Wi Fi Ethernet connection Data Concentrator User Manual Edition v 201809a http www tcpipweb com...

Страница 2: ...rnet Port 8 Serial Port of RS 232 RS 422 RS 485 8 DC IN Power Outlet 9 Reset Button 9 LED Indicators 9 Wiring Architecture 10 Configuration 11 IP Search Utility Setup 12 Configuration through Web brow...

Страница 3: ...d Internet There are two serial ports as one is a RS 232 and other one is RS 422 485 Configuration is easy to operate via web page setup WPC 832 Con is featured as a Data Concentrator via Modbus TCP t...

Страница 4: ...bus data from various serial interface devices with continuous or not continuous register address It mapping the register addresses of serial interface devices connected with its port 1 or port 2 beco...

Страница 5: ...oncentrator attached with the following items 1 unit of Serial to WPC 832 Con Converter 1 unit of PowerAdaptor 12V DC 1A is an option 1 unit of dipole antenna 2 0dBi Documentation Utility CD NOTE Info...

Страница 6: ...11 54 72 2 Mbps 20Mhz Band Width Modulation DSSS OFDM Frequency 2 4GHz Tx Power 11b Max 22dBm Tx Power 11g n Max 19dBm Rx Sensitivity 76dBm 54Mbps 89 5dBm 11Mbps Tx Rate Max 54Mbps with auto fallback...

Страница 7: ...erature 20 70 Storage Temperature 25 80 Dimensions 115 90 30 mm LxWxH include din rail wings Weight 110 5gm Housing Plastic Other Features for programming purpose Led Lamp SYS WiFi RX TX LAN Watch Dog...

Страница 8: ...ub When the connection is made the green color LED of Ethernet port will light on When data traffic Rx Tx occurs on the network yellow color LED will blink during data transferring SerialPort of RS 23...

Страница 9: ...ntrator back to default Use the Reset button At first power on the device then press Reset button by more than 20 seconds and then release to reset the device to the factory default LED Indicators PWR...

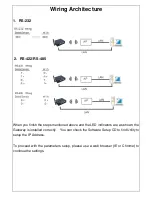
Страница 10: ...eps mentioned above and the LED indicators are as shown the Gateway is installed correctly You can check the Software Setup CD to find Utility to setup the IP Address To proceed with the parameters se...

Страница 11: ...n setting up this Concentrator for the first time the first thing you should do is to configure the IP address The following topics are covered in this chapter IP Search Utility Setup Configuration th...

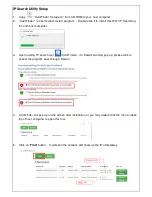
Страница 12: ...earching tool into host computer 3 Upon running IP search tool CvIotFinder if a firewall warning pop up please click to accept the program pass through firewall 4 CvIotFinder will pop up on the screen...

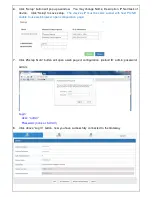
Страница 13: ...p The device s IP must be same subnet with host PC NB enable to use web browser open configuration page 7 Click 5 step Goto button will open a web page of configuration default ID admin password admin...

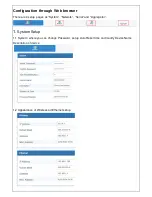
Страница 14: ...There are 4 setup pages as System Network Serial and Aggregator 1 System Setup 1 1 System where you can change Password set up Auto Reset time and modify Device Name Description of device 1 2 Appeara...

Страница 15: ...open file manager Then select the file with specified version and click open button When the selected file name appears on the input column click Update button 1 5Up to now Setup is successfully conf...

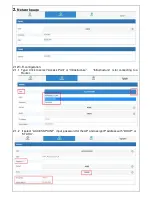
Страница 16: ...i Fi configuration 2 1 1 Type Click to select Access Point or Infrastructure Infrastructure is for connecting to a Router 2 1 2 If select ACCESS POINT input password for the AP and assign IP address w...

Страница 17: ...SSID CVIoT_XX_XX_XX_XX_XX_XX PC NB Smart Phone PAD should connect to this SSID and then able to open web browser with default IP of this Device 2 1 4 Password In ACCESS POINT mode key in password at...

Страница 18: ...her inputs 2 1 8 Go to item SSID click Scan will get list of available SSID of Access Points select the one in your network to link For example 2 1 9 On the NB PC choose same SSID to link NB PC must c...

Страница 19: ...and DNS section check with MIS for right IP address of Gateway The Gateway must be set with correct IP enable to connect with Internet 2 4 Up to now Setup is successfully configured Please click Save...

Страница 20: ...6K bps 3 2 Parity None Even Odd 3 3 Data Bits 5 6 7 8 3 4 Stop Bits 1 2 3 5 Flow Control None XON XOFF 3 6 RxDelay ms 3 7 TxDelay ms 3 8 Up to now Setup is successfully configured Please click Save f...

Страница 21: ...t 1 to be ID 1 Serial port 2 to be ID 2 4 1 2 TCP inactive timeout If no data stream via TCP transmission during the time period watchdog will be active to reboot device 4 1 3 RTU response timeout Tim...

Страница 22: ...ata input 4 2 4 No The sequential number for item Maximum 100 items each function 4 2 5 Reg ID The register address to be read from Concentrator 4 2 6 Device ID Input RTU device s ID 4 2 7 Device Reg...

Страница 23: ...4 Save Save and Reboot 4 4 1 Save for save settings of this page temporarily It s not a permanent yet 4 4 2 Save and Reboot Permanent save and reboot this device 5 Reset if needed Ensure power is on...

Отзывы: