15
4.2 Dip Switch
1) Setting mode: #1~#4 pins all at up position to modify LoRa settings.
2) Operation mode: only #1 at down position to run data transmission.
5. LoRa setting process
5.1 Pull power off
5.1.1 For Ethernet to LoRa model: pull off power plug.
5.1.2 For Serial to LoRa model: pull off power plug, use a USB to RS-232 Converter to onnect with the
RS-232 port. A crosslink RS-232 adaptor is necessary.
5.1.3 For USB to LoRa model: pull off USB plug from NB/PC USB host.
5.1.4 For DI/DO to LoRa model: pull off power plug.
5.2 Poke Dip Switch #1 to down position as setting mode.
5.3 Plug in the power plug or USB plug to turn power ON.
5.4 Recognize LoRa device’s COM port
5.5 Running the Setting Tool:
1) Press “Refresh” button, select right COM port number.
2) Press “Read” button to read existing parameters out.
3) Modify parameters as follows.
5.6 Setting UART parameters
Содержание LR-201-DIO
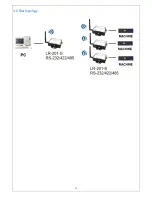
Страница 13: ...13 3 5 Star topology...
Страница 19: ...19 6 5 Press Update to save new parameters and reboot...

