background image

15

DE

Bedienungsanleitung

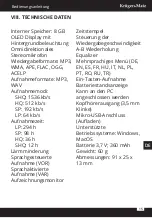
VIII. TECHNISCHE DATEN

Interner Speicher: 8 GB

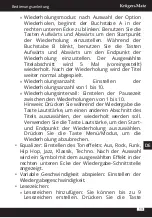
OLED Display mit 

Hintergrundbeleuchtung

Omnidirektionales 

Stereomikrofon

Wiedergabeformate: MP3, 

WMA, APE, FLAC, OGG, 

ACELP

Aufnahmeformate: MP3, 

WAV

Aufnahmemodi:

SHQ: 1536 kb/s

HQ: 512 kb/s

SP: 192 kb/s

LP: 64 kb/s

Aufnahmezeit:

LP: 294 h

SP: 98 h

HQ: 36 h

SHQ: 12 h

Lärmminderung

Sprachgesteuerte 

Aufnahme (VOR)

Sprachaktivierte 

Aufnahme (VAR)

Aufzeichnungsmonitor

Zeitstempel

Steuerung der 

Wiedergabegeschwindigkeit

A-B Wiederholung

Equalizer

Mehrsprachiges Menü (DE, 

EN, ES, FR, HU, IT, NL, PL, 

PT, RO, RU, TR)

Ein-Tasten-Aufnahme

Batteriestandsanzeige

Kann an den PC 

angeschlossen werden

Kopfhörerausgang (3,5 mm 

Klinke)

Mikro-USB-Anschluss 

(Aufladen)

Unterstützte 

Betriebssysteme: Windows, 

MacOS

Batterie 3,7 V; 360 mAh

Gewicht: 60 g

Abmessungen: 91 x 25 x 

13 mm

Содержание KM0286

Страница 1: ...DE PL Digital voice recorder KM0286 BEDIENUNGSANLEITUNG OWNER S MANUAL INSTRUKCJA OBSŁUGI MANUAL DE UTILIZARE EN RO ...

Страница 2: ......

Страница 3: ...t und Wärmequellen aus 2 Stellen Sie keine schweren Gegenstände auf das Gerät 3 Verhindern Sie das Gerät starken Schocks ausgesetzt wird 4 Verwenden Sie nur zugelassenes Zubehör 5 Das Gerät nicht verwenden wenn es beschädigt wurde oder abnormal funktioniert 6 Versuchen Sie nicht dieses Gerät selbst zu reparieren Im Schadensfall wenden Sie sich an einen autorisierten Kundendienst für Überprüfung Re...

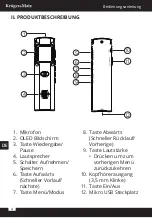
Страница 4: ...hmen Speichern 6 Taste Aufwärts Schneller Vorlauf nächste 7 Taste Menü Modus 8 Taste Abwärts Schneller Rücklauf Vorherige 9 Taste Lautstärke Drücken um zum vorherigen Menü zurückzukehren 10 Kopfhörerausgang 3 5 mm Klinke 11 Taste Ein Aus 12 Mikro USB Steckplatz UP M STOP REC VOL PLAY UP M STOP REC VOL PLAY 1 2 3 4 5 6 7 8 9 10 11 12 ...

Страница 5: ...Entladen der Batterie zu verhindern Wenn ein Passwort eingestellt ist benutzen Sie nach dem Start die Tasten Aufwärts Abwärts um Passwortziffern einzugeben Drücken Sie die Taste Menü Modus um zwischen den Passwortabschnitten zu wechseln Drücken Sie die Taste Wiedergabe Pause um das Passwort zu bestätigen Drücken Sie die Taste Wiedergabe Pause um eine Aufnahme einen Titel abzuspielen und die Einste...

Страница 6: ...edrückt um das Lautstärke Menü aufzurufen Verwenden Sie die Tasten Aufwärts und Abwärts um die Lautstärke zu ändern Drücken Sie im Wiedergabemodus bei angehaltenem Titel die Taste Lautstärke um die Datei zu löschen Drücken Sie im Wiedergabemodus während der Wiedergabe des Titels die Taste Lautstärke um den Wiedergabemodus zu ändern Einmal Wiederholen Alle wiederholen Zufällig Drücken Sie die Taste...

Страница 7: ...rmate MP3 64 192 Kbps WAV 512 1536 Kbps Titel VAR Modus Das Gerät nimmt nur auf wenn es Ton erkennt Ist kein Ton zu hören oder ist dieser schwach unterbricht das Gerät die Aufnahme und die Aufnahmezeit beginnt zu blinken Diese Funktion ist nur um Speicherplatz zu sparen Rauschunterdrückung Das Gerät blockiert das Hintergrundrauschen Je höher der Pegel desto mehr Hintergrundgeräusche werden gesperr...

Страница 8: ... Stunden einzustellen danach drücken Sie die Taste Menü Modus und benutzen die Tasten Aufwärts und Abwärts um die Minuten einzustellen Bestätigen Sie durch drücken der Taste Wiedergabe Pause Datumseinstellungen Um das Datumsformat zu ändern wählen Sie das Menü Zeitformat einstellen Benutzen Sie die Tasten Aufwärts und Abwärts um das gewünschte Zeitformat einzustellen Bestätigen Sie durch drücken d...

Страница 9: ...en Aufwärts und Abwärts um die Helligkeitsstufe einzustellen Werkzeuge Zeitgesteuerte Aufnahme Aufnehme Ein Aus Programmierung des Gerätes um zu einer gewissen Zeit die Aufnahme zu beginnen Zeitgesteuerte Aufnahmezeit wählen zwischen Einzelne Aufnahme Tägliche Aufnahme oder Aufnahme an Werkstagen Anfangszeit Beendigungszeit Benutzen Sie die Tasten Aufwärts und Abwärts um die Aufnahmezeit einzustel...

Страница 10: ...urch drücken der Taste Wiedergabe Pause Hinweis Um die Passworteinstellungen zu speichern müssen Sie die Taste Lautstärke drücken um zum vorherigen Menü zurückzukehren und dann die Taste Wiedergabe Pause drücken und halten um das Gerät neu zu starten Nach dem Neustart fragt das Gerät nach dem Passwort Wenn Sie nach dem Neustart das Passwort dreimal falsch eingeben schaltet sich das Gerät automatis...

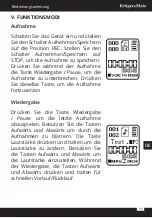
Страница 11: ...ie Aufnahme zu unterbrechen Drücken Sie dieselbe Taste um die Aufnahme fortzusetzen Wiedergabe Drücken Sie die Taste Wiedergabe Pause um die letzte Aufnahme abzuspielen Benutzen Sie die Tasten Aufwärts und Abwärts um durch die Aufnahmen zu blättern Die Taste Lautstärke drücken und halten um die Lautstärke zu ändern Benutzen Sie die Tasten Aufwärts und Abwärts um die Lautstärke einzustellen Während...

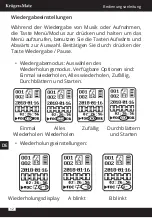
Страница 12: ...e Tasten Aufwärts und Abwärts zur Auswahl Bestätigen Sie durch drücken der Taste Wiedergabe Pause Wiedergabemodus Auswählen des Wiederholungsmodus Verfügbare Optionen sind Einmal wiederholen Alles wiederholen Zufällig Durchblättern und Starten Einmal Wiederholen Alles Wiederholen Zufällig Durchblättern und Starten Wiederholungseinstellungen Wiederholungsdisplay A blinkt B blinkt ...

Страница 13: ...derholungsintervall Einstelen der Pausezeit zwischen den Wiederholungen von 1 bis 10 Hinweis Drücken Sie während der Wiedergabe die Taste Lautstärke um einen anderen Abschnitt des Titels auszuwählen der wiederholt werden soll Verwenden Sie die Taste Lautstärke um den Start und Endpunkt der Wiederholung auszuwählen Drücken Sie die Taste Menü Modus um die Wiederholung abzubrechen Equalizer Einstelle...

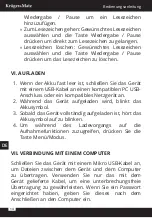
Страница 14: ...SB Anschluss oder ein kompatibles Netzgerät an 2 Während das Gerät aufgeladen wird blinkt das Akkusymbol 3 Sobald das Gerät vollständig aufgeladen ist hört das Akkusymbol auf zu blinken 4 Um während des Ladevorgangs auf die Aufnahmefunktionen zuzugreifen drücken Sie die Taste Menü Modus VII VERBINDUNG MIT EINEM COMPUTER Schließen Sie das Gerät mit einem Mikro USB Kabel an um Dateien zwischen dem G...

Страница 15: ...SP 98 h HQ 36 h SHQ 12 h Lärmminderung Sprachgesteuerte Aufnahme VOR Sprachaktivierte Aufnahme VAR Aufzeichnungsmonitor Zeitstempel Steuerung der Wiedergabegeschwindigkeit A B Wiederholung Equalizer Mehrsprachiges Menü DE EN ES FR HU IT NL PL PT RO RU TR Ein Tasten Aufnahme Batteriestandsanzeige Kann an den PC angeschlossen werden Kopfhörerausgang 3 5 mm Klinke Mikro USB Anschluss Aufladen Unterst...

Страница 16: ...rmalen Haushaltsmüll entsorgt werden darf Entsorgen Sie dieses Gerät bitte getrennt von anderen Abfällen um der Umwelt bzw der menschilchen Gesundheit nicht durch unkontrollierte Müllbeseitigung zu schaden Recyceln Sie das Gerät um die nachhaltige Wiederverwertung von stofflichen Ressourcen zu fördern Private Nutzer sollten den Händler bei dem das Produkt gekauft wurde oder die zuständigen Behörde...

Страница 17: ...ources of heat 2 Do not place heavy objects on the device 3 Do not expose the device to strong impacts 4 Use only authorized accessories 5 Do not use this device if it has been damaged or its operation is abnormal 6 Do not attempt to repair this device yourself In case of damage contact with an authorized service point for check up repair 7 When you disconnect the power cord of the device grasp an...

Страница 18: ...on 4 Speaker 5 Record save switch 6 Up button fast forward next 7 Menu mode button 8 Down button rewind previous 9 Volume button Press to return to the previous menu 10 Headphone jack 11 Power switch 12 micro USB port UP M STOP REC VOL PLAY UP M STOP REC VOL PLAY 1 2 3 4 5 6 7 8 9 10 11 12 ...

Страница 19: ... buttons to input password digits Press the Menu mode button to go to switch between password sections Press the Play pause to confirm password Press the Play pause button to play a recording song and to confirm settings Press the Menu mode button to change between recording and playing mode Press and hold the Menu mode button to enter System settings While playing track press and hold the Menu mo...

Страница 20: ...creen non recording or playing press and hold the Menu mode button to enter System menu Use the Up and Down buttons to navigate use the Play pause button to enter and to confirm Deleting a file To delete a file while in main screen use the Up and Down buttons to select the file that you want to delete press and hold the Menu mode button select Delete and press the Play pause button to confirm Sele...

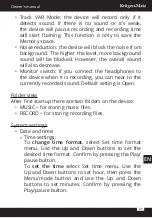
Страница 21: ...headphones to the device when it is recording you can hear to the currently recorded sound Default setting is Open Folder view After first startup there are two folders on the device MUSIC for storing music files RECORD for storing recording files System settings Date and time Time settings To change time format select Set time format menu Use the Up and Down buttons to set the desired time format...

Страница 22: ...ht timer Set the display backlight to go off automatically if no operation is performed within the selected time Auto switch off Set the device to switch off automatically if no operation is performed within the selected time Brightness Use the Up and Down buttons to set the brightness level Tools Timed recording Record on off Program the device to start recording at desired time Time Record Cycle...

Страница 23: ...lume button to return to previous menu and then press and hold the Play pause button to reboot the device After reboot the device will ask for password If you input password incorrectly three times after startup the device will shutdown automatically Disk space Check total and available space Format device Wipe all files from the device Factory settings Restore all settings to factory settings V W...

Страница 24: ...tons to adjust volume During playing press and hold the Up and Down buttons to fast forward or to reverse Playing settings While playing the recordings or music press and hold the Menu mode button to enter menu use the Up and Down buttons to choose press the play pause button to confirm Play mode Select repeat mode Available options are Repeat 1 Repeat all Random View playing Repeat 1 Repeat all S...

Страница 25: ...peat Times Set repeating times from 1 to 10 Repeat Interval Set pause time between repeating from 1 to 10 Note While playing on repeat press the Volume button to select another part of track to repeat Use the Volume button to select starting and ending point of repeat Press the Menu mode button to cancel repeating Equalizer Set play effect Off Rock Funk Hip Hop Jazz Classical Techno After choosing...

Страница 26: ...evice with a USB cable to a compatible PC USB port or power adapter 2 While the device is charging the battery icon will flash 3 Once the device is fully charged the battery icon will stop flashing 4 To access recording features while charging press the Menu mode button VII CONNECTION WITH THE PC To transfer files between the device and the computer connect the device using micro USB cable To ensu...

Страница 27: ...h HQ 36 h SHQ 12 h Noise reduction Voice operated recording VOR Voice activated recording VAR Recording monitor Time stamp Playback speed control A B Repeat Equalizer Multilanguage menu DE EN ES FR HU IT NL PL PT RO RU TR One button recording Battery level indicator Connectable to the PC Headphone output 3 5 mm jack Micro USB port charging Supported operating systems Windows MacOS Battery 3 7 V 36...

Страница 28: ...se of material resources Household users should contact either the retailer where they purchased this product or their local government office for details of where and how they can take this item for environmentally safe recycling Business users should contact their supplier and check the terms and conditions of the purchase contract This product should not be mixed with other commercial wastes fo...

Страница 29: ...Nie należy umieszczać na urządzeniu ciężkich przedmiotów 3 Urządzenie należy chronić przed silnymi wstrząsami 4 Nie należy używać nieoryginalnych akcesoriów 5 Nie należy używać produktu jeśli został uszkodzony lub nie działa poprawnie 6 Zabrania się własnoręcznej naprawy sprzętu W wypadku uszkodzenia należy skontaktować się z autoryzowanym punktem serwisowym w celu sprawdzenia naprawy 7 Odłączając...

Страница 30: ...isywania 6 Przycisk w górę przewijanie następny utwór 7 Przycisk M menu zmiana trybu 8 Przycisk w dół cofanie poprzedni utwór 9 Przycisk VOL zmiana głośności Naciśnij aby powrócić do poprzedniego menu 10 Gniazdo słuchawkowe 11 Przełącznik zasilania 12 Port micro USB UP M STOP REC VOL PLAY UP M STOP REC VOL PLAY 1 2 3 4 5 6 7 8 9 10 11 12 ...

Страница 31: ...ów w górę i w dół aby wprowadzić hasło Należy użyć przycisku M aby przełączać się między sekcjami hasła Należy nacisnąć przycisk PLAY aby potwierdzić hasło Należy nacisnąć przycisk PLAY aby odtworzyć nagranie lub utwór oraz aby potwierdzać ustawienia Należy nacisnąć przycisk M aby przełączać się między trybami nagrywania i odtwarzania Należy nacisnąć i przytrzymać przycisk M aby wejść do menu usta...

Страница 32: ... potwierdzić Należy wybrać opcję Usuń aby usunąć pojedynczy plik lub Usuń wszystkie aby usunąć wszystkie pliki Należy nacisnąć przycisk w górę aby wybrać następny utwór opcję Podczas odtwarzania należy nacisnąć i przytrzymać aby przewinąć do przodu Należy nacisnąć i przytrzymać przycisk VOL aby wejść do menu głośności Należy użyć przycisków w górę i w dół aby zmienić poziom głośności W trybie odtw...

Страница 33: ...otoczenia Im wyższy poziom tym więcej dźwięków z otoczenia będzie blokowane Głośność całego nagrania również zostanie zmniejszona Przełącznik słuchawek Jeżeli słuchawki zostaną podłączone podczas nagrywania aktualnie nagrywany dźwięk będzie odtwarzany przez słuchawki Domyślnie ta opcja jest włączona Widok folderów Po pierwszym uruchomieniu na urządzeniu dostępne są dwa foldery MUSIC do przechowywa...

Страница 34: ...M aby przełączać się między dniem miesiącem i rokiem Należy użyć przycisku PLAY aby potwierdzić Język Należyużyćprzyciskówwgóręiwdół abyzmienić język Należy użyć przycisku PLAY aby potwierdzić Czas podświetlenia ustaw czas po którym urządzenie wyłączy podświetlenie wyświetlacza jeżeli w przeciągu ustawionego czasu nie zostanie wykonana żadna akcja Automatyczne wyłączanie Ustaw czas po którym urząd...

Страница 35: ... aby potwierdzić Ustaw hasło Należy użyć przycisków w górę i w dół aby ustawić hasło Należy nacisnąć przycisk M aby przełączać się między sekcjami hasła Należy nacisnąć przycisk PLAY aby potwierdzić Uwaga Aby zapisać hasło należy nacisnąć przycisk VOL aby powrócić do poprzedniego menu i nacisnąć i przytrzymać przycisk PLAY aby uruchomić ponownie urządzenie Po ponownym uruchomieniu urządzenie zażąd...

Страница 36: ...yć ostatnie nagranie Należy użyć przycisków w górę i w dół aby zmieniać odtwarzane nagrania Należy nacisnąć i przytrzymać przycisk VOL aby zmienić poziom głośności Należy użyć przycisków w górę i w dół aby zmienić poziom głośności Podczas odtwarzania należy nacisnąć i przytrzymać przycisk w górę lub w dół aby przewijać odtwarzany utwór Nagrywanie Odtwarzanie Ustawienia odtwarzania Podczas odtwarza...

Страница 37: ...ia Tryb odtwarzania Wybierz tryb powtarzania Dostępne opcje Powtórz 1 Powtórz wszystko Losowo Teraz odtwarzane Tryb powtarzania Po wybraniu tej opcji litera A zacznie migać w prawym dolnym rogu Należy nacisnąć przycisk w górę aby wybrać punkt początkowy powtarzania Podczas gdy miga litera B należy nacisnąć przycisk w górę aby wybrać ...

Страница 38: ...sku VOL aby wybrać punkt początkowy i końcowy nowo wybieranego fragmentu Należy nacisnąć przycisk M aby anulować powtarzanie Korektor Dostępne efekty Wyłączone Rock Funk Hip Hop Jazz Klasyczna Techno Po wybraniu efektu korektora odpowiednia ikona pojawi się w prawym dolnym rogu interfejsu odtwarzania Szybkość odtwarzania Dostosowywanie szybkości odtwarzania Zakładki Dodaj zakładkę Dostępna liczba ...

Страница 39: ...rzycisk M VII PODŁĄCZENIE DO KOMPUTERA Aby przesyłać pliki między urządzeniem i komputerem należy podłączyć urządzenie do komputera używając kabla micro USB Aby zapewnić bezproblemowe przesyłanie danych należy używać tylko kabla który został dołączony do urządzenia Jeżeli zostało ustawione hasło należy je podać przy podłączaniu do komputera Pamięć wewnętrzna 8 GB Podświetlany wyświetlacz OLED Mikr...

Страница 40: ...zasu Regulacja prędkości odtwarzania Powtarzanie A B Equalizer Wielojęzykowe menu DE EN ES FR HU IT NL PL PT RO RU TR Nagrywanie za pomocą jednego przycisku Wskaźnik poziomu naładowania baterii Możliwość podłączenia do komputera Wyjście słuchawkowe jack 3 5 mm Port micro USB ładowanie Obsługiwane systemy operacyjne Windows MacOS Bateria 3 7 V 360 mAh Waga 60 g Wymiary 91 x 25 x 13 mm ...

Страница 41: ...a temat miejsca i sposobu bezpiecznego dla środowiska recyklingu tego produktu użytkownicy w gospodarstwach domowych powinni skontaktować się z punktem sprzedaży detalicznej w którym dokonali zakupu produkt lub z organem władz lokalnych Użytkownicy w firmach powinni skontaktować się ze swoim dostawcą i sprawdzić warunki umowy zakupu Produkt nie należy usuwać razem z innymi odpadami komercyjnymi Wy...

Страница 42: ... și la surse de căldură 2 Nu puneți obiecte grele pe dispozitiv 3 Nu supuneți dispozitivul la impacte puternice 4 Utilizați doar accesorii autorizate 5 Nu utilizați dispozitivul dacă a fost deteriorat sau dacă funcționează defectuos 6 Nu încercați să reparați dispozitivul singur În caz de deteriorare contactați un service autorizat pentru verificare reparații 7 Cânddeconectațicabluldealimentareald...

Страница 43: ...re salvare 6 Buton SUS derulare rapidă înainte următorul 7 Buton meniu mod 8 Buton JOS derulare rapidă înapoi anteriorul 9 Buton volum Apăsați acest buton pentru a reveni la meniul anterior 10 Mufă jack pentru căști 11 Comutator alimentare 12 Port micro USB UP M STOP REC VOL PLAY UP M STOP REC VOL PLAY 1 2 3 4 5 6 7 8 9 10 11 12 ...

Страница 44: ...e setată o parolă după pornire utilizați butoanele SUS și JOS pentru a introduce cifrele parolei Apăsați butonul Meniu mod pentru a comuta între cifrele parolei Apăsați butonul Redare pauză pentru a confirma parola Apăsați butonul Redare pauză pentru a reda o înregistrare melodie și pentru a confirma setările Apăsați butonul Meniu mod pentru a schimba între modul înregistrare și redare Apăsați și ...

Страница 45: ...i butonul Volum pentru a modifica modul de redare Repetă 1 Repetă tot Aleatoriu Apăsați butonul volum pentru a reveni la maniul anterior IV MENIU SISTEM În ecranul principal când nu înregistrează sau redă apăsați și țineți apăsat butonul Meniu mod pentru a accesa meniul Sistem Utilizați butoanele Sus și Jos pentru a naviga utilizați butonul Redare pauză pentru a accesa și confirma Ștergerea unui f...

Страница 46: ...e memorie Reducere zgomot Dispozitivul va bloca zgomotul din fundal Cu cât este mai mare nivelul va fi blocat mai mult sunet de fundal Cu toate aceste setări sunetul general va scădea și el Comutator monitor Dacă conectați căștile la dispozitiv în timp ce acesta înregistrează puteți auzi sunetul înregistrat Setarea implicită este Deschis Vizualizare fișier După prima pornire pe dispozitiv sunt dou...

Страница 47: ...le Sus și Jos pentru a schimba ziua luna și anul Utilizați butonul Meniu mod pentru a comuta între zi lună și an Confirmați apăsând butonul Redare pauză Limbă Utilizați butoanele Sus și Jos pentru a alege limba Apăsați butonul Redare pauză pentru a confirma Temporizator lumină de fundal Setați ca lumina de fundal a ecranului să se stingă automat dacă nu este efectuată nicio acțiune în timpul selec...

Страница 48: ...entru a activa sau dezactiva parola Apăsați butonul Redare pauză pentru a confirma Setare parolă Utilizați butoanele Sus și Jos pentru a seta parola Apăsați butonul Meniu mod pentru a comuta între secțiunile parolei Apăsați butonul Redare pauză pentru a confirma Notă Pentru a salva setările parolei trebuie să apăsați butonul Volum pentru a reveni la meniul anterior și apoi să apăsați și să țineți ...

Страница 49: ...are pauză pentru a reda ultima înregistrare Utilizați butoanele Sus și Jos pentru a naviga între înregistrări Apăsați și țineți apăsat butonul Volum pentru a modifica nivelul volumului Utilizați butonul Sus și Jos pentru a regla volumul În timpul redării apăsați și țineți apăsat butoanele Sus și Jos pentru a derula rapid înainte sau înapoi Înregistrare Redare Setări redare În timp ce redați înregi...

Страница 50: ...tare A intermitent B intermitent Setări repetare Mod repetare După selectarea acestei opțiuni litera A va începe să pâlpâie în colțul din dreapta jos Apăsați butonul Sus pentru a selecta punctul de pornire al repetării În timp ce litera B pâlpâie apăsați butonul Sus pentru a selecta punctul de oprire al repetării Partea selectată a piesei va fi redată de 5 ori setare implicită După repetare ...

Страница 51: ...l repetării Apăsați butonul Meniu mod pentru a anula repetarea Eqalizator Setați efectul redării Oprit Rock Funck Hip Hop Jazz Clasic Techno După ce ați ales o pictogramă cu efectul selectat va apărea în colțul din dreapta jos a interfeței de redare Viteză variabilă de redare Reglați viteza de redare Marcaje Adaugă marcaj Puteți crea până la 9 marcaje Apăsați butonul Redare pauză pentru a adăuga u...

Страница 52: ...sați butonul Meniu mod VII CONECTAREA CU CALCULATORUL Pentru a transfera fișiere între dispozitiv și calculator conectați dispozitivul utilizân un cablu micro USB Pentru a vă asigura că transferul se efectuează fără întreruperi utilizați doar cablul furnizat împreună cu dispozitivul Dacă ați setat o parolă introduceți o după conectarea la calculator Memorie internă 8 GB Ecran OLED Microfon stereo ...

Страница 53: ...istrării Marcaj dată și oră Control viteză de redare Repetare A B Egalizator Meniu în mai multe limbi DE EN ES FR HU IT NL PL PT RO RU TR Înregistrare cu un singur buton Indicator nivel baterie Se poate conecta la PC Ieșire căști 3 5 mm jack Port micro USB încărcare Sisteme de operare acceptate Windows MacOS Baterie 3 7 V 360 mAh Greutate 60 g Dimensiuni 91 x 25 x 13 mm ...

Страница 54: ...veni posibile efecte daunatoare asupra mediului inconjurator sau a san ata tii oamenilor datorate evacuarii necontrolate a reziduurilor vă rugăm să separați acest produs de alte tipuri de reziduuri si să l reciclati in mod responsabil pentru a promova refolosirea resurselor materiale Utilizatorii casnici sunt rugati să ia legatura fie cu distribuitorul de la care au achizitionat acest produs fie c...

Страница 55: ......

Страница 56: ...www krugermatz com is a registered trademark ...

Отзывы: