background image

Bedienungsanleitung

Bedienungsanleitung

DE

DE

16

17

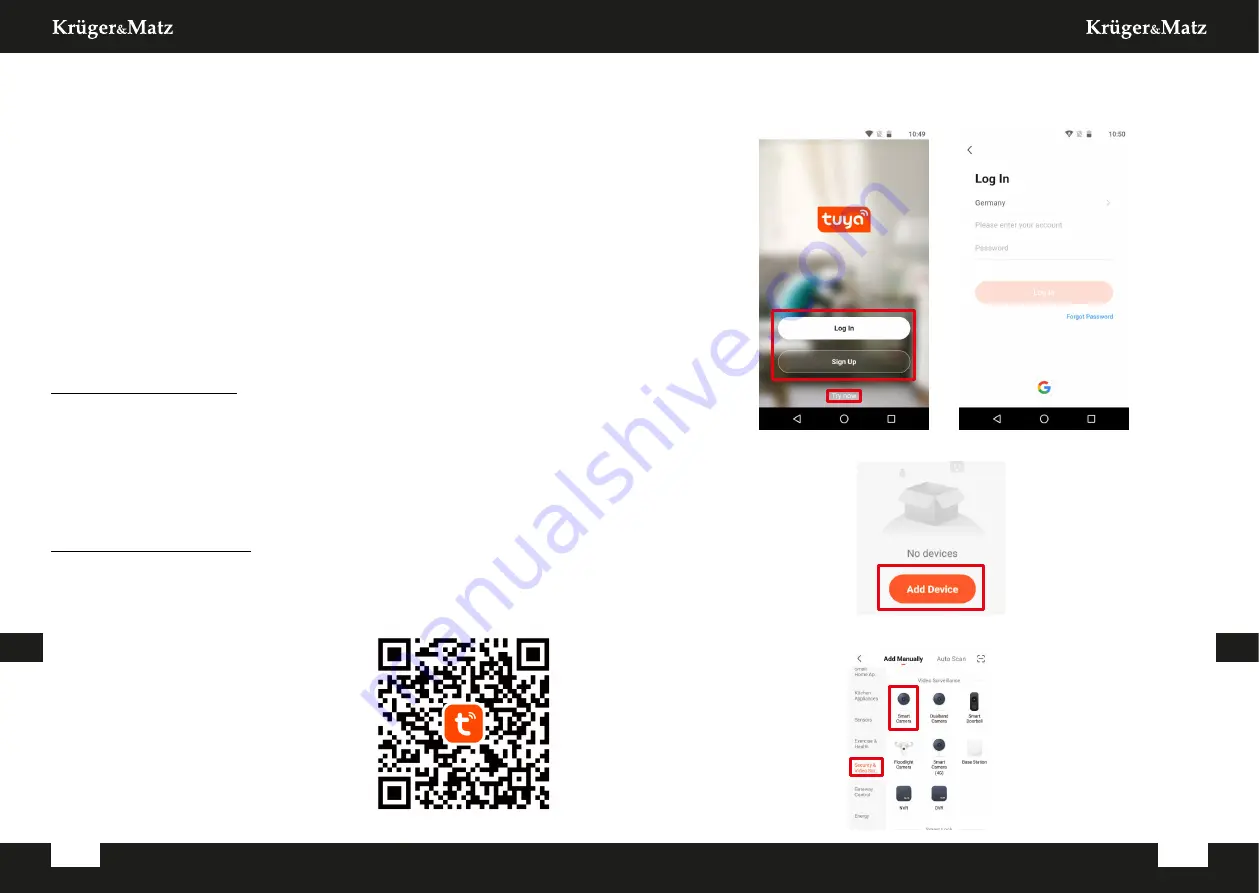
2. Erstellen Sie ein Konto und / oder melden Sie sich an bei der Tuya-

Anwendung an. Es ist möglich, die Anwendung ohne Konto zu benutzen.

Es ist jedoch erforderlich, ein Heim einzurichten und Familienmitglieder

hinzuzufügen.

3. Tippen Sie auf die Schaltfläche Neues Gerät hinzufügen.

4. Wechseln Sie in die Kategorie Sicherheit und Videoüberwachung und

wählen die Option Smart Kamera.

SICHERHEITSHINWEISE

1. Informieren

Sie

sich

vor

der

Installation

über

die

örtlichen

Einschränkungen für Aufzeichnungs- und Überwachungssysteme.

2. Schützen Sie das Gerät vor hohen oder niedrigen Temperaturen.

3. Schützen Sie das Gerät vor Wasser und anderen Flüssigkeiten. Fassen Sie

das Gerät nicht mit nassen Händen an.

4. Verwenden Sie das Gerät nicht dort, wo die Verwendung des 2,4-GHz-

Bandes verboten ist.

5. Verwenden Sie Speicherkarten der Klasse 10 oder höher.

6. Vergewissern Sie sich vor dem Reinigen des Geräts, dass das Gerät vom

Stromnetz getrennt ist.

7. Reinigen Sie dieses Gerät regelmäßig mit einem weichen, trockenen Tuch

ohne Scheuermittel.

8. Zerlegen oder versuchen Sie nicht, das Gerät selbst zu reparieren.

Wenden Sie sich bei Beschädigung oder Fehlfunktion an einen

autorisierten Kundendienst.

INSTALLATION

1. Laden Sie die Anwendung TuyaSmart

aus dem Play Store oder AppStore

herunter und führen diese aus. Achtung:

Die angezeigten Bilder können von der

aktuellen

Version

der

Anwendung

abweichen.

ANSCHLIESSEN

KM2205, KM2206, KM2207

1. Schließen Sie den Mikro-USB-Anschluss des mitgelieferten Kabels an den

Stecker der Kamera an. Schließen Sie den USB-Stecker an das

mitgelieferte Netzgerät an.

2. Schließen Sie das Netzgerät an eine Netzsteckdose an.

3. Nach einer Weile schaltet sich die Kamera ein. Der Start-Ton ertönt und

die Kamera dreht das Objektiv in alle Richtungen.

4. Wenn die Kamera zum ersten Mal verwendet wird, ertönt aus der

Kamera der Kopplungs-Ton.

KM2207-1, KM2208, KM2209

1. Schließen Sie den Netzadapter an den Netzanschluss der Kamera an.

2. Nach einer Weile schaltet sich die Kamera ein. Der Start-Ton ertönt und

die Kamera dreht das Objektiv in alle Richtungen.

3. Wenn die Kamera zum ersten Mal verwendet wird, ertönt aus der

Kamera der Kopplungs-Ton.

Содержание Connect C30

Страница 1: ...KM2205 KM2206 KM2207 KM2207 1 KM2208 IP Wi Fi security camera Extended manual DE BEDIENUNGSANLEITUNG CS NÁVOD K OBSLUZE EN OWNER S MANUAL PL INSTRUKCJA OBSŁUGI RO MANUAL DE UTILIZARE ...

Страница 2: ... Play nebo App Store Poznámka zobrazené snímky obrazovky se mohou lišit v závislosti na verzi aplikace 2 Zaregistrujte se nebo se přihlaste do aplikace Tuya Aplikaci můžete používat i bez účtu avšak účet je nutný pro vytvoření rodinné skupiny a přidávání členů rodiny 3 Stiskněte tlačítko Přidat zařízení 4 Vyberte kategorii Video dohled a vyberte položku Bezpečnostní kamera PŘIPOJENÍ KM2205 KM2206 ...

Страница 3: ...tovo Kamera byla přidána Pokud chcete změnit její zobrazený název stiskněte tlačítko Upravit a zadejte požadovaný název Stiskněte tlačítko Dokončit 10 Na hlavní obrazovce stiskněte název kamery pro zobrazení podrobností a Živý obraz z kamery b Ztlumení zvuku kamery c Přepínání kvality obrazu d Přepínání na celou obrazovku e Úroveň signálu f Nastavení kamery g Snímek kamery h Stiskněte a mluvte a n...

Страница 4: ...ku 2 Zvedněte záslepku Pozor Na záslepce je reproduktor Záslepku nevytahujte úplně 3 Zasuňte paměťovou kartu do slotu dokud nezapadne 4 Zavřete záslepku a utáhněte zajišťovací šroubky Reset kamery Pokud kamera přestala reagovat nebo ji potřebujete odpojit od aplikace resetujte ji KM2205 1 Posuňte objektiv kamery úplně nahoru dokud neuvidíte resetovací tlačítko 2 Do otvoru tlačítka vložte tenký pře...

Страница 5: ...nastavení způsobu komunikace 7 Nákup cloudového uložiště 8 Offline upozornění 9 Sdílení zařízení 10 Aktualizace softwaru zařízení 11 Odebrání zařízení 11 10 9 8 7 6 5 4 3 2 1 Návod k obsluze Návod k obsluze CS CS 8 9 Nastavení domácnosti 1 Z hlavní obrazovky přejděte do nabídky Já 2 Stiskněte tlačítko Správa domácnosti 3 Stiskněte tlačítko Přidat rodinu nebo vyberte stávající domácnost a upravte j...

Страница 6: ...oogle Chrome 1 Otevřete prohlížeč a do adresního řádku zadejte ipc eu ismartlife me login 2 Otevřete aplikaci Tuya ve svém chytrém telefonu 3 Přejděte do nabídky Me Já 4 Stiskněte ikonu v pravém horním rohu 5 Naskenujte QR kód z prohlížeče 6 Stisknutím tlačítka autorizujte přihlášení 7 V prohlížeči se zobrazí kanál z kamery ...

Страница 7: ...vou adresu na kterou je aplikace zaregistrovaná v zařízení člena rodiny c Za okamžik se v aplikaci v zařízení člena rodiny zobrazí oznámení o přidání do domácnosti Potvrďte jej d Hotovo Od této chvíle může člen rodiny ovládat zařízení přidaná do domácnosti Ručně a Vyberte nabídku Další Zobrazí se přístupový kód b V zařízení člena rodiny přejděte do nabídky Já a pak do nabídky Správa domácnosti c S...

Страница 8: ...tovného využití hmotných zdrojů coby stálé praxe Pro více informací ohledně místa a způsobu recyklace tohoto výrobku která bude bezpečná pro životní prostředí domácí uživatelé mohou kontaktovat maloobchodní prodejnu v níž výrobek zakoupili nebo orgán místní samosprávy Firemní uživatelé mohou kontaktovat dodavatele a zkontrolovat podmínky kupní smlouvy Neodstraňujte výrobek společně s ostatními kom...

Страница 9: ...ie dieses Gerät regelmäßig mit einem weichen trockenen Tuch ohne Scheuermittel 8 Zerlegen oder versuchen Sie nicht das Gerät selbst zu reparieren Wenden Sie sich bei Beschädigung oder Fehlfunktion an einen autorisierten Kundendienst INSTALLATION 1 Laden Sie die Anwendung TuyaSmart aus dem Play Store oder AppStore herunter und führen diese aus Achtung Die angezeigten Bilder können von der aktuellen...

Страница 10: ...inschalten i e a m n o p q l k j h g f d c b 5 Überprüfen Sie die Markierung und tippen auf Weiter 6 Wählen Sie ein Netzwerk aus und geben das Passwort ein Achtung Stellen Sie sicher dass der Router im 2 4 GHz Band arbeitet 5 GHz werden nicht unterstützt 7 Zeigen Sie der Kamera den QR Code Stellen Sie sicher dass der Abstand zwischen Kamera und Telefon etwa 15 bis 20 cm beträgt und die Kamera dire...

Страница 11: ...an die Stromversorgung angeschlossen ist KM2206 1 Bewegen Sie das Objektiv nach oben bis Sie die Reset Taste sehen 2 Halten Sie die Taste 5 Sekunden lang gedrückt solange diese noch an die Stromversorgung angeschlossen ist KM2207 1 Lösen Sie zwei Schrauben mit denen die Abdeckung befestigt ist 2 Heben Sie die Abdeckung an 3 Schieben Sie einen dünnen Gegenstand z B eine Büroklammer in das Einlegen ...

Страница 12: ... Drücken Sie die Taste auf dem Hauptbildschirm um die Liveübertragung von mehreren Kameras bis zu 4 anzuzeigen Ein orangefarbener Rahmen um die Ansicht zeigt die Kamera an die Sie mit den unteren Schaltflächen bewegen können Kameraeinstellungen 1 Ändern des Kameranamens und Symbol 2 Grundlegende Informationen zum Gerät 3 Tippen um die Automatisierung zu starten 4 Verbinden Sie sich mit dem Spracha...

Страница 13: ...efügt wurde Bestätigen Sie d Bereit Jetzt kann das Mitglied Geräte steuern die dem Heim hinzugefügt sind Manuel a Wählen Sie die Option Mehr Der Einladungscode wird angezeigt b Gehen Sie auf dem Mitgliedergerät zum Menü Ich Me und öffne das Menü Heim Management c Wählen Sie die Option einem Heim beitreten d Geben Sie im Feld Einladungscode den Einladungscode vom Hauptgerät ein Tippen Sie auf die S...

Страница 14: ...Bedienungsanleitung Bedienungsanleitung DE 26 DE 27 a d b Manuel c 2 a b c Automatisch ...

Страница 15: ...n anderen Abfällen um der Umwelt bzw der menschlichen Gesundheit nicht durch unkontrollierte Müllbeseitigung zu schaden Recyceln Sie das Gerät um die nachhaltige Wiederverwertung von stofflichen Ressourcen zu fördern Private Nutzer sollten den Händler bei dem das Produkt gekauft wurde oder die zuständigen Behörden kontaktieren um in Erfahrung zu bringen wie sie das Gerät auf umweltfreundliche Weis...

Страница 16: ...e phone The camera will play a chime once it establishes the connection Attention if the camera will not detect the QR code try turning the camera by 180 8 Press the I Heard a Prompt button Wait until the app add the camera 9 Ready The camera has been added If you want to change the name of the camera press the Edit button and input the name Press the Done button 3 Press the Add new device button ...

Страница 17: ...Close the cover and screw the security screws 10 On the main screen press the camera to view the details a Live view b Mute sound from the camera c Switch the image quality d Switch full screen e Signal level f Camera settings g Make a screenshot h Press and talk and the camera will play your voice i Record video to phone storage j Play the saved recordings on a memory card k Open the gallery of r...

Страница 18: ...the slot until it clicks 4 Close the cover and screw the security screws Resetting the camera If the camera has stopped responding or you want to disconnect it from the app do the reset KM2205 1 Move the lens to the top until you see the reset button 2 Slide a thin object ex a paper clip to the button hole 3 Press and hold the button for 5 seconds while still connected to the power supply KM2206 1...

Страница 19: ...st 8 All devices and rooms will be shown 9 To add a device to a room select the room and press the Add device button 10 Repeat the steps 3 10 from Connecting paragraph Before clicking the Done button select a room in which you want to add the socket 11 10 9 8 7 6 5 4 3 2 1 Camera settings 1 Change the name and icon of the camera 2 Basic information about the device 3 Tap to Run Automation 4 Link w...

Страница 20: ...ontrol devices that are added to the home Manual a Select the More option The invitation code will be shown b On the members device go to the Me menu and go to the Home management menu c Select the Join a home option d In the Invitation code field input the invitation code from the main device Press the Next button e Ready Now the member can control devices that are added to the home 1 2 Web brows...

Страница 21: ...Owner s manual 40 Owner s manual 41 EN EN a d b Manual c 2 a b c Automatically ...

Страница 22: ...y dźwięk a kamera wykona obrót głowicą we wszystkie strony 3 Jeżeli jest to pierwsze uruchomienie kamera będzie wydawać dźwięk sygnalizując tryb parowania INSTALACJA 1 Pobierz i uruchom aplikację TuyaSmart na telefon ze Sklepu Play lub App Store Uwaga pokazane zrzuty ekranu mogą się różnić w zależności od wersji aplikacji Lechpol Electronics Leszek Sp k hereby declares that the Wi Fi security came...

Страница 23: ...k sygnalizujący połączenie Uwaga jeżeli kamera nie wykrywa kodu QR spróbuj obrócić kamerę o 180 8 Naciśnij przycisk Słyszałem dźwięk Zaczekaj aż aplikacja doda kamerę 9 Gotowe Kamera została dodana Jeżeli chcesz zmienić jej wyświetlaną nazwę naciśnij przycisk edycji i wprowadź wybraną nazwę Naciśnij przycisk Zakończ 2 Zarejestruj się i lub zaloguj do aplikacji Tuya Możliwe jest korzystanie z aplik...

Страница 24: ...eczona 4 Zamknąć zaślepkę i przykręcić śrubki zabezpieczające 10 Na ekranie głównym naciśnij nazwę kamery aby wyświetlić szczegóły a Obraz z kamery na żywo b Wyciszanie dźwięku z kamery c Przełączanie jakości obrazu d Przełączanie pełnego ekranu e Poziom sygnału f Ustawienia kamery g Zrzut ekranu kamery h Naciśnij i mów aby kamera odtworzyła nagrany głos i Nagrywanie obrazu do pamięci telefonu j O...

Страница 25: ...świetlić obraz z kilku kamer jednocześnie maksymalnie z 4 należy nacisnąć przycisk na ekranie głównym Obraz w ramce oznacza wybraną kamerę którą można sterować przy pomocy przycisków poniżej KM2208 1 Odkręcić dwie śrubki zabezpieczające zaślepkę 2 Podnieść zaślepkę Uwaga Na zaślepce znajduje się głośnik Nie należy wyciągać zaślepki całkowicie 3 Wsunąć kartę pamięci do gniazda aż zostanie zabezpiec...

Страница 26: ...łączone urządzenia i podział na pokoje 9 Aby dodać urządzenie do pokoju wybierz pokój i naciśnij przycisk Dodaj urządzenie 10 Wykonaj kroki 3 10 z rozdziału Podłączanie Przed naciśnięciem przycisku Zakończ zaznacz pokój do którego chcesz dodać gniazdko Ustawienia kamery 1 Zmiana nazwy i wyświetlanej ikony kamery 2 Podstawowe informacje o urządzeniu 3 Scenariusze automatyzacji 4 Łączenie z asystent...

Страница 27: ...olować urządzenia dodane do domu Ręcznie a Wybierz opcję Więcej Zostanie wyświetlony kod dostępu b Na urządzeniu członka rodziny przejdź do menu Ja następnie do menu Zarządzanie domem c Naciśnij przycisk Dołącz do domu d W polu Kod zaproszenia wprowadź kod wyświetlony na urządzeniu głównym Naciśnij przycisk Dalej e Gotowe Od teraz członek rodziny może kontrolować urządzenia dodane do domu 1 2 Dost...

Страница 28: ...Instrukcja obsługi 54 Instrukcja obsługi 55 PL PL a d b Ręcznie c 2 a b c Automatycznie ...

Страница 29: ...fișate pot fi diferite față de versiunea curentă a aplicației 2 Înscrieți vă și sau conectați vă la aplicația Tuya Este posibil să utilizați aplicația fără cont totuși este necesar să configurați o casă și să adăugați membri ai familiei Poland Prawidłowe usuwanie produktu zużyty sprzęt elektryczny i elektroniczny Oznaczenie przekreślonego kosza umieszczone na produkcie lub w odnoszących się do nie...

Страница 30: ...15 20 cm iar camera este îndreptată direct către telefon Camera va reda un sunet odată ce va stabili conexiunea Atenție dacă camera nu detectează codul QR încercați să rotiți camera cu 180 8 Apăsați butonul I Heard a Prompt Așteptați până când aplicația adaugă camera 9 Gata Camera a fost adăugată Dacă doriți să schimbați denumirea camerei apăsați butonul Edit și introduceți denumirea Apăsați buton...

Страница 31: ...i capacul și înșurubați șuruburile de fixare 10 Pe ecranul principal apăsați camera pentru a vizualiza detaliile a Vizualizare live b Dezactivați sunetul de la cameră c Schimbați calitatea imaginii d Activați ecranul complet e Puterea semnalului f Setările camerei g Faceți o captură de ecran h Apăsați și vorbiți iar camera vă va reda vocea i Înregistrați videoclipuri pe telefon j Redați înregistră...

Страница 32: ...camera pe care o puteți deplasa cu butoanele de mai jos KM2208 1 Deșurubați două șuruburi care fixează capacul 2 Ridicați capacul Atenție există un difuzor pe capac Nu ridicați capacul până la capăt 3 Glisați o cartelă de memorie în slot până când face clic 4 Închideți capacul și înșurubați șuruburile de siguranță Resetarea camerei Dacă camera nu mai răspunde sau doriți să o deconectați de la apli...

Страница 33: ...ă 8 Vor fi afișate toate dispozitivele și camerele 9 Pentru a adăuga un dispozitiv sau o cameră selectați camera și apăsați butonul Add device 10 Repetați pașii 3 10 Înainte de apăsarea pe butonul Done selectați o cameră în care doriți să adăugați o priză 11 10 9 8 7 6 5 4 3 2 1 Setări cameră 1 Schimbați denumirea și pictograma camerei 2 Informații de bază despre dispozitiv 3 Automatizare Tap to R...

Страница 34: ...oogle Chrome 1 Deschideți browserul și tastați ipc eu ismartlife me login în bara de adrese 2 Deschideți aplicația Tuya pe smartphone 3 Mergeți la meniul Me Eu 4 Apăsați pictograma din dreapta sus 5 Scanați codul QR din browser 6 Apăsați butonul pentru a autoriza autentificarea 7 Fluxul de la cameră va fi afișat în browser ...

Страница 35: ...oduceți adresa de email care este înregistrată în aplicația dispozitivelor membrilor a După un moment apare o notificare în aplicația dispozitivelor membrilor despre adăugarea la casă Confirmați a Gata Acuma membrii pot controla dispozitivele adăugate la casă Manual a Selectați opțiunea More Va fi afișat un cod pentru invitație b Pe dispozitivele membrilor mergeți la Me menuși deschideți meniul Ho...

Страница 36: ...fecte daunatoare asupra mediului inconjurator sau a san ata tii oamenilor datorate evacuarii necontrolate a reziduurilor vă rugăm să separați acest produs de alte tipuri de reziduuri si să l reciclati in mod responsabil pentru a promova refolosirea resurselor materiale Utilizatorii casnici sunt rugati să ia legatura fie cu distribuitorul de la care au achizitionat acest produs fie cu autoritatile ...

Страница 37: ...is a registered trademark ...

Отзывы: