background image


Instruction Manual KG-453 

21 


“To-do-list” before operating the machine  

 
Make sure the slicer is clean especially in those areas that come in contact with 
the food. For example: the inside of the lid, the collecting container 

(7) 

and the 

pushing  handle 

(5). 

In  case  it  is necessary  clean  those areas  according  to  the 

instructions given in paragraph cleaning. 
The collecting container 

(7) 

and the ejector 

(8) 

have to be installed on the vege-

table slicer to function properly.  
 

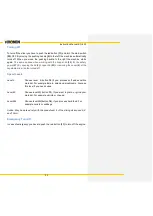
Turning on 

 
To turn on the machine plugged in the 
slicer and close the lid (3) or the hop-
per  lid 

(23)

,  the  cover 

(6)

  is  attached 

and the main switch 

(20)

 on the back 

of the machine is turned ON. Press the 
green push button 

(10)

 of the vegeta-

ble slicer. This glows green to indicate 
that the vegetable slicer is ready. If you 
pivot  the  pushing  handle 

(5)

  on  the 

hopper or it is already in this position, 
the  vegetable  slicer  sets  into  motion. 
The same applies when you work with the 

3-Tube feeder

 (17)

 or when working 

with the hopper lid 

(23)

 and the safety grid 

(21)


20 

Содержание KG-453

Страница 1: ...Vegetable Slicer Type KG 453 Translation of the Original Instruction Manual English ...

Страница 2: ...Instruction Manual KG 453 2 Instruction Manual KG 453 Version 2 2 Date of release 10 08 2018 ...

Страница 3: ...l Information 4 2 Safety 8 3 Technical Characteristics 10 4 Installation and Function 11 5 Transportation and Packaging 17 6 Installation and Initial Operation 18 7 Use and Operating 20 8 Malfunctions 31 9 Maintenance 33 10 Appendix 36 11 Index 38 ...

Страница 4: ...xplanation of the symbols used in the documents Limitation of liability If you do not follow the instruction manual the manufacturer is not liable Manufacturer Kronen Küchengeräte GmbH Gewerbestr 3 D 77731 Willstätt Phone 49 0 78 54 96 60 0 Fax 49 0 78 54 96 60 50 info kronen germany de Caution risk of injury Follow the instruction to avoid in juries Attention you have to follow the instructions t...

Страница 5: ... electrical factors any modifications of the merchandise performed without our consent 5 The Buyer shall allow the Seller the necessary time and opportunity to perform any subsequent improvement or substitute delivery which we regard in our rea sonable judgment to be necessary 6 In the event of legitimate complaints the Seller shall bear the immediate costs of the subsequent improvement or substit...

Страница 6: ...ar and tear Incorrect installation of the appliance Willful damage or incorrect operation Damage caused by calcium deposits Damage caused by inspection or repair by persons who are not authorised by Kronen Küchengeräte GmbH 4 Kronen Küchengeräte GmbH restricts the terms and conditions of warranty for appliances which are intended for sale abroad In such cases Kronen Küch gengeräte GmbH grants a wa...

Страница 7: ...ator are excluded from the above warranty cover Copyright Protection It is forbidden to copy all the documents delivered with the vegetable slicer partly or completely without the permission of the manufacturer Disposal of the Machine The slicer respectively all the parts have to be disposed recycled according to the local rules and laws It is forbidden to dispose the slicer with the household gar...

Страница 8: ...ld result in serious danger for the user While you are using the machine stay concentrated and never get dis tracted Just slice goods which are listed in the instruction manual Always keep your working environment clean and dry to make sure you don t slip and fall Don t put objects on the slicer which don t belong there and don t use the machine as a storage place Before you clean the slicer make ...

Страница 9: ...could occur if one uses no or a wrong slicing disk A overfilling of the slicer could also result in a misuse of the machine It can also lead to a failure to operate the machine when the ejector is not installed This can lead to a blockage of the vegetable cutter The vegetable slicer is intended for industrial use and only should be used by trained workers of the company Personal protective equipme...

Страница 10: ...ed place horizontal and flat Not slippery Performance data and limits Net power 1500 W Speed 250 350 450 r p m Recommended mains fuse 16 A Non ionizing radiation Non ionizing radiation is not produced specific but only technically limited by the electrical equipment e g electric motors power lines or magnetic coils deliv ered In addition the machine has no strong permanent magnets In compliance wi...

Страница 11: ...gear Included in delivery Delivery includes the fully assembled vegetable slicer consisting of base body lid ejector and the handle for pushing the vegetable or fruit into the slicing de partment Also in the box are all the documents including the instruction manual circuit plan and the optional slicing disks Type Plate The label is at the back of the vegetable slicer It includes following informa...

Страница 12: ...licing chamber and is removable for cleaning Collecting container 7 the sliced products fall into the collecting con tainer To make the cleaning easy the collecting container is removable You can also use the collecting container for optional cube gates Ejector 8 the ejector is responsible for the transport of the processed food to the ejection chute Slicing disks 9 the slicing disks are responsib...

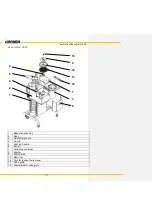
Страница 13: ...Base with slice tray 2 Body 3 Lid with big chute 4 Lid clip 5 Pushing handle 6 Cover 7 Collecting container 8 Ejector 9 Slicing disk 15 Remover 16 Tool for loosen the remover 17 Cube grate 18 Slicing disk for cube grate 8 5 4 2 1 15 9 18 17 16 7 3 6 ...

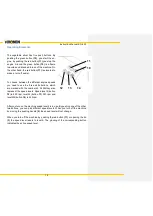
Страница 14: ...hree white buttons which are marked with the numbers I II III they also represent the speed levels Speed level I button 12 is 250 rpm level II button 13 350 rpm and level III button 14 is 450 rpm After you turn on the machine speed level I is in use By pushing one of the other two buttons you can pick different speed levels When you turn off the machine by moving the pushing handle 5 the speed lev...

Страница 15: ...table slicer automatically Switch in the housing which is operated by the pivoting of the pushing handle 5 or safety guard 21 The pushing handle 5 automatically stops the engine when it is pivoted away from the fill opening to the left When swinging back of the pushing handle 5 the motor will start auto matically Engine overheating protection that turns off engine immediately if there is any possi...

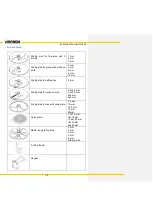
Страница 16: ... 4 mm 5 mm 8 mm 6 mm 10 mm Slicing disk for raffle slice 4 mm Slicing disk for Julienne slice 2 2x2 2 mm 2 5x2 5 mm 4x4 mm 6x6 mm Slicing disk for use with cube grate 7 5 mm 10 mm 12 5 mm 15 mm 20mm Cube grate 7 5x7 5 mm 10x10 mm 12 5x12 5 mm 15x15 mm 20x20 mm Raffle and grating disk 2 mm 3 mm 4 mm 6 mm 8 mm Grating disk 3 Tube feeder Hopper ...

Страница 17: ...box by slicing the tape with a tape slicer Do not use sharp knives Lift the vegetable slicer out of the box and put it on the table Make sure that shipment consists out of the things you ordered In case the ship ment is not complete talk to the responsible salesman There are no transportation devices installed on the vegetable slicer Dispose or recycle the machine according to the local laws Store...

Страница 18: ...intended outlet The mains plug have to be viewed and easily accessible at any time by the operator Before you do that make sure that the required specifications on the label are fulfilled In case they don t match don t plug in the machine or turn it on In this case call the responsible customer service The outlet has to comply with the CEE 7 7 standards The electrical equipment must be by a faulty...

Страница 19: ...not installed Check if the engine turns off when you move the pushing handle to the left side and if the engine turns back on when you move the pushing handle back to the right Check if you can turn on the machine when the lid is open Make sure the vegetable slicer cannot be turned on when the cover is removed In case the machine is not working properly it needs to get fixed by your cus tomer serv...

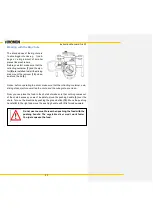
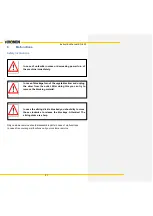
Страница 20: ...rding to EN ISO 7010 The sign forbids access to the ejector during operation It is strictly prohibited to put your fingers in the ejector while the machine is running The risk of injury is too high The slicing disks have sharp knives Be careful when touching the slicing disks to avoid injuries The use of the ejector is absolutely necessary When not in use it can lead to jamming of the machine When...

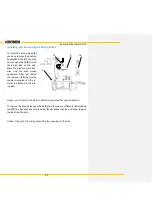
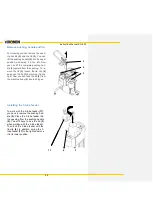
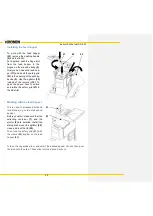
Страница 21: ... installed on the vege table slicer to function properly Turning on To turn on the machine plugged in the slicer and close the lid 3 or the hop per lid 23 the cover 6 is attached and the main switch 20 on the back of the machine is turned ON Press the green push button 10 of the vegeta ble slicer This glows green to indicate that the vegetable slicer is ready If you pivot the pushing handle 5 on t...

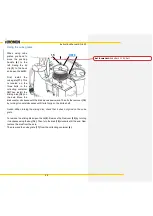
Страница 22: ...he cover 6 of the vegetable slicer is also turned off Speed Levels Level I Choose level I button 12 if you process soft and sensitive material For example tomato salad and mushrooms Also use this level if you need cubes Level II Choose level II button 13 if you want to grate or grind your material For example carrots or cheese Level III Choose level III button 14 if you process hard food For examp...

Страница 23: ...isk moves downward After that install the remover 15 by moving counter clockwise until the re mover is attached to the slic ing disk Advice you should not be able to lift the slicing disk after your installation To remove the slicing disk open the lid 3 turn the remover 15 with the intended tool 16 in clockwise and turn the disk 9 clockwise until the end Now remove the disk from the axle Advice On...

Страница 24: ... disk counter clockwise until the disk moves downward Then fix the remover 15 by turning it counterclockwise until it sits firmly on the knife shaft Advice When turning the slicing disc check that it does not grind on the cube grate To remove the slicing disk open the lid 2 Remove the Remover 15 by turning it clockwise using the key 16 Then turn the disk 18 clockwise till the end Now remove the di...

Страница 25: ...he slicer make sure that the collecting container axle slicing disks ejector as well as the chute and the cube grate are clean Now you can place the food in the chute but make sure that nothing comes out of the chute because you won t be able to move the pushing handle 5 over the chute Turn on the machine by pushing the green button 10 Move the pushing handle 5 to the right and move the pushing ha...

Страница 26: ...e lid clip 4 and open the lid 3 by turning it to the right Now you can take the lid 3 from the machine body 2 located hinges Installing the 3 tube feeder To work with the 3 tube feeder 17 you have to remove the pushing han dle 5 Place the 3 tube feeder into the opening from the pushing handle 5 You still have to use the lid 3 when working with the 3 tube feeder Then lock the 3 tube feeder with the...

Страница 27: ... can choose from three different opening sizes The smallest opening is for thin cuttings e g carrots leeks and the two larger openings are for thicker cuttings e g cucumber zucchini Remove the pusher 18 out of the se lected slicing compartment and fill the small compartment with material Start the engine by pushing the green button 10 and use the pusher 18 to push the food with moderate force Advi...

Страница 28: ... open the lid you have to unlock and rotate the safety grid 21 to the side first Working with the feed hopper This is used to processed bulk and round foods e g nuts potatoes and apples Before you start make sure that the collecting container 7 and the ejector 8 are installed Install the slicing disk mount the agitator 22 close and lock the lid 20 Then lock the safety grid 21 with the clamp 22 loc...

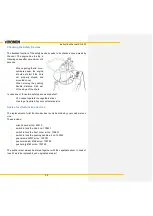
Страница 29: ...e the vegetable slicer the first time make sure you clean it thor oughly Also clean the machine multiple times during the day after use Always use standard cleansers for cleaning the slicer After use or before using different material remove the dirt with a sponge and clean the machine with warm water and disinfectants The vegetable slicer is only protected against splash wa ter Do not use high pr...

Страница 30: ...arts Body 2 Push ing handle 5 lid 3 or cucumbers paper 17 cover 6 container 7 remover 15 und ejector 8 Clean the pushing handle 5 lid 3 cover 6 and collecting container 7 in the dish washer The body 2 and ejector 8 should be cleaned with warm water and disinfectants Reassemble the slicer after cleaning After cleaning disinfect the slicing disks and rinse them with water Advice For cleaning the cub...

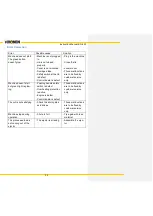
Страница 31: ...customer service In case of unfamiliar noises or decreasing power turn of the machine immediately In case of blockage turn of the vegetable slicer and unplug the slicer from the outlet After doing this you can try to remove the blocking material In case the slicing disk is blocked you should try to move those clockwise to release the blockage Attention The slicing disks are sharp ...

Страница 32: ... be fixed by customer service only Machine doesn t start but green light is glow ing Pushing handle safety switch is defect Overheating protection is active Engine is defect Control board is defect Those malfunctions are to be fixed by customer service only The cut is not satisfying Check the slicing disk and knives Those malfunctions are to be fixed by customer service only Machine stops during o...

Страница 33: ...e yearly inspection In premature failure of these bearings should be replaced by customer service The knives of the slicing disks have a natural abrasion In case they become dull you can sharpen the knives again If a sharpening is not possible anymore you need to change the disks You cannot sharpen the reaming and raffle disk You need to change the disks in case of significant abrasion Maintenance...

Страница 34: ...se two safety devices are defect You cannot operate the vegetable slicer Has to get repaired by your customer service Advice for vital function devices The replacement of vital function devices is only be made by your customer ser vice These include circuit board art no 45410 switch to lock the lid art no 100831 switch to lock the front cover art no 100831 switch to lock the pushing handle art no ...

Страница 35: ... customer service Kronen Küchengeräte GmbH Gewerbestr 3 D 77731 Willstätt Phone 49 0 78 54 96 60 0 Fax 49 0 78 54 96 60 50 info kronen germany de Local Sales Department and customer service Partner Street Zip Code Place Tel Fax Service yes no To be filled out by local representative ...

Страница 36: ...KG 453 Serial Number ________________________ conform with the guideline mentioned on top including the changes of the statement at this point of time Following engineer standards apply EN 1678 vegetable cutting machines safety and hygiene standards EN 60204 1 electrical equipment of machines part 1 General Operation 1935 2004 ordinance for materials and parts that get in con tact with food EN 550...

Страница 37: ...Instruction Manual KG 453 37 Circuit plan ...

Страница 38: ...umbers paper 24 25 Customer service 33 Declaration of Conformity 34 Defects and claims 5 Disposal 7 Hopper 26 Intended Place 10 Maintenance Schedule 31 Operating Elements 14 Packaging 17 Slicing disk 12 22 27 Speed Levels 21 Terms and Conditions of Warranty 6 Transportation 17 Turning on 20 Type plate 11 ...

Отзывы: