background image

BIC · Edition 09.22

EN-10

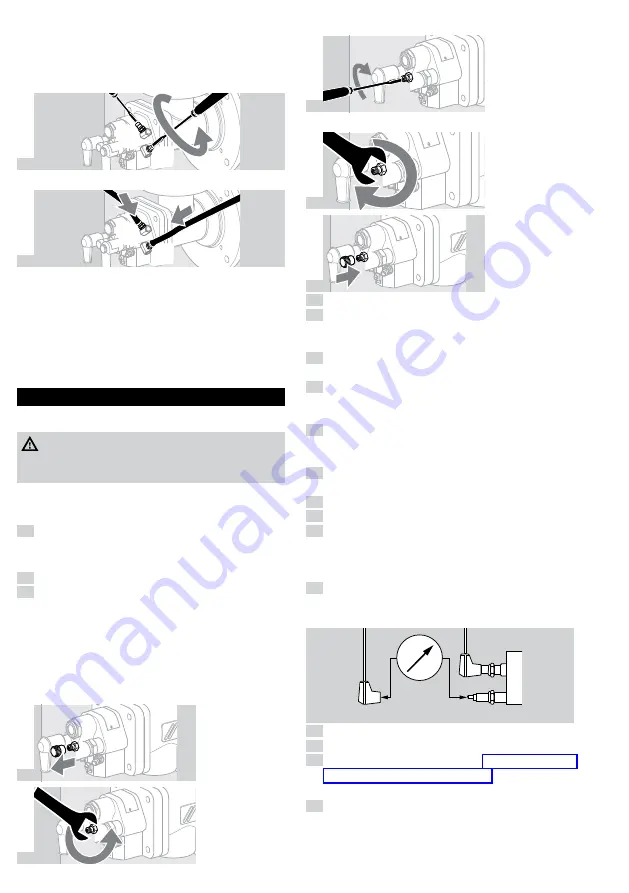
5.13 Integrated pilot on the BIC..L


Air pressure test nipple 

l

, outside dia. = 9 mm 

(0.35").


Gas pressure test nipple 

g

, outside dia. = 9 mm 

(0.35").

 1 

g

l


Loosen the screws 2 turns.

 2 

g

l


Pilot:  
p

gas

 = 30–50 mbar, 

p

air

 = 30–50 mbar.


Check flame stability and ionization current.


The gas and air pressure of the integrated pilot 

must be higher than the gas and air pressure of 
the main burner.

6 CoMMIssIonInG

6.1 Igniting and adjusting the burner

 WARnInG


– Ensure adequate ventilation of the furnace 

chamber before each burner start!


The burner body will become hot during operation 

with preheated combustion air. Provide protection 
against accidental contact as required.

 1 

All valves of the installation must be checked for 

tightness before ignition.

6.2 setting the low-fire rate

 1 

Set the valves to ignition position.

 2 

Limit the maximum gas volume.


Should an adjustable gas restrictor be installed 
upstream of the burner, open the restrictor by ap-
prox. a quarter.


on burners with integrated gas flow adjust-

ment ( BIC 65–140): 

 on delivery, the flow rate 

restrictor is 100% open. Close the flow rate rate 
restrictor with approx. 10 turns:

 3 


 4 


Loosen the lock nut only.

 5 

Q-


Set flow rate 

Q

.

 6 


 7 
 8 

Gaszufuhr öffnen.

 9 

Ignite the burner.


The safety time of the automatic burner control unit 

starts to elapse.

 10 

If no flame forms, check and adjust the gas and air 

pressures of the start gas adjustment.

 11 

In the case of operation with bypass (e.g. when 

using an air/gas ratio control): check the bypass 
nozzle and adjust if required.

 12 

In the case of operation without bypass (e.g. when 

using an air/gas ratio control without bypass): in-
crease the low-fire rate setting.

 13 

Check the basic setting or bypass of the air control 

valve.

 14 

Check the position of the restrictor in the air line.

 15 

Check the fan.

 16 

Reset the automatic burner control unit and re-ig-

nite the burner.


The burner ignites and proceeds to normal op-

eration.

 17 

Check flame stability and ionization current at low-
fire rate. Switch-off threshold – see automatic 

burner control unit operating instructions.

+


μ

Z

I

 18 

Monitor flame formation.

 19 

Adjust the low-fire rate settings if required.

 20 

If no flame is detected – see  page 14 (8 Assis-

tance in the event of malfunction).

6.3 setting the high-fire rate

 1 

Set the air and gas circuit of the burner to high fire 

while continuously monitoring the flame.


Avoid CO formation – always operate the burner 

with excess air when starting up!

Содержание BIC 100

Страница 1: ...ust be installed and commissioned in accordance with the regulations and standards in force These instructions can also be found at www docuthek com 1 2 Explanation of symbols 1 2 3 a b c Action Instruction 1 3 Liability We will not be held liable for damage resulting from non observance of the instructions and non com pliant use 1 4 Safety instructions Information that is relevant for safety is i...

Страница 2: ...operation B Natural gas D Coke oven gas town gas G Propane propane butane butane M Propane propane butane butane with mixer L Low calorific value gas F Biogas L integrated pilot R Reduced capacity X X mm length of steel tube as of furnace flange L1 X X mm distance from furnace flange to front edge of burner head L2 X Burner head identifier XE Heat resistant version A Z Construction stage H High te...

Страница 3: ...formation of dust when dis mantling the burner insert and do not damage the surface of the internal insulation 1 2 3 4 Place the burner insert in such a way that the in sulators are protected against damage No burner extension 1 2 3 4 Centre the ceramic tube 5 6 7 Tighten the screws in a crosswise fashion Mounting flange and furnace flange must be flush With burner extension 1 2 3 Centre the ceram...

Страница 4: ... 65 Rp 3 4 Rp 1 1 2 BIC 80 Rp 3 4 Rp 2 BIC 100 Rp 1 Rp 2 BIC 125 Rp 1 1 2 DN 65 BIC 140 Rp 1 1 2 DN 80 BICW 65 Rp 3 4 DN 65 BICW 80 Rp 3 4 DN 80 BICW 100 Rp 1 DN 80 BICW 125 Rp 1 1 2 DN 100 BICW 140 Rp 1 1 2 DN 125 Up to burner size 100 threaded connection as from burner size 125 flanged connection BICA 65 tube connection Threaded connection to DIN 2999 flange dimen sions to DIN 2633 PN 16 Install...

Страница 5: ...ld flange K to air pipe P for air connection LA and use NPT thread adapter H for gas connection GA BIC 125 and BIC 140 H K GA LA P BICW GA LA K P H 14 16 17 3 6 Pilot connections on the BIC L Air connection la Rp 3 8 Gas connection ga as from burner size 65 Rp 1 4 la ga Pilot capacity 1 5 kW 3 7 Installing the burner insert WARNING BICW do not damage the surface of the insulation Avoid the formati...

Страница 6: ...or burner ground to the burn er insert In the case of single electrode operation route the PE wire from the burner insert directly to the terminal on the automatic burner control unit WARNING High voltage risk It is essential that a high voltage warning label be attached to the ignition cable 7 For more detailed information on how to wire the ionization and ignition cables refer to the operating i...

Страница 7: ...erature rises Fine adjustment should be carried out at max furnace temperature and at as high a capacity demand as possible 5 3 Notes on the flow rate curve If the gas density in the operating state differs from that reflected in the flow rate curve convert the pressures according to the local operating state pB pM δB δM δM Gas density reflected in the flow rate curve in kg m3 lb ft3 δB Gas densit...

Страница 8: ... type label are equipped with gas flow adjustment to replace the restrictor in the gas pipe 5 7 Hot air compensation The combustion air pressure pair must be increased in hot air operating mode lambda constant 0 50 100 150 200 250 300 350 400 450 500 550 600 100 150 200 300 250 Air temperature C Air pressure p air The gas pressure is increased by 5 10 mbar The total burner capacity Pgas rises as t...

Страница 9: ...heck the air pressure pair 5 10 Preparing the gas pressure measurement for low fire and high fire 1 Connect all measuring devices for subsequent fine adjustment of the burner Leave the gas supply closed Gas measuring nipple G outside dia 9 mm 0 35 5 11 Burners without gas measuring orifice 1 Read the gas pressure pgas for the required flow rate Q from the enclosed flow rate curve for cold air mbar...

Страница 10: ...with approx 10 turns 3 4 Loosen the lock nut only 5 Q Set flow rate Q 6 7 8 Gaszufuhr öffnen 9 Ignite the burner The safety time of the automatic burner control unit starts to elapse 10 If no flame forms check and adjust the gas and air pressures of the start gas adjustment 11In the case of operation with bypass e g when using an air gas ratio control check the bypass nozzle and adjust if required...

Страница 11: ...r flow rates if possible De termine the lambda value and readjust the settings if required 6 5 Tightness test DANGER Escaping gas Danger from a leakage at the gas connections Check the gas connections on the burner for leaks immediately after commissioning the burner 1 2 3 4 Avoid condensation due to the furnace atmos phere entering the burner body While the burner is switched off at furnace tempe...

Страница 12: ...ried out by authorized trained personnel only DANGER Risk of burning Outflowing flue gases and burner components are hot We recommend that all the gaskets removed during maintenance work be replaced The appropriate gasket set is available separately as a spare part 1 Check the ionization and ignition cables 2 Measure the ionization current The ionization current must be at least 5 µA and must not ...

Страница 13: ...lectrode from ground pin or gas nozzle 2 0 5 mm 0 08 0 02 2 0 5 mm 0 08 0 02 inch 6 When the furnace chamber has cooled down check the burner tube and burner block through the furnace flange Replace the gas housing gasket 7 8 9 10 Tighten burner insert in a crosswise fashion BIC A 50 to 100 with max 15 Nm 11 lb ft BIC 125 to 140 with max 30 Nm 22 lb ft 11 Connect the system to the electrical power...

Страница 14: ...ner is adequately grounded Note the automatic burner control unit operat ing instructions No ignition spark is created Check the ignition cable Check the voltage supply and wiring Check whether the burner is adequately grounded Check the electrode see page 12 7 Maintenance Defective insulator on the electrode ignition spark jumps over incorrectly Check the electrode Burner performs a fault lock ou...

Страница 15: ...corro sion resistant stainless steel Ambient conditions 20 C to 180 C 68 F to 356 F outside the ther moprocessing system no condensation permitted painted surfaces may corrode Maximum furnace temperature 1450 C 2642 F Maximum air temperature BIC up to 450 C 842 F BICA up to 200 C 392 F BICW up to 600 C 1112 F 10 1 Ceramic tube Material SI 1500 Maximum furnace temperature up to 1450 C 2642 F Maximu...

Страница 16: ...lfilled RoHS II 2011 65 EU The partly completed machine may only be com missioned once it has been established that the machine into which the product mentioned above is to be incorporated complies with the provisions of the Machinery Directive 2006 42 EC Elster GmbH 14 CERTIFICATION 14 1 Eurasian Customs Union The products BIC meet the technical specifications of the Eurasian Customs Union 14 2 C...

Отзывы: