background image

14

7055

KRAUSMANN  POWER TOOLS

4

2

1

English | 

EN

Working LED light

Switching the tool ON and OFF

To switch the tool on, push the ON / OFF switch 

1

To turn the tool off, release the ON / OFF switch 

1.

      CAUTION:

D

o not change the speed during operation.

5. Maintenance

For safe and proper working, always keep the 

tool and ventilation slots clean.

Τhe tool may be cleaned most effectively with 

compressed dry air. 

Always wear safety goggles 

when cleaning tools with compressed air.

C

ertain cleaning agents and solvents dam

-

age  plastic parts.

 Some of these are: gasoline, 

carbon tetrachloride, chlorinated cleaning solvents, 

ammonia and household detergents that contain 

ammonia.

S

tore the tool, operating instructions and where 

necessary the accessories in the original packag-

ing. In this way you will always have all the informa-

tion and parts ready to hand.

R

otate the front section of the drill chuck 

to 

the right to open the jaws until the tool can 

be inserted.
Insert the drill bit or the tool as far as it will go 

into the drill chuck.

T

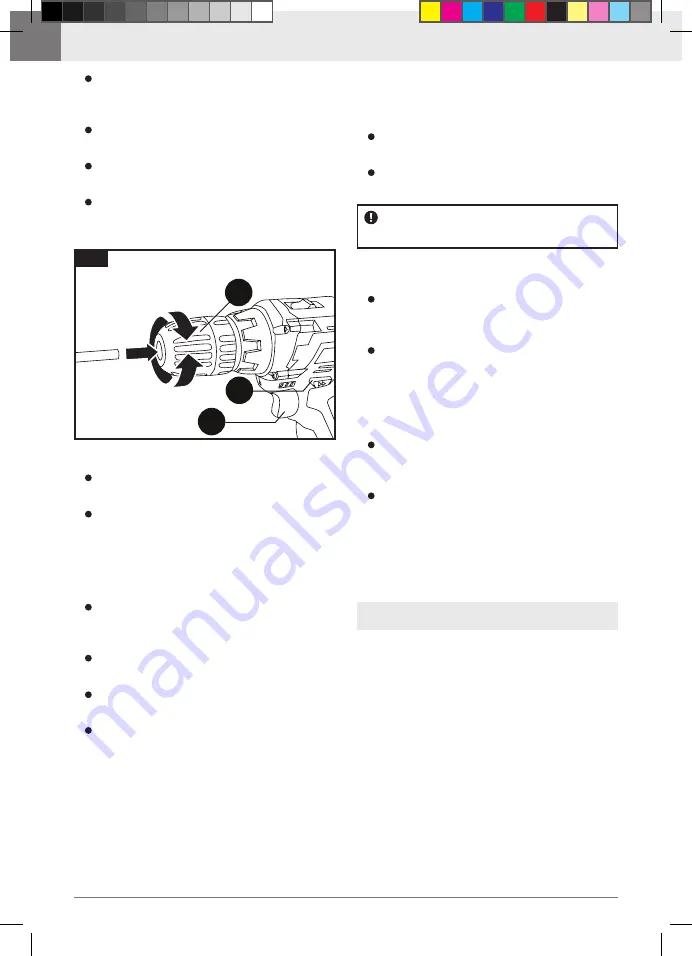
o close the drill chuck, rotate the front sec-

tion to the left to close the jaws (fig 1).
Ensure that the drill bit or tool is seated 

correctly and centrally as you close the drill 

chuck.

Pushing the ON / OFF switch 

will turn on 

the working LED light 

5

.

Leaving the operating button 

will switch off 

the working LED light 

5

.

fig 1

The rotation direction of the drill chuck 

can be 

changed using the rotation direction switch 

2.

This machine is fitted with a switch 

to select two 

rotation speed settings.

The battery powered drill is fitted with a torque 

setting.

See below to select the appropriate rotation 

speed.

When drilling into metal, wood ir plastic, the adjust-

able ring 

should be adjusted so that the drill symbol 

indicates the appropriate marking on the housing.

To change the direction of rotation, stop the 

machine and turn the left / right switch 

in 

the desired direction (fig 1).

T

he central position of the left / right switch 

2


locks the ON / OFF switch 

1

.

Do not change the direction of rotation of the 

machine when it is operating!

B

efore beginning to work, check that the 

rotation direction switch 

is in the desired 

position in order to avoid potential damage 

to the tool or to the battery powered drill.

The first setting sets the machine rotation 

speed between 0-550 min-1.

T

he second setting sets the machine rotation 

speed between 0-1400 min-1.

Rotate the ring 

to adjust the torque. The 

higher the adjustment number, the higher 

the torque.
For drilling, turn the ring 

to the drill symbol, 

which will provide the highest possible 

torque.

Low rotation speed (setting 1) is for drilling 

into non pre-worked materials, for screwing, 

mixing paints, or for drilling into ceramics.

T

he high rotation speed (setting 2) is for 

drilling into metal and plastic.

Left / right motion direction

Revolutions pre-selection

Torque settings

Drilling

Содержание 7055

Страница 1: ...ς Operation manual GR EN ΠΡΟΣΟΧΗ Μη χρησιμοποιείτε το μηχάνημα χωρίς να έχετε διαβάσει πρώτα τις οδηγίες χρήσης WARNING Do not use the machine without reading the instruction manual 7055 ΔΡΑΠΑΝΟΚΑΤΣΑΒΙΔΟ ΕΠΑΝΑΦΟΡΤΙΖΟΜΕΝΟ CORDLESS DRILL SCREWDRIVER ...

Страница 2: ...τερά Ροδέλα ρύθμισης ροπής Διακόπτης 2 ταχυτήτων Φορτιστής 6 τρυπάνια αέρος Περιγραφή Εργαλείου 1 2 3 8 9 10 1 Επισκόπηση Αυτόματο τσοκ 10mm 4 Κουμπί απελευθέρωσης μπαταρίας Φως LED εργασίας 7 5 6 μύτες ίσιες Pz Ph 11 Mπαταρία Μαγνητικός αντάπτορας 6 12 3 4 5 9 7 10 12 11 6 1 2 8 ...

Страница 3: ...μακευτικής αγωγής Μια στιγμή απροσεξίας μπορεί να προκαλέσει σοβαρό προσωπικό τραυματισμό Χρησιμοποιείστε εξοπλισμό ασφαλείας Πάντα να φοράτε προστασία για τα μάτια σας Η χρήση κατάλληλου εξοπλισμού ασφαλείας για τις εκάστοτε συνθήκες εργασίας όπως μάσκα σκόνης αντιολισθητικά παπούτσια ασφαλείας κράνος προστασίας ή ωτοασπίδες θα μειώσει τον κίνδυνο προσωπικού τραυματισμού Αποφύγετε ακούσια εκκίνησ...

Страница 4: ... χρήσης Τα ηλεκτρικά εργαλεία είναι επικίνδυνα στα χέρια μη εκπαιδευμένων ατόμων Συντηρείστε τα ηλεκτρικά εργαλεία ελέγξτε την ευθυγράμμιση ή εμπλοκή των κινούμενων τμημάτων τυχόν ρωγμές τμημάτων σύνδεση και κάθε άλλη συνθήκη που μπορεί να το καταστήσει επικίνδυνο και να επηρεάσει τη λειτουργία του Αν έχει υποστεί ζημιά πρέπει να επισκευαστεί Χρήση και φροντίδα του ηλεκτρικού εργαλείου καλύτερο έλ...

Страница 5: ...ήποτε στην περιοχή λειτουργίας Κάποιο εξάρτημα ίσως αποκολληθεί με αποτέλεσμα να προκαλέσει σοβαρό τραυματισμό Μην αγγίζετε τα εξαρτήματα κοντά στα 6 7 Πρόσθετες οδηγίες ασφαλείας ειδικά για επαναφορτιζόμενα δραπανοκατσάβιδα Πριν από την εργασία σε ένα εξάρτημα βεβαιωθείτε ότι το εξάρτημα είναι συγκρατημένο με τη βοήθεια μιας μέγγενης ή ενός σφιγκτήρα στερέωσης Μην χρησιμοποιείτε υπερβολική πίεση ...

Страница 6: ...αταρία πιέστε το κλιπ προσαρμογής 7 στην επάνω πλευρά της συστοιχίας μπαταριών 6 και αποσυνδέστε τη μπαταρία Συνδέστε το βύσμα του φορτιστή στην υποδοχή φόρτισης της μπαταρίας Η κόκκινη λυχνία LED ανάβει μόλις συνδεθεί η μπαταρία στο φορτιστή και η διαδικασία φόρτισης θα συνεχιστεί Η μπαταρία είναι πλήρως φορτισμένη και έτοιμη για χρήση μόλις ανάψει η πράσινη λυχνία LED και η κόκκινη λυχνία LED εί...

Страница 7: ... ταχύτητα περιστροφής του μηχανήματος μεταξύ 0 550 min 1 Η δεύτερη ρύθμιση ρυθμίζει την ταχύτητα περιστροφής του μηχανήματος μεταξύ 0 1400 min 1 Περιστρέψτε τον δακτύλιο 3 για να ρυθμίσετε τη ροπή Όσο υψηλότερος είναι ο αριθμός ρύθμισης τόσο μεγαλύτερη είναι η ροπή Για τη διάτρηση γυρίστε το δακτύλιο 3 στο σύμβολο του τρυπανιού το οποίο θα παρέχει την υψηλότερη δυνατή ροπή Η χαμηλή ταχύτητα περιστ...

Страница 8: ...δοτημένο τμήμα σέρβις το εργαλείο θα αντικατασταθεί χωρίς πρόσθετο κόστος Η εγγύηση ισχύει μόνο όταν Σε περίπτωση ανάγκης για επισκευή μετά τη λήξη της περιόδου εγγύησης θα δώσουμε την καλύτερη δυνατή προσοχή για την επιτυχή επιδιόρθωση του εργαλείου 7 Επισκευή Σέρβις 9 Δήλωση Συμμόρφωσης Δια της παρούσης δηλώνεται ότι To Επαναφορτιζόμενο Δραπανοκατσάβιδο με ΚΩΔΙΚΟ 7055 και διακριτικό τίτλο KW CD1...

Страница 9: ...9 KRAUSMANN POWER TOOLS 7055 Ελληνικά GR Έτος απόκτησης CE πιστοποίησης εργαλείο 2017 φορτιστής 2016 Ημερομηνία 31 Ιουλίου 2017 Σημειώσεις Notes ...

Страница 10: ...otation switch Adjustable ring for torque 2 speed operating switch Charger 6 drills Tool description 1 2 3 8 9 10 1 Overview Keyless drill chuck 10mm 4 Battery attachment clip Working LED light 7 5 6 tips straight Pz Ph 11 Battery Magnetic adapter 6 12 3 4 5 9 7 10 12 11 6 1 2 8 ...

Страница 11: ...k When operating a power tool outdoors use an extension cord suitable for outdoor use Use of a cord for outdoor use reduces the risk of electric shock Stay alert watch what you are doing and use common sense when operating a power tool Do not use a power tool while you are tired or under the influence of drugs alcohol or medication A moment of distraction while operating power tools may result in ...

Страница 12: ...ld Do not point the tool at any one in the area when operating Parts could fly out and injure somenone seriously Do not touch parts close to the bit immedi ately after operation they may be extremely hot and could burn your skin Some material contains chemicals which may be toxic Take caution to prevent dust inhalation and skin contact Follow material supplier safety data DO NOT let comfort or fam...

Страница 13: ... the battery charger housing have this examinded by a specialised repair shop and if necessary replaced Always wear protective eyewear and ear pro tectors when working A dust mask should be worn during any dust producing work Before first use the battery 6 must be loaded Only use the provided adaptor 9 to charge the battery Only charge the battery when the ambient temperature is within 10 40 C Plu...

Страница 14: ...off the working LED light 5 fig 1 The rotation direction of the drill chuck 4 can be changed using the rotation direction switch 2 This machine is fitted with a switch 8 to select two rotation speed settings The battery powered drill is fitted with a torque setting See below to select the appropriate rotation speed Whendrillingintometal woodirplastic theadjust ablering3shouldbeadjustedsothatthedri...

Страница 15: ...ervice department the tool will be replaced without any extra cost The warranty is valid only when Do not dispose of electrical machines as unsorted municipal waste use separate collection facilities Contact your local government collection systems for informa tion regarding the collection systems available If electrical machines are disposed of in landfills or dumps hazardous substances can leak ...

Страница 16: ...16 7055 KRAUSMANN POWER TOOLS 7055 www krausmann gr ...

Отзывы: