background image

Kratki.pl Marek Bal 

ul. Gombrowicza 4, Wsola, 26-660 Jedlińsk, Poland

tel. 00 48 48 389 99 00, 00 48 48 384 44 88, fax 00 48 48 384 44 88 wew. 106

www.kratki.com

AP/02/2020

Содержание HOME EASY BOX

Страница 1: ... Kratki pl Marek Bal ul W Gombrowicza 4 26 660 Wsola Jedlińsk kratki HOME EASY BOX Instrukcja instalacji i obsługi HOME EASY BOX Installations und Bedienungsanleitung DE HOME EASY BOX Installation and operating instructions EN ...

Страница 2: ...urządzeniem WŁAŚCICIEL KONSUMENT Zachowaj niniejszą instrukcję do przyszłego użytku For the INSTALLER Leave the manual with the device CONSUMER Keep this manual for future reference Für den INSTALLATEUR Lassen Sie das Handbuch bei dem Gerät VERBRAUCHER Bewahren Sie dieses Handbuch zum späteren Nachschlagen auf ...

Страница 3: ...ało zaprojektowane z myślą o Państwa bezpieczeństwie i komforcie Wyrażamy pewność że będą Państwo zadowoleni ze swojego wyboru ze względu na zaangażowanie jakie włożyliśmy w pra cę nad projektem i produkcją tego urządzenia Przed instalacją i użytkowaniem prosimy o do kładne zapoznanie się z niniejszą instrukcją Jeśli mają Państwo jakieś pytania lub zastrzeżenia prosimy o kontakt z naszym działem t...

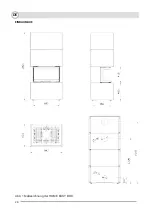
Страница 4: ...4 PL WYMIARY ZABUDOWY Rys 1 Rys 1 Zwymiarowany rysunek zabudowy HOME EASY BOX ...

Страница 5: ...zkowi okresowego prze glądu kominiarskiego Ewentualnego przeglądu lub serwisu urządzenia może dokonywać jedynie wykwalifikowany kominiarz serwisant posiadający odpowiednie uprawnienia Nieprzestrzeganie tych zasad może skutkować poważnym ubytkiem na zdrowiu a nawet śmiercią oraz uszkodzeniem mienia Instalacja i użytkowanie musi przebiegać według obowiązującego w danym kraju prawa budowla nego Twój ...

Страница 6: ...inny unikać kontaktu z urządzeniem aby zapobiec oparzeniom i zapłonowi odziez y UWAGI ODNOŚNIE PRZEMIESZCZANIA URZĄDZENIA To urządzenie zostało zaprojektowane z myślą o łatwej instalacji i montażu z możliwością umiej scowienia go praktycznie w dowolnym miejsce tj wszędzie tam gdzie można wyprowadzić komin zgodny z wymogami instalacyjnymi instrukcji kominka oraz z wymogami prawa budowlanego OSTRZEŻ...

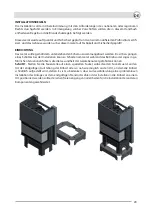
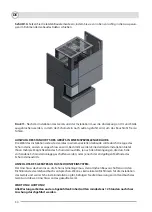
Страница 7: ...ależy zmontować zgodnie ze schematem poniżej Pominięcie jakiegokolwiek kroku pod czas instalacji może skutkować uszkodzeniem urządzenia w trakcie pracy a nawet wystąpieniem nie bezpiecznych sytuacji zagrażających zdrowiu użytkowników urządzenia Krok 1 Należy ustawić kominek na dedykowanej podstawie uprzednio umieszczając podstawę w miejscu ostatecznego montażu urządzenia lub możliwie blisko miejsc...

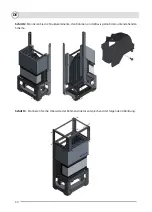
Страница 8: ...8 PL Krok 3 Zamontuj zgodnie ze schematem poniżej górną część konstrukcji szkieletu zabudowy Krok 2 Zamontuj elementy konstrukcyjne szkieletu zabudowy montowane do podstawy zgodnie ze schematem poniżej ...

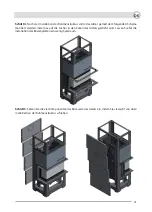
Страница 9: ...cę zgodnie ze schematem poniżej skręcając ją na otworach znajdujących się w narożnikach maskownicy Pozostaw lekki luz na potrzeby montażu dolnych paneli zabudowy Krok 5 Zamontuj cztery elementy pleców urządzenia wsuwając je lekko od góry we wcięcia w kon strukcji szkieletu zabudowy ...

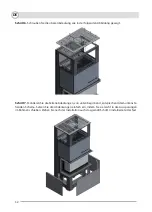
Страница 10: ... poniżej Krok 7 Zamontuj osłony boczne zaczynając od dołu zgodnie ze schematem poniżej Przesłony wy starczy założyc wsuwając je lekko we wcięcia w szkielecie konstrukcji zabudowy Po ich montażu skręć mocno również maskownicę zamontowaną zgodnie z krokiem 4 ...

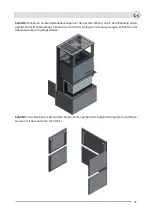
Страница 11: ...ym poziomie zgodnie ze schematem poniżej Przesłony wystarczu założyc wsuwając je lekko we wcięcia w szkielecie konstrukcji zabudowy Krok 9 Skręć ze sobą pozostałe elementy zabudowy zgodnie ze schematem poniżej następnie przejdź do kolejnego kroku ...

Страница 12: ...dzenia komina w zależności od tego jakie warunki stwarza istniejące instalacja kominowa bądź w zależności od tego jaki sposób wyprowadzenia komina zostanie ostatecznie wybrany PODŁĄCZENIE URZĄDZENIA DO INSTALACJI KOMINOWEJ Podłączenie kominka do instalacji kominowej powinno odbywać się z poszanowaniem lokalnego prawa budowlanego oraz wytycznych zawartych w instrukcji urządzenia Jeśli brak jest lok...

Страница 13: ...rzadziej niż raz na rok Urządzenie należy poddawać okresowym przeglądom minimum raz w roku Czyszczenie powinno mieć miejsce regularnie lub w miarę pojawiania się nadmiaru popiołu Zabrania się wprowadzania jakichkolwiek zmian w konstrukcji urządzenia Urządzenia nie należy czyścić przy użyciu środków o działaniu żrącym W przypadku wymiany poszczególnych elementów należy używać tylko oryginalnych czę...

Страница 14: ...BOX This device was designed with your safety and comfort in mind We are confident that you will be satisfied with your cho ice because of the commitment we put into the design and production of this device Before installation and use please read this manual carefully If you have any questions or concerns please contact our technical department Any additional information is available on our websit...

Страница 15: ...15 INSTALLATION DIMENSIONS Fig 1 Dimensional drawing of the HOME EASY BOX EN ...

Страница 16: ... device is subject to periodic chimney sweep Any possible inspection or service of the appliance may only be performed by a qualified chimney sweep serviceman with appropriate qualifications Failure to observe these rules may result in a serious loss of health or even death and damage to the property Installation and use must be carried out in accordance with the applicable national building regul...

Страница 17: ...ct with the appliance to prevent burns and ignition of clothing NOTES ON THE MOVEMENT OF THE DEVICE This device has been designed for easy installation and assembly with the possibility to place it practically in any place i e anywhere where the chimney can be brought out in accordance with the installation requirements of the fireplace manual and the building law WARNING DO NOT TRY TO MOVE THE DE...

Страница 18: ...ld be assembled according to the diagram below Skipping any step during installation may result in damage to the device during operation or even in dangerous situations that may endan ger the health of the device users Step 1 Place the fireplace on a dedicated base first placing the base at the place of final installation of the unit or as close as possible to the place where the unit will finally...

Страница 19: ...19 Step 3 Mount the top of the frame structure according to the diagram below Step 2 Mount the structural elements the frame to the base according to the diagram below EN ...

Страница 20: ...n accordance with the diagram below by turning it on the holes in the corners of the grille Leave a slight slack for the installation of the bottom panels Step 5 Fit the four components of the back of the unit by sliding them slightly from above into the notches in the frame structure EN ...

Страница 21: ...ow Step 7 Mount the side covers starting from the bottom according to the diagram below Simply insert the covers by sliding them slightly into the notches in the frame After installation also tighten the grille installed according to step 4 EN ...

Страница 22: ...as shown in the diagram below The side covers can be inserted by inserting them slightly into the notches in the frame of the building structure Step 9 Screw together the other components according to the diagram below then proceed to the next step EN ...

Страница 23: ...nected Dedicated installation gives you several possi bilities of chimney exit depending on the conditions created by the existing chimney installation or depending on the final chimney exit method CONNECTION OF THE DEVICE TO THE CHIMNEY SYSTEM The connection of the fireplace to the chimney system must comply with local building regulations and the guidelines contained in the appliance manual If t...

Страница 24: ...idelines of the local building law but at least once a year The device should be periodically inspected at least once a year Cleaning should take place regularly or as excess ash emerges No changes may be made to the design of the unit The device should not be cleaned with corrosive agents When replacing individual components use only original parts available from the manufacturer EN ...

Страница 25: ...de im Hinblick auf Ihre Sicherheit und Ihren Komfort entwickelt Wir sind zuversichtlich dass Sie mit Ihrer Wahl aufgrund des Engagements das wir in das Design und die Produktion dieses Geräts investiert haben zufrieden sein werden Bitte lesen Sie dieses Handbuch vor der Installation und Benutzung sorgfältig durch Wenn Sie Fragen oder Bedenken haben wenden Sie sich bitte an unsere technische Abteil...

Страница 26: ...26 DE EINBAUMAßE Abb 1 Maßzeichnung der HOME EASY BOX ...

Страница 27: ...e Inspektion oder Wartung des Geräts darf nur von einem qualifizierten Schornsteinfeger Schornsteinfegermeister mit ent sprechender Qualifikation durchgeführt werden Die Nichtbeachtung dieser Regeln kann zu einem schweren Gesundheitsverlust oder sogar zum Tod und zur Beschädigung des Eigentums führen Die Installation und Nutzung muss in Übereinstimmung mit den geltenden nationalen Bauvor schriften...

Страница 28: ... der Kleidung zu vermeiden NOTIZEN ÜBER DIE BEWEGUNG DES GERÄTS Dieses Gerät wurde für eine einfache Installation und Montage konzipiert mit der Möglichkeit es praktisch an jedem Ort zu platzieren d h überall dort wo der Schornstein gemäß den Installation sanforderungen des Kaminhandbuchs und des Baurechts herausgebracht werden kann WARNUNG VERSUCHEN SIE NICHT DAS GERÄT WÄHREND DES BETRIEBS ZU BEW...

Страница 29: ... werden Das Überspringen eines Schrittes bei der Installation kann zu Schäden am Gerät während des Betriebs oder sogar in ge fährlichen Situationen führen die die Gesundheit der Gerätebenutzer gefährden können Schritt 1 Stellen Sie die Feuerstelle auf einen speziellen Sockel wobei Sie den Sockel zuerst an den Ort der endgültigen Aufstellung der Einheit oder so nah wie möglich an den Ort an dem die...

Страница 30: ...30 Schritt 3 Montieren Sie die Oberseite der Rahmenstruktur entsprechend der folgenden Abbildung Schritt 2 Montieren Sie die Strukturelemente den Rahmen an der Basis gemäß dem untenstehenden Schema DE ...

Страница 31: ...ema montiert werden indem es auf die Löcher in den Ecken des Gitters gedreht wird Lassen Sie für die Installation der Bodenplatten ein wenig Spielraum Schritt 5 Setzen Sie die vier Komponenten der Rückseite des Geräts ein indem Sie sie leicht von oben in die Kerben der Rahmenstruktur schieben DE ...

Страница 32: ...chritt 7 Montieren Sie die Seitenabdeckungen von unten beginnend entsprechend dem untenste henden Schema Setzen Sie die Abdeckungen einfach ein indem Sie sie leicht in die Aussparungen im Rahmen schieben Ziehen Sie nach der Installation auch das gemäß Schritt 4 installierte Gitter fest DE ...

Страница 33: ...der Abbildung unten gezeigt Die Seitenabdeckungen können durch leichtes Einfügen in die Aussparungen im Rahmen der Gebäudestruktur eingefügt werden Schritt 9 Verschrauben Sie die anderen Komponenten gemäß dem folgenden Diagramm und fahren Sie dann mit dem nächsten Schritt fort DE ...

Страница 34: ...en Eine dedizierte Installation bietet Ihnen mehrere Möglichkeiten des Schornsteinaustritts je nach den Bedingungen die durch die vorhandene Schornsteinanlage geschaffen werden oder je nach der endgültigen Methode des Schornsteinaustritts ANSCHLUSS DES GERÄTES AN DAS SCHORNSTEINSYSTEM Der Anschluss des Kamins an die Schornsteinanlage muss den örtlichen Bauvorschriften und den Richtlinien des Gerät...

Страница 35: ...nmal im Jahr erforderlich sind Das Gerät sollte regelmäßig mindestens einmal pro Jahr überprüft werden Die Reinigung sollte regelmäßig oder bei Auftreten von überschüssiger Asche erfolgen Es dürfen keine Änderungen an der Konstruktion der Einheit vorgenommen werden Das Gerät sollte nicht mit korrosiven Mitteln gereinigt werden Verwenden Sie beim Austausch einzelner Komponenten nur Originalteile di...

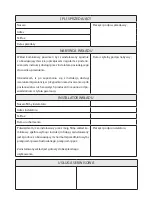
Страница 36: ...ji w przypadku niezastosowania się do postanowień w nich zawartych producent nie ponosi odpo wiedzialności z tytułu gwarancji Data i czytelny podpis nabywcy INSTALATOR WKŁADU Nazwa firmy instalatora Adres instalatora Tel fax Data uruchomienia Potwierdzam iż zainstalowany przez moją firmę wkład ko minkowy spełnia wymogi instrukcji obsługi zainstalowany jest zgodnie z obowiązującymi normami przedmio...

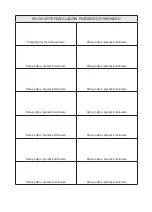
Страница 37: ... i pieczęć kominiarza Data podpis i pieczęć kominiarza Data podpis i pieczęć kominiarza Data podpis i pieczęć kominiarza Data podpis i pieczęć kominiarza Data podpis i pieczęć kominiarza Data podpis i pieczęć kominiarza Data podpis i pieczęć kominiarza Data podpis i pieczęć kominiarza Data podpis i pieczęć kominiarza Data podpis i pieczęć kominiarza ...

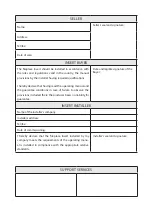
Страница 38: ...anual and the guarantee conditions in case of failure to observe the provisions included there the producer bears no liability for guarantee Date and legible signature of the Buyer INSERT INSTALLER Name of the installer s company Installer s address Tel fax Date of commissioning I hereby declare that the fireplace insert installed by my company meets the requirements of the operating manu al is in...

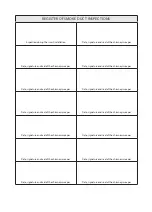
Страница 39: ...f the chimney sweeper Date signature and seal of the chimney sweeper Date signature and seal of the chimney sweeper Date signature and seal of the chimney sweeper Date signature and seal of the chimney sweeper Date signature and seal of the chimney sweeper Date signature and seal of the chimney sweeper Date signature and seal of the chimney sweeper Date signature and seal of the chimney sweeper Da...

Страница 40: ...Kratki pl Marek Bal ul Gombrowicza 4 Wsola 26 660 Jedlińsk Poland tel 00 48 48 389 99 00 00 48 48 384 44 88 fax 00 48 48 384 44 88 wew 106 www kratki com AP 02 2020 ...

Отзывы: