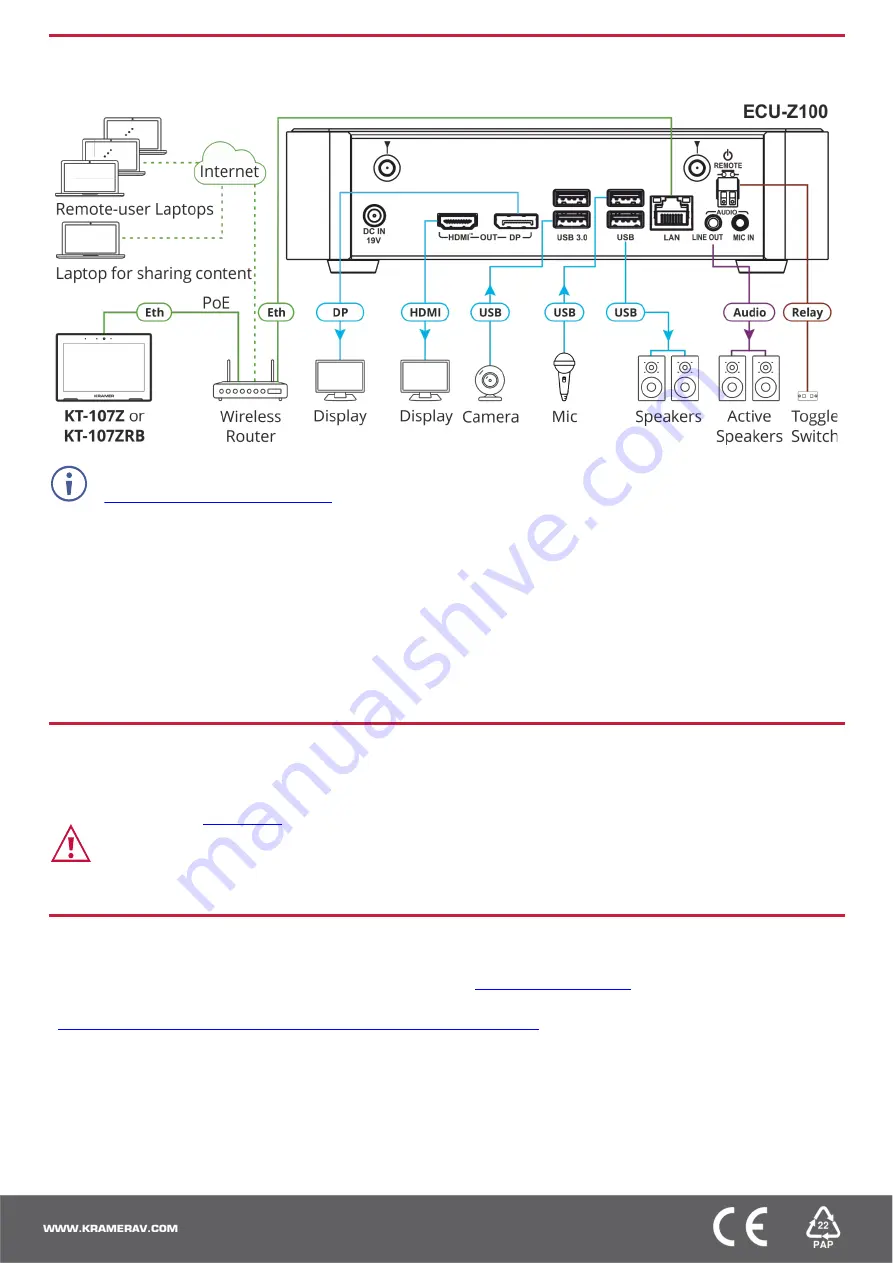
Step 5: Connect inputs and outputs
Always switch OFF the power on each device before connecting it to your
KIT-Z100
.
To achieve specified extension distances, use the recommended Kramer cables available at
www.kramerav.com/product/KIT-Z100
. Using third-party cables may cause damage!
Microphone and speakers can be connected to
ECU-Z100
in the following ways:
•
Speakers can be connected via LINE OUT connector and/or USB ports.
•
Microphones cab be connected via MIC IN connector (via amp) and/or USB ports.
•
Speakerphones (combining a speaker and a microphone) can be connected via USB ports.
KT-107Z/KT-107ZRB
can be powered in any of the following ways:
•
Using the power adapter when connected by LAN (without PoE support).
•
Using the power adapter when connected to LAN by Wi-Fi
•
By PoE when connecting to Ethernet by PoE-supporting LAN.
Step 6: Connect power
Connect the power cord to
ECU-Z100
and plug it into the mains electricity.
If required, connect the power adapter on the
KT-107Z/KT-107ZRB
to the Power 2-pin terminal block connector on the
tabletop mount and to the mains power.
Safety Instructions (See
for updated safety information)
Caution:
•
There are no operator serviceable parts inside the unit.
Warning:
•
Use only the power cord that is supplied with the unit.
•
Disconnect the power and unplug the unit from the wall before installing.
•
Do not open the unit. High voltages can cause electrical shock! Servicing by qualified personnel only.
•
To ensure continuous risk protection, replace fuses only according to the rating specified on the product label which located on the bottom of the unit.
Step 7: Set and operate KIT-Z100
Before setting up the application on
KT-107Z/KT-107ZRB
, you need to acquire Zoom Rooms licenses.
To set and operate the application, go to the Zoom Rooms website at
To use the Zoom Rooms widget on Kramer Control, go to Zoom Rooms settings at
www.manula.com/manuals/kramer/kramer-control/1/en/topic/zoom-room-module