


Thank you for purchasing the Korg mini kaoss pad 2s dynamic effect processor. To help you get the most out of your new instrument, please
read this manual carefully.
Controls and connectors
3
1
2
4
7
6
8
9
11
12
5
15
10
13
14
VALUE slider
smp button
fx button
Display
fnc button
HOLD indicator
hld button
bpm button
Play button
Touchpad
Internal mic
Volume
buttons
mic on/off button
Internal speaker
Power button
it with an object other than your finger, or while wearing gloves.
8. fnc (function) button
Use this button to adjust various settings. Repeatedly press the fnc
button to select the menu item that you want to adjust.
TIP
By holding down the fx button and pressing the fnc button, you
can step through the menu items in reverse order.
9. Power button
Please refer to the “Turning the power on/off” section
10. HOLD indicator
11. hld (hold) button
Please refer to the “Performing with the touchpad” section
12. Volume buttons
Use these buttons to adjust the volume of the headphones or the
internal speaker. You can adjust the MIC input volume by holding
down the mic on/off button and using these buttons. You can adjust
the LINE input volume by holding down the fx button and using
these buttons.
You can adjust the volume of the audio player by holding down the
smp button and using these buttons.
13. BPM (tempo) button
Use this button to set the tempo. The button will light up in synchro-
nization with the tempo. Please refer to the “Setting the BPM (tem-
po)” section.
14. Touchpad
Please refer to the “Performing with the touchpad” section.
15. Internal speaker
The sound of your performance is played through this speaker.
If you connect headphones to the PHONES jack, the internal
speaker will be disabled and will not play sound.
Setup screen
Program select screen
Audio player level Input level
Card status
Value
Value slider guide
Item
Battery indicator
Tempo
Page number
Program number
Program name
Value slider guide
Performing
Turning the power on/off
To turn the power on, hold down the power button until the
startup screen appears. To turn the power off, hold down the
power button until the shutdown screen appears.
Do not touch the buttons or the touchpad while turning
the power on.
Do not insert or remove a memory card while the mini
kaoss pad 2s is powered-on. Doing so may damage the data
in the mini kaoss pad 2s or on the card, or it may render the
memory card unusable.
Auto power-off function
The mini kaoss pad 2s has an auto power-off function. After
approximately four hours have elapsed since the last user
input, the auto power-off function will automatically turn off
the power.
TIP
The auto power-off function will not engage if there is
audio being input.
TIP
To disable this function, set the AUTO POWER OFF
setting to “Disable” in the utility menu. To enable the auto
power-off function, select the “Enable” setting. This setting is
enabled by default.
Selecting programs
Press the fx button to access the screen where you can
select programs. To switch programs, use your finger to slide
or tap the VALUE slider.
TIP
To switch programs by category, hold down the fx button
and use the VALUE slider.
Storing Favorites
Up to three frequently used programs can be stored as fa-
vorites for instant recall.
1. To store a favorite, make sure that the desired program is
selected, and then hold down the left, center, or right of
the VALUE slider for a short period of time. The program
will be stored as Favorite 1, 2, or 3 respectively.
2. To recall a favorite, hold down the fx button while select-
ing programs; the Favorite screen will appear. On the
Favorite screen, tap the left, center, or right of the VALUE
slider to recall Favorite 1, 2, or 3 respectively.
Performing with the touchpad
Perform by using your finger to rub or tap the touchpad.
Do not use a hard or sharp object such as a stylus.
The screen might not work correctly if you attempt to use it
with a different object or while wearing gloves.
Hold
When you press the hld button, the HOLD indicator will light up.
When you take your hand off the touchpad, the effect sound will
remain as it had been.
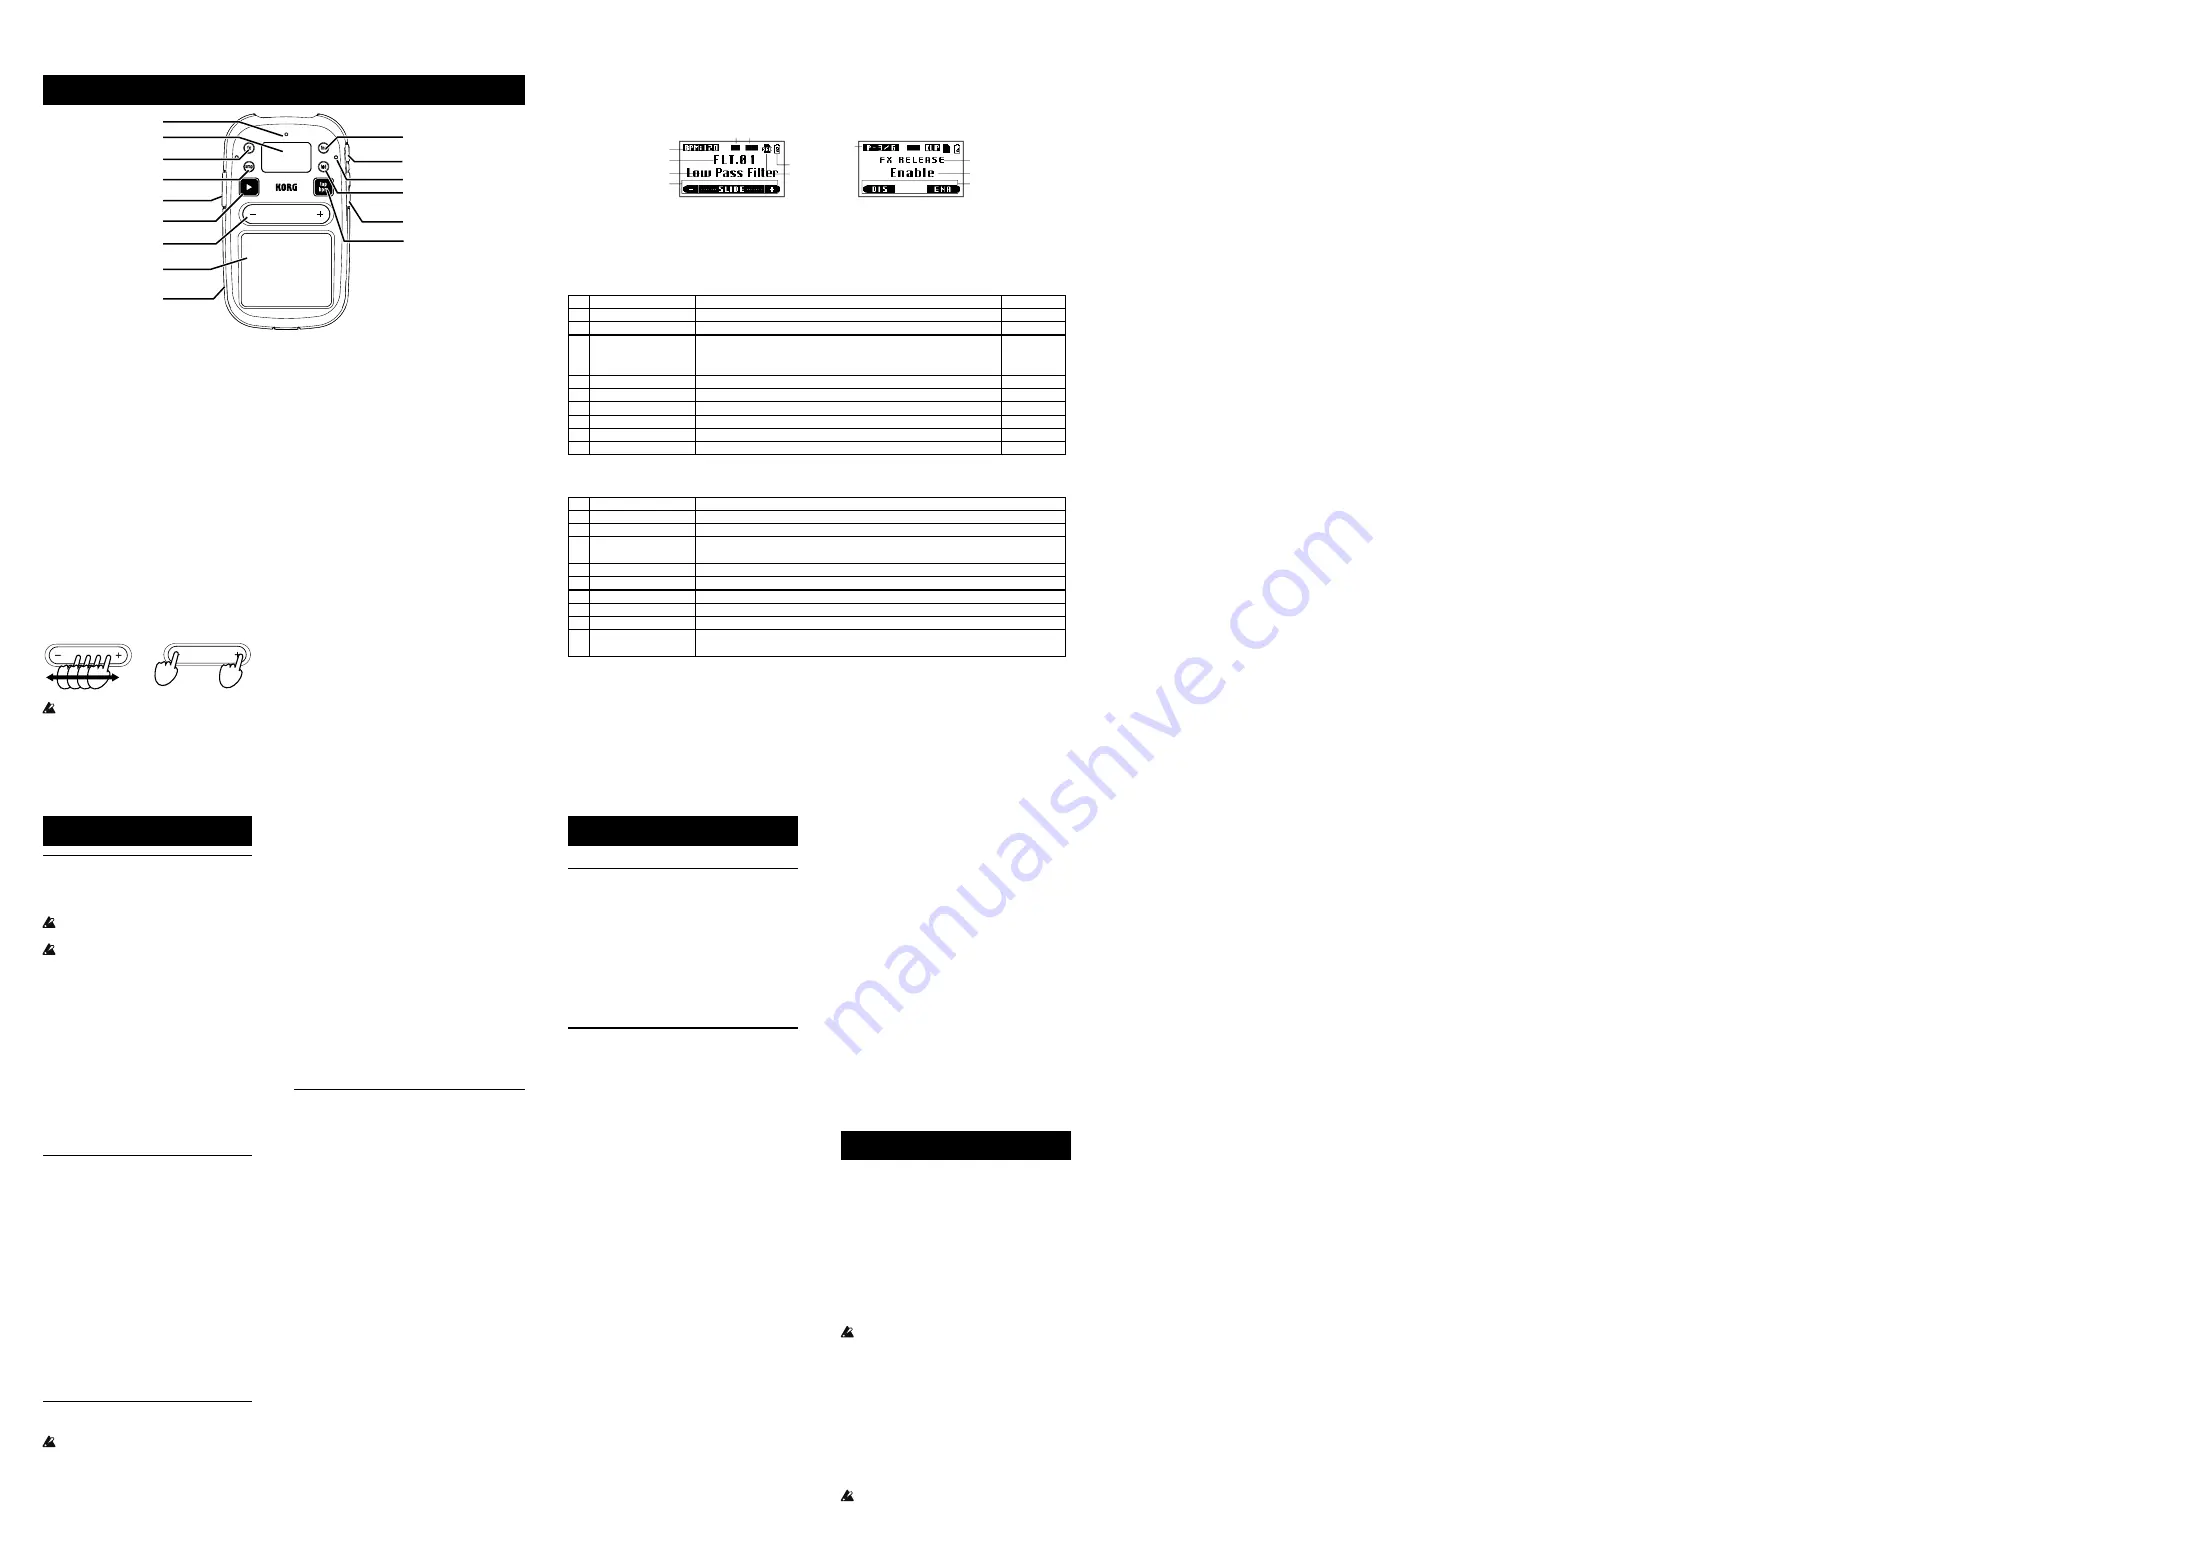
Turning FX RELEASE on/off
1. Press the fnc button to access the FX RELEASE screen.
2. Use the VALUE slider to turn this setting on or off. If this is on, a
delay effect synchronized with the BPM tempo will start the
moment you take your hand off the touch pad (i.e., the moment
the effect turns off), and the effect sound will decay gradually. If
this is turned off, the effect sound will disappear the instant you
take your finger off the touchpad.
TIP
For some programs, this is unavailable.
Adjusting the effect depth
1. Press the fnc button to access the FX DEPTH screen.
2. Use the VALUE slider to adjust the effect depth.
TIP
Depending on the program, and for some types of input sound,
the effect might be difficult to notice, or unexpected sounds might
be produced.
Setting the BPM (tempo)
Here’s how to specify the tempo that will be used by effects such
as delay.
1. Press the bpm button to access the BPM screen.
2. To change the value, stroke the VALUE slider or tap the two
ends of the VALUE slider.
Tap tempo
After pressing the bpm button to display the BPM, press the bpm
button several times at regular intervals to set the BPM to the
corresponding tempo.
Auto BPM
If you hold down the bpm button for a while, the beat of the song will be
detected automatically, and the BPM value will be automatically specified.
When the Auto BPM function is enabled, the bpm button is lit in green.
To disable Auto BPM, once again hold down the bpm button for a while.
The BPM will be set to the value that had been detected at that time.
TIP
Press the fnc button to access the AUTO BPM screen, where
you can select whether a beat is detected during Auto BPM either
from the song being played back by the audio player or from the
signal present from the LINE IN jack.
TIP
If the BPM cannot be detected, press the bpm button several
times in time with the beat; the BPM will be automatically detected
using that beat as a guide. Due to the nature of Auto BPM, the
detected value may sometimes be 1/2 or 1/3 the correct BPM, or
slight irregularities might occur; in such cases, you can use the
bpm button to correct these problems. The interval at which you
press the bpm button during Auto BPM detection will specify the
central value of the BPM range.
TIP
The BPM value cannot be detected if the music does not have
a clear sense of beat. The detectable BPM range is 80–160.
Audio player
Audio data that you copied to a memory card can be played back.
Preparing the audio data
Using your computer, copy the desired audio data files to the mem-
ory card.
Supported file formats
WAV files (16-bit, 44.1 kHz / 48 kHz, stereo)
MP3 files (44.1 kHz / 128, 192, 256, or 320 kbps, stereo, VBR
supported)
TIP
It may take some time, for example, while loading, when play-
ing back an MP3 file or a WAV file of 10 seconds or more.
For smooth one-shot playback or looped playback, use sample
data (WAV files of 10 seconds or less).
Playback
Playing back audio data
1. Press the smp button to access the AUDIO PLAYER screen.
2. Use the VALUE slider to select the file that you want to play. Tap
the center of the VALUE slider to confirm your choice.
TIP
If a file is selected, you can delete the selected file by long-
pressing the center of the VALUE slider.
3. After the file is loaded, the playback mode screen appears.
IThis is the screen where you can select the playback mode.
ONESHOT (one-shot playback): Starts playback when the play
button is pressed, and stops after playing back to the end of the
data.
GATE (gate playback): Plays back while the play button is
pressed. Stops playback when the button is released. Pressing
the play button again starts playback from the beginning.
LOOP (loop playback): Starts playback when the play button is
pressed, and repeats playback until it is stopped.
TIP
When playing back data other than sample data, a silent gap is
inserted at the beginning of playback and between repeated data.
TIP
Loop playback of sample data will stop after it has repeated for
approximately six hours.
4. Press the play button to play or pause the audio data that’s
currently selected .
TIP
If the play button is pressed during one-shot playback, play-
back is stopped and can be immediately restarted from the begin-
ning.
5. To adjust the volume of the audio player, hold down the smp
button and use the volume buttons.
6. During playback, press the fx button to return to the program
display screen.
Adjusting the volume balance
1. Press the fnc button to access the Mixer screen.
2. Use the VALUE slider to adjust the volume of the audio input
and the audio player playback.
TIP
The effect will be applied to the sound as it is adjusted here.
The effect depth can be modified by adjusting the FX DEPTH
parameter.
Adjusting the playback speed
Here’s how to adjust the playback speed of the audio player.
1. Press the smp button to access the playback speed adjustment
screen, and tap the VALUE slider.
2. Use the VALUE slider to move the fader shown in the middle of
the screen; the playback speed will change.
3. By pressing either end of the VALUE slider, you can increase or
decrease the playback speed while you continue pressing it.
4. During playback, press the fx button to return to the program
display screen.
Specifying the playback position
1. Press the smp button several times to access the playback
position setting screen.
2. You can specify the playback position by using the VALUE slider
to control the fader located in the center of the screen.
3. By tapping the left edge of the VALUE slider while playing or
paused, you can specify a Cue point.
4. By tapping the right edge of the VALUE slider, you can start
playback from the Cue point.
Master/Sample recorder
Your performance on the touchpad and the playback of the audio
player can be recorded to the memory card.
1. Press the fnc button to access the MASTER RECORDER or
SAMPLE RECORDER screen.
Select SAMPLE RECORDER to record as sample data (WAV
file of 10 seconds or less).
2. Tap the VALUE slider; recording will start. The counter will start
running. If SAMPLE RECORDER was selected, record-standby
mode will be entered. Tap the VALUE slider again to start re-
cording.
3. Press the fx button to return to the program display and play
back.
When recording while playing back an MP3 file, skipping or
operation delays may occur, and the recording may not be com-
pleted correctly.
4. When the screen shown in step 1 appears, tap the VALUE slider
to stop recording.
TIP
Recording will end automatically if the memory card has no more
room, or when the recording time reaches approximately two hours.
TIP
If SAMPLE RECORDER was selected in step 1, recording
stops after approximately 10 seconds.
TIP
Audio data recorded with MASTER RECORDER or SAMPLE
RECORDER is saved in the RECORD or SAMPLE folder inside
the MINIKP2S folder on the memory card.
Do not use your computer to edit the files in these folders.
1. Internal mic
Sounds picked up by the internal mic will be audible while
you hold down the mic on/off button.
2. Display
This shows information such as the program that’s currently
selected. The lower part of the screen functions as the slider
guide.
3. fx (effect) button
This button takes you to a screen where you can select an
effect.
4. smp button
Please refer to the “Audio player” section.
5. mic on/off button
Sounds picked up by the internal mic will be audible while
you hold down the mic on/off button.
6.
►
(Play) button
Please refer to the “Audio player” section.
7. VALUE slider
You can change programs or edit a value by sliding or tap-
ping your finger on this slider. Stroking the slider will change
the value smoothly. To change the value in steps of one,
press either end of the slider.
Do not use a hard or sharp object to operate the slider.
Also, the slider might not work properly if you attempt to use
Setup menu contents
Page Item
Content
Default value
P-1/9
MIXER
Adjusts the playback volume of the audio input and the audio player playback.
--
P-2/9
BPM
Specifies the tempo used by effects such as delay.
120
P-3/9
AUTO BPM
Specifies whether automatic detection of the beat will be from the song being played
back by the audio player (PLAYER), from the signal present from the LINE IN jack
(LINE IN), or turned off (OFF).
Off
P-4/9
FX DEPTH
Adjusts the effect depth.
100
P-5/9
FX RELEASE
Specifies how the effect will remain when you turn off the effect.
Enable
P-6/9
CONNECTION
Specifies whether the audio input and the effect sound will be mixed for output.
Direct
P-7/9
MASTER RECORDER
Records your mini kaoss pad 2s performance onto the memory card.
--
P-8/9
SAMPLE RECORDER
Records the audio input onto the memory card as sample data.
--
P-8/9
UTILITY
Tap the center of the VALUE slider to enter the UTILITY menu selections.
--
Utility menu contents
Press the fnc button repeatedly until UTILITY appears; then tap the VALUE slider to change utility menu settings.
Page Item
Content
U-1/9
DATE
Sets the date and time of the internal clock. This information is used to time-stamp files.
U-2/9
BATTERY
Specifies the type of battery you're using.
U-3/9
POWER SAVING
Lowers the power consumption of the mini kaoss pad 2s by limiting the speaker output, extending the
battery life.
U-4/9
AUTO POWER OFF
Specifies whether the mini kaoss pad 2s will automatically power-off (after four hours). *1
U-5/9
DISPLAY
Adjusts the brightness of the screen. *2
U-6/9
CARD TEST
Tests the inserted memory card to check whether it can be used with the mini kaoss pad 2s.
U-7/9
CARD FORMAT
Checks and formats the memory card.
U-8/9
PAD CALIBRATION
Calibrates the active region of the touchpad and VALUE slider.
U-9/9
SOFTWARE UPDATE
Updates the system software of the mini kaoss pad 2s. For details on updating the system, please refer to
the Korg website.
*1: Even if this is Enabled, the power will not turn off automatically if there is user input.
*2: Extended use at high settings will affect the display’s lifespan.
TIP
After you change this setting, the program display will reappear if there is no user input for a while. By pressing the fx button you can immedi-
ately return to the program display.


